Frozen ginger grates more easily. It lowers waste and stays fresh for months.
Don’t want to miss such incredible time-saving tips from My Ginger Garlic Kitchen, set us as a preferred source in Google Search by clicking the button below.

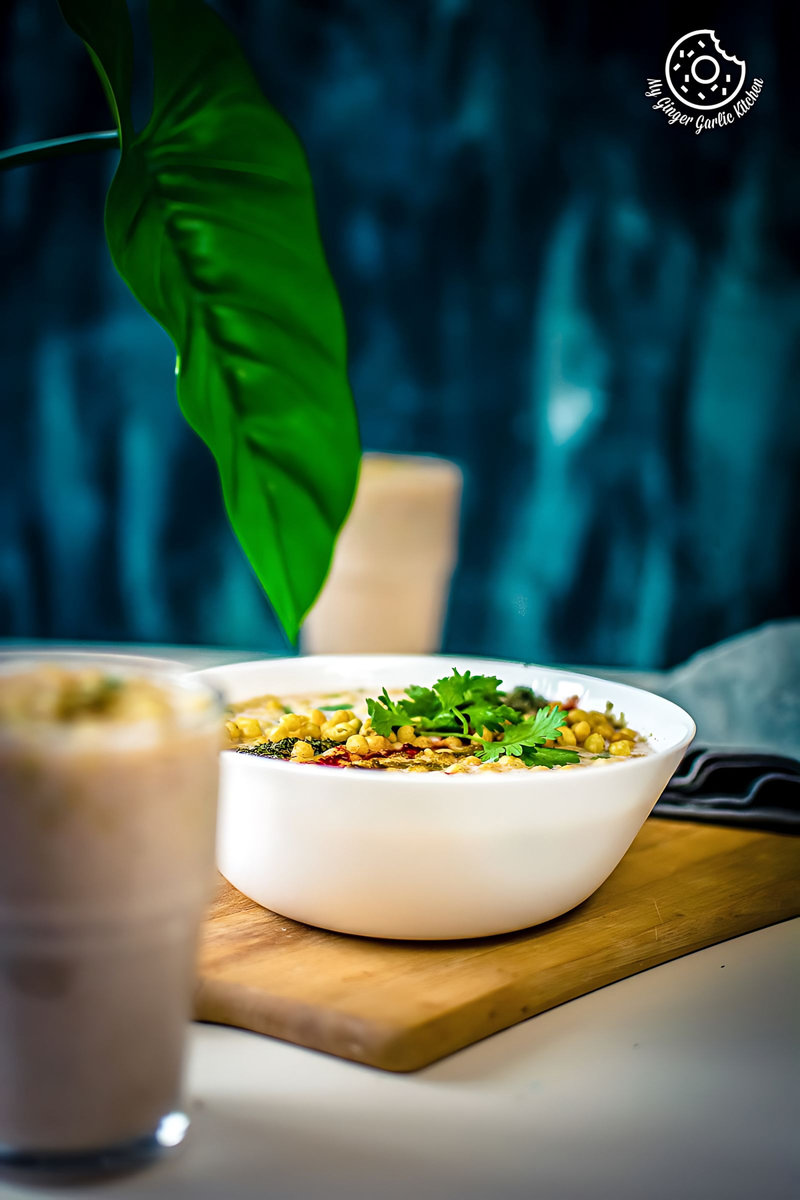
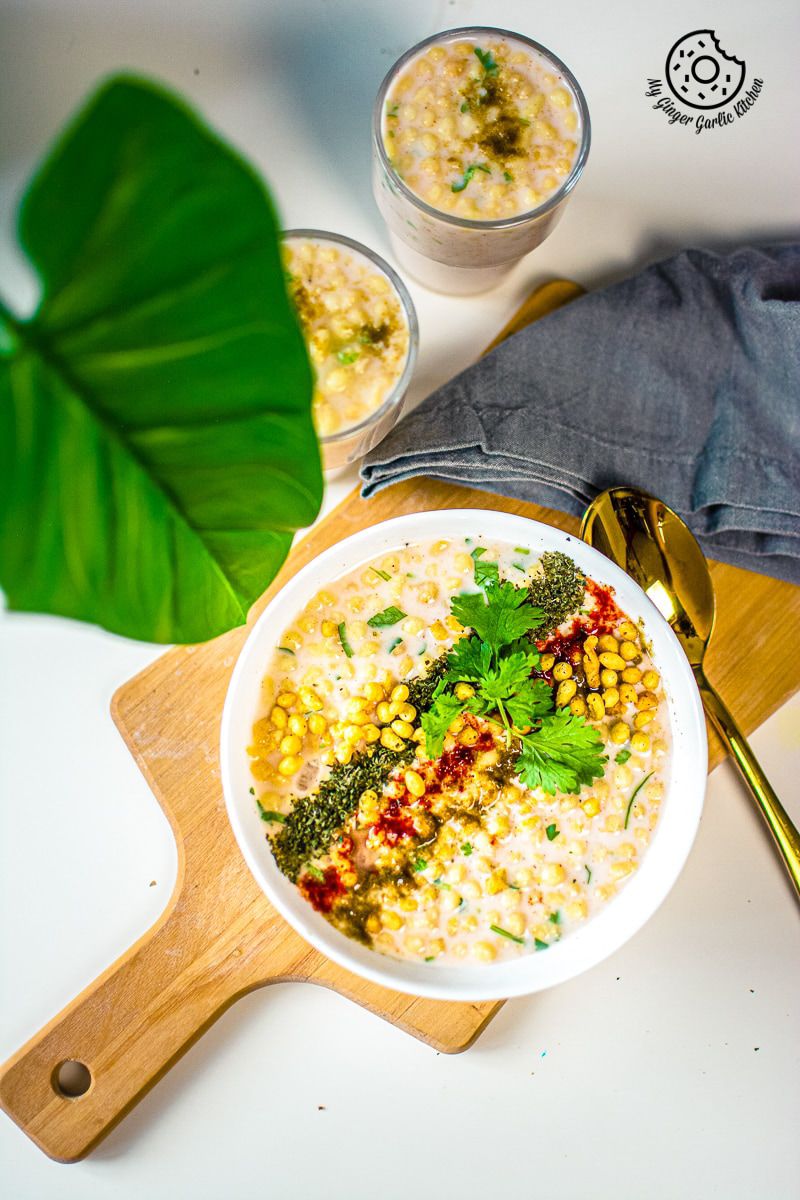
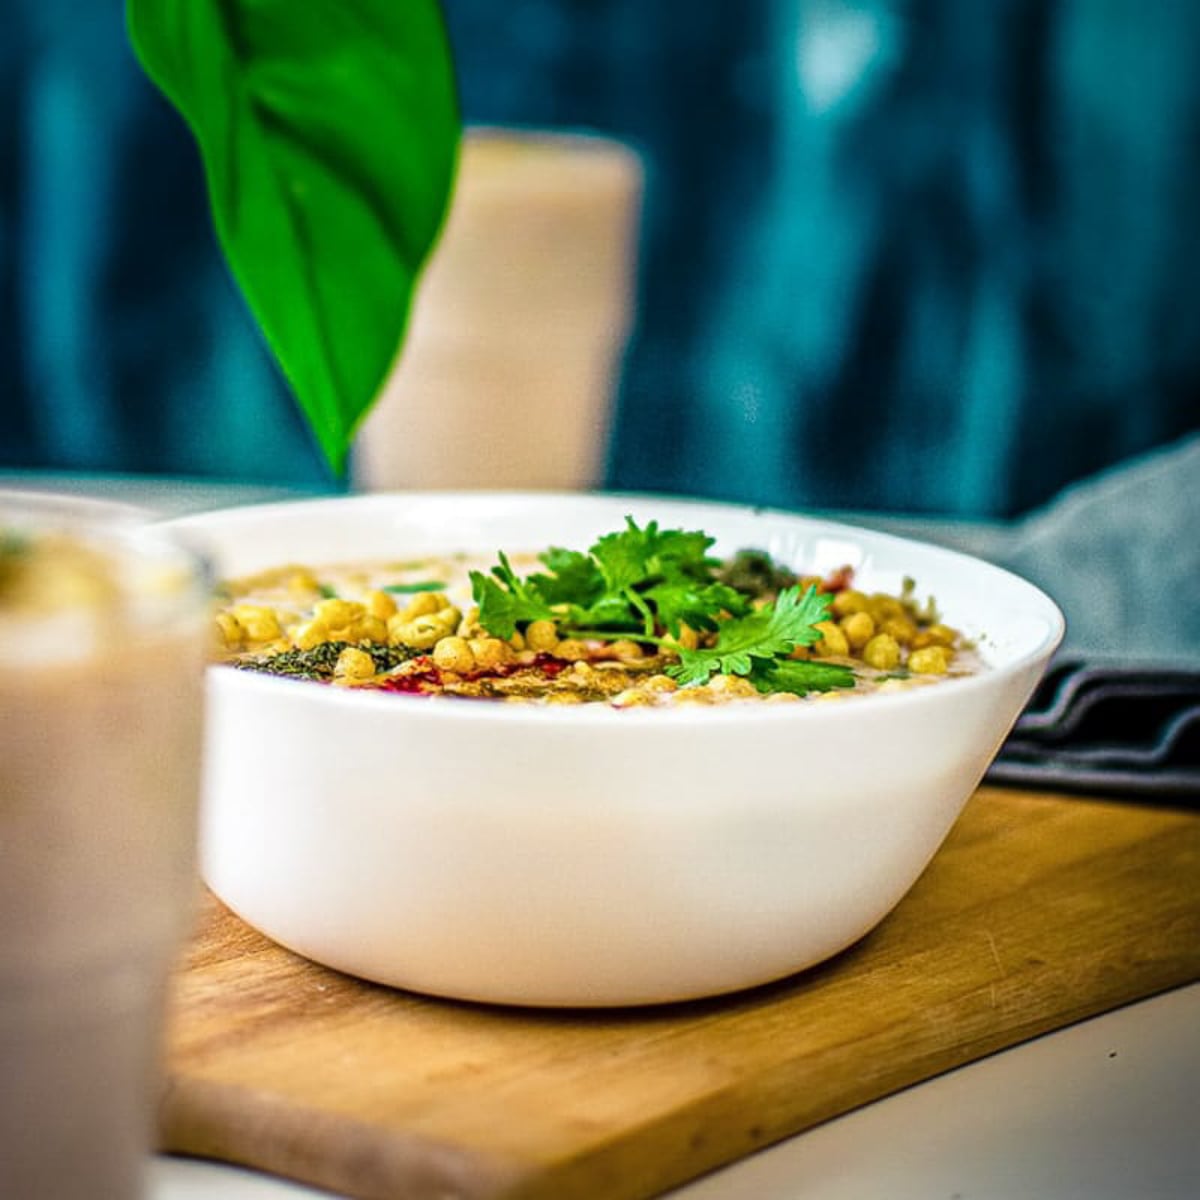
Boondi Raita or Boondi ka Raita is a classic side dish from Northern part of India. Here, spiced yogurt is mixed with boondi aka fried gram flour (chickpea flour) puffs. This is a nourishing, delicious, and easy to make accompaniment which fits well with all type of Indian meals. This boondi raita also makes for a great side dish for stuffed paratha and pulao.
This boondi raita is quick and simple to make and can be served under 15 minutes from start to finish if you have some boondi at hand. Other than boondi, this recipe calls for very simple ingredients which are readily available in any kitchen.
These ingredients include yogurt, roasted cumin powder, salt, chili powder, ground black pepper.
What is Raita?
Raita is an Indian style condiment where dahi/curd (yogurt) is used as the star component. Raita is an essential part of Indian meals. Here, whisked yogurt is blended with some spices and other ingredients depending upon the raita recipe you are planning to make.
Raita is a staple in most of the Indian households, and thus, there are a number of raita recipes in Indian cuisine. Diverse ingredients like cucumber, onions, tomatoes, and spice powders are added to it based upon the variation of the raita.
You can either use cooked or raw vegetables, fruits, nuts, or even crispy namkeens such as boondi. The choices are endless.
What is Boondi?
Boondi are light, crisp, deep-fried little droplets or pearls made using besan (gram flour/chickpea) flour. The batter is deep-fried in hot oil until the pearls are crispy and crunchy. Boondi can either be homemade or it can be store-bought. At home, Boondi is very easy to make.
Boondi raita is one of the most popular recipes made using boondi.
What is Boondi Raita?
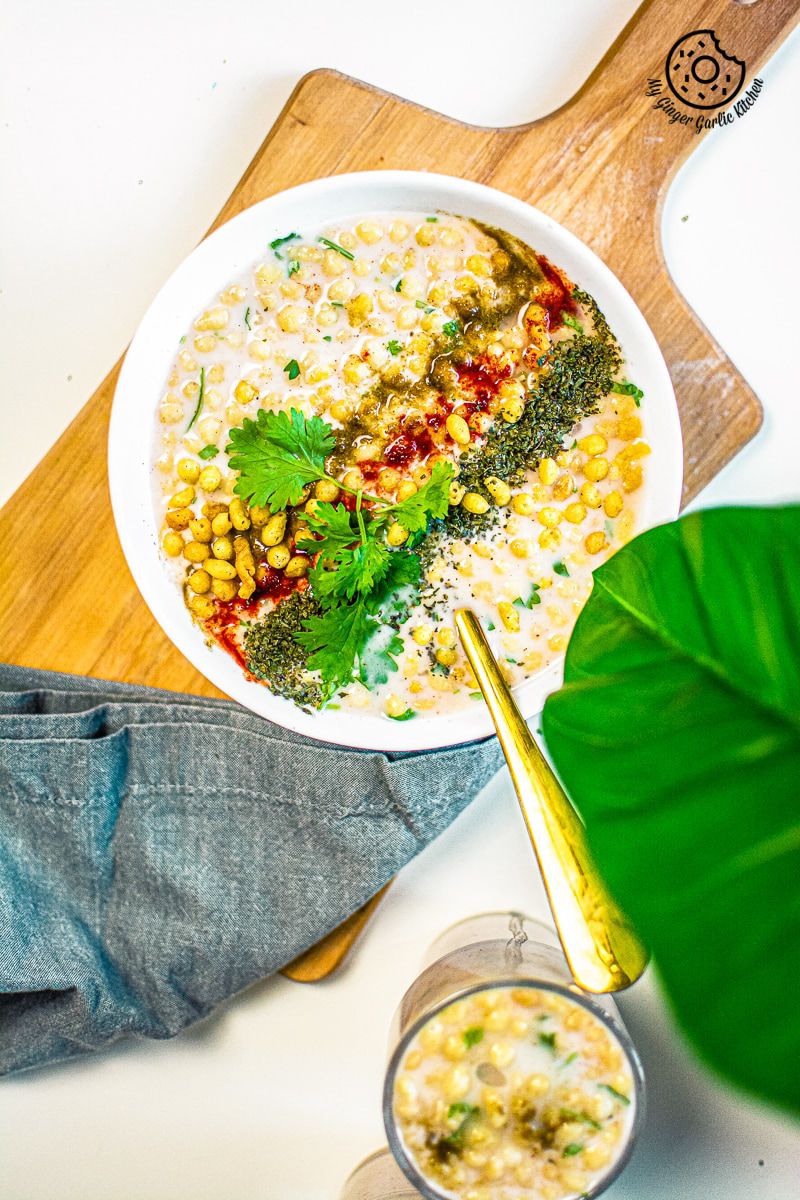
Boondi raita is a classy and enticing North Indian style side dish made with boondi (deep-fried tiny gram flour puffs) and spiced yogurt. Indian curd is used as a base ingredient which gives body to this dish.
In this dish, creamy yogurt is spiced first & crisp fried balls are added to it. You can pair it with any Indian foods such as aloo ka paratha, biryani, or pulao.
How to make Boondi ka Raita?
Mildly spicy boondi raita makes a delightful accompaniment to any spicy meal. Boondi raita is very quick and straightforward to make and can be served as a side dish with an Indian meal.
_This is how to make Boondi ka Raita Recipe at home in 4 easy steps: _
-
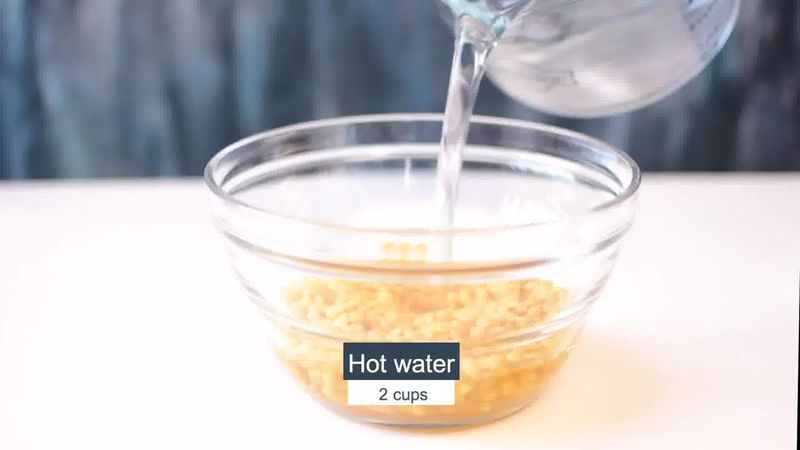
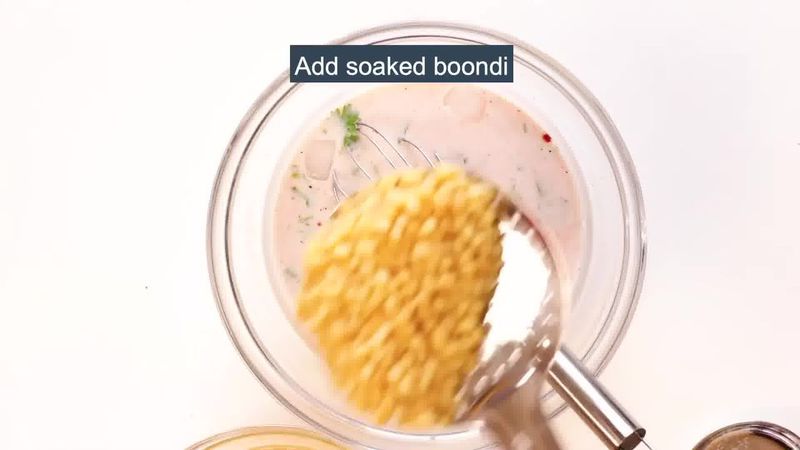
Soak boondi in warm water.
-
Mix in chilled yogurt with iced water, powdered spice, coriander leaves and whisk well.
-
Add soaked boondi and mix well again.
-
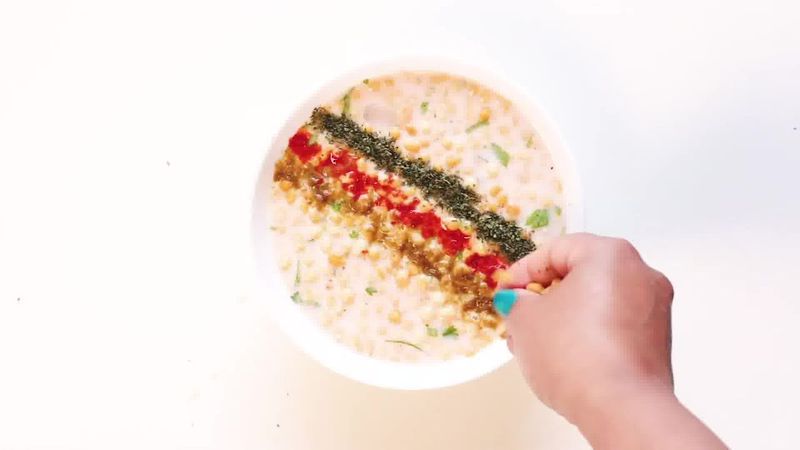
Garnish with powdered spice, crispy boondi, and coriander leaves. Done! Your Boondi ka Raita is ready to serve.
Why Boondi Raita is so famous?
All the various types of raitas have their own significant number of fans. Some like tomato onion raita, while others go for pineapple or any other fruit basted raita. But if you want me to name only one very famous raita, then it would be ‘Boondi Ka Raita’.
Be it a wedding banquet, other ceremonies, festivals, or even a get-together, this raita has seen them all, and is worshiped by all age-groups.
What are the ingredients you’ll need for making boondi raita?
For making boondi raita, you will need the following ingredients:
✓ Plain Or Salted Boondi
✓ Whisked Yogurt/curd (Dahi)
✓ Black Pepper Powder (Kali Mirch Powder)
✓ Bhuna Jeera Powder (Roasted Cumin Powder)
✓ Salt To Taste
✓ Black Salt (Kala Namak)
✓ Red Chili Powder (Lal Mirch Powder)
✓ Chopped Coriander Leaves (Kata Hua Hara Dhaniya)
How to make Boondi Raita Recipe with Tadka?
Boondi Raita Recipe with Tadka is also known as Tadke Wala Boondi Ka Raita. The raita recipe is the same as boondi ka raita — just a tempering is poured over chilled raita.
The usual tadka (tempering) of this raita has oil (tel), mustard seeds (rai), and/or cumin seeds (jeera), and some green chilies (hari mirch) or dried red chilies (sukhi lal mirch), curry leaves (meetha neem), and asafoetida (hing).
Here are some awesome recipes ideas to serve with Boondi raita:
Bhindi Aloo Tofu Masala Recipe
How to serve Boondi Raita?
You can serve boondi raita as a side dish with the main course dishes such as Paratha, Biryani, Pulav/Pulao/Pilaf, or Kabab. This raita tastes wonderful with any simple dal, sabzi, curry and chapati or even with some dal chawal, chole bhature, puri sabji, or masala khichdi, just name it. You can also serve it as a sauce with a snack. Or it can also be served as dressing for your favorite salad.
How many types of Boondi are available?
There are basically 4 main types of boondi available.
1. Salted Boondi: It can either be used in raitas or used as a garnish for chaats such as dahi vada, sev puri. Or added to liquids such as pani puri water, or jaljeera water, chaas.
2. Plain Boondi: This type of boondi is mainly used in raita recipes, or dessert recipes such boondi ladoo or motichoor ladoo.
3. Masala Boondi (aka khara boondi): This type of boondi is tikha or khara because the boondi batter is mixed with spices before frying. Khara boondi can be eaten by itself as a snack, or is added to Indian-mixture namkeen or chaats.
4. Sweet Boondi: Since this is a sweet boondi, it is served as desserts.
What type of Boondi is best for Boondi Raita?
For making raita recipe, you can either use plain or salted boondi. They both taste great in raita.
Can I make Boondi Raita Vegan?
Yes, you can certainly do that. Making boondi raita vegan is very simple, just replace yogurt with non-dairy yogurt and follow the recipe. Your VEGAN boondi raita is ready.
Is Boondi Raita gluten free?
Yes, it is entirely gluten-free. This raita does not have any gluten. The main ingredient of this raita is boondi which is made with gram flour or chickpea flour, hence, this is raita is entirely gluten-free.
Can I use boondi without soaking in water?
Technically, you can. Soaking boondi makes them fluffy and soft, thus, they absorb all the spiced yogurt. When you use unsoaked crispy boondi, the raita will be crunchy for some time and then slowly it would start absorbing the spicy yogurt flavors.
You want to soak boondi or not, the choice is entirely up to you.
Can I add Khara Boondi in Raita?
Indeed you can use Khara Boondi for making raita. If you want to use khara boondi, then I would suggest not soaking them in water. Soaking would take away all the spicy flavors. Since boondi are well seasoned, you don’t need to add any other spices in the yogurt.
Just mix crisp boondi with whisked yogurt (check for seasonings). Your raita is ready.
What are the tips and variations to make your very best Boondi Raita?
-
This type of raita normally has a thinner consistency, so if you are planning to use Greek or Turkish yogurt then make sure you add some water to it.
-
For this raita recipe, we need a smooth and creamy texture of yogurt. So if you are using homemade yogurt, or (halwai wala dahi) which has solid milk cream in it, then make sure you whisk the yogurt well using a wire whisk before using it. For ease, you can also strain it or blend it in a blender.
-
The amount of spices can easily be adjusted according to your taste.
-
Boondi is deep-fried, and all the deep-fried namkeens are best when used fresh or within 3 months of manufacturing. If you use the old boondi, then there are chances that it got spoiled and started smelling bad. So it is advisable to check the label before buying it.
-
Soaking boondi in hot water is really necessary here. By soaking, boondi will remove all the excess oil, and they will soften and puff up in hot water. 10 minutes is all you need to get rid of excess oil before adding it in the yogurt. When they are added in spicy yogurt, they will soak up the spicy flavorings of yogurt and become soft melt-in-mouth and flavorful.
-
I did not add any green chilies in this raita. But if you want it hotter, then feel free to add some chopped green chilies. If you are using green chilies, then I would advise you to skip the red chili powder, or else it would be very hot.
-
You can customize the consistency of the boondi raita by increasing or decreasing the amount of water. I like both thin and thick versions of this raita.
-
You can also add fruits and vegetables of your choice and make this fruity veggie version of Boondi Raita. It tastes awesome.
-
If you want a mild version of boondi raita, then you can make a simple boondi raita by adding only salt and cumin powder. Omit all the other spices. The most delicious raita is ready.
-
If using salted boondi, add less salt, because the boondi also has salt in it.
-
It tastes best when served fresh. So serve this Boondi Raita immediately, or you can also refrigerate it for up to 1 day.
Some other raita recipes you may be interested in:
Rajasthani Besan Ke Cheele Ka Raita
Boondi Raita Recipe - How to make Boondi ka Raita (Step-by-step photo instructions)
How to soak Boondi //
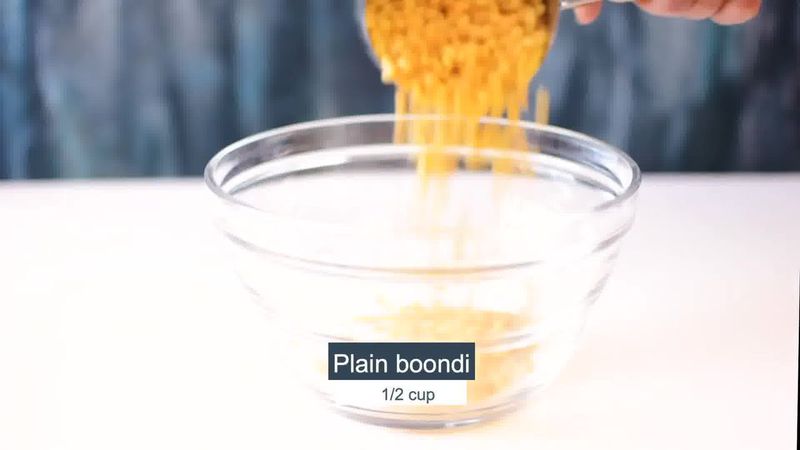
- Add 1/2 cup boondi to a large mixing bowl.
- Fill the bowl with 3 cups of hot water, and let it get soaked for 10 minutes.
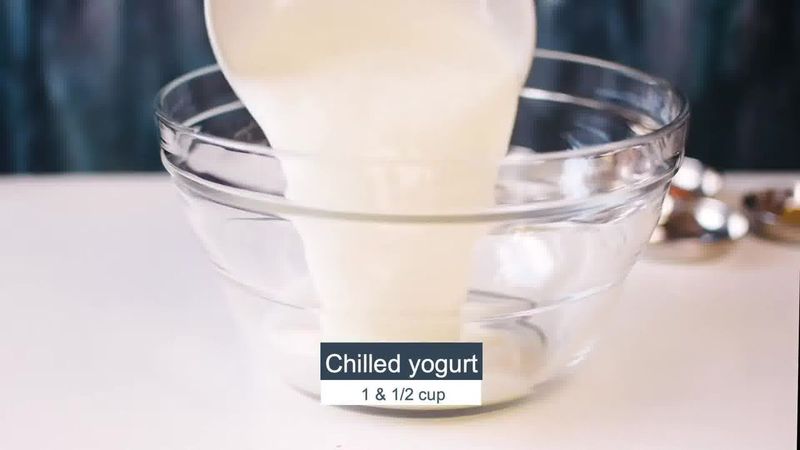
How to make Boondi Raita //
- Add whisked yogurt to a mixing bowl.
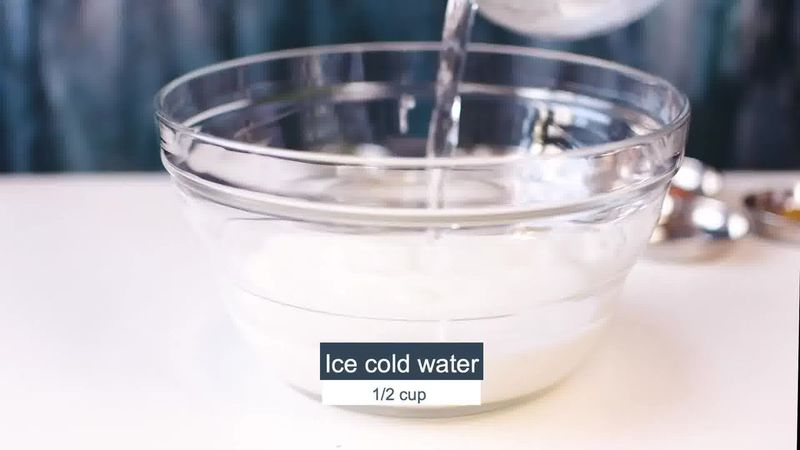
- Next add ice cold water and whisk well.
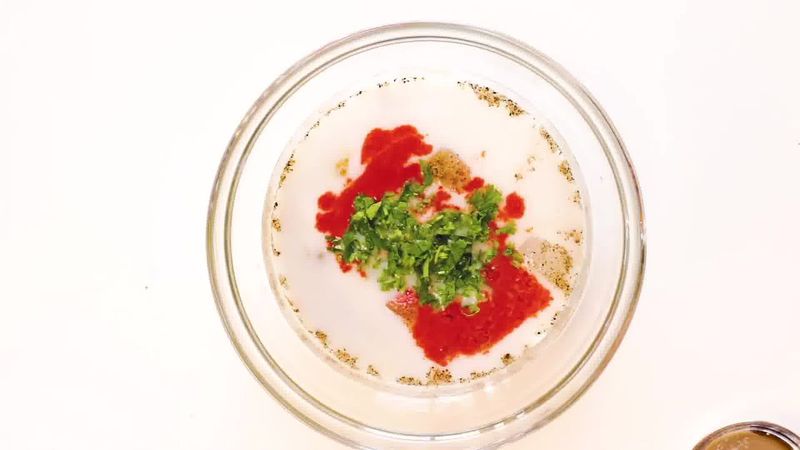
- Now add ground black pepper, salt, black powder, red chili powder, and and chopped coriander leaves.
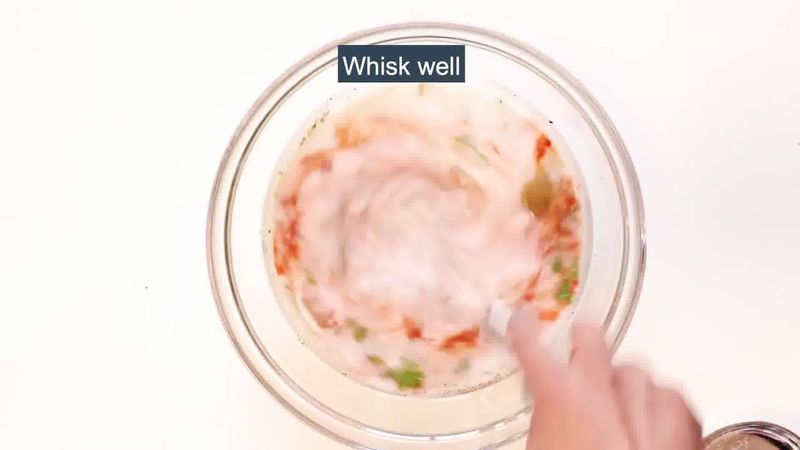
- Whisk everything well until combined.
- After 10 minutes, drain boondi using a slotted spoon or a colander. You can also lightly squeeze the soaked boondi. Now add the soaked boondi. Mix again until combined.
How to serve Boondi Raita //
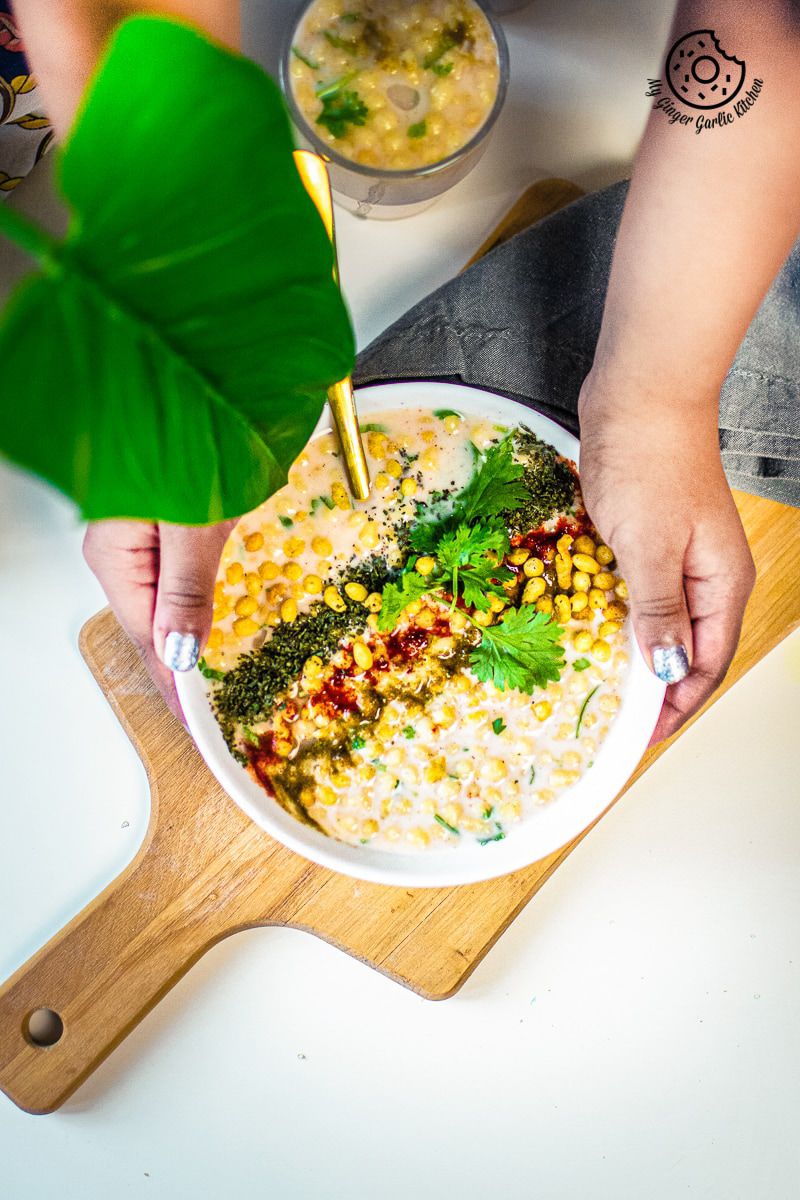
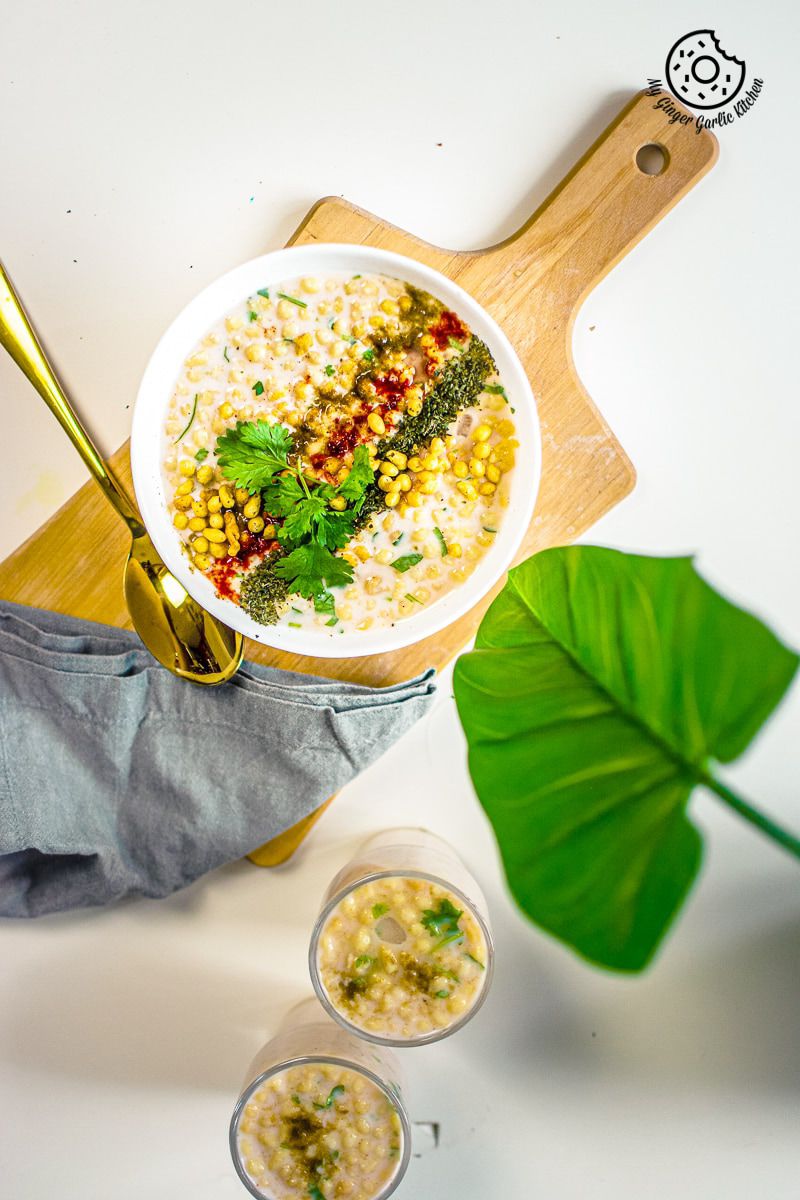
- Garnish boondi raita with roasted cumin powder, chili powder, mint powder and coriander leaves.
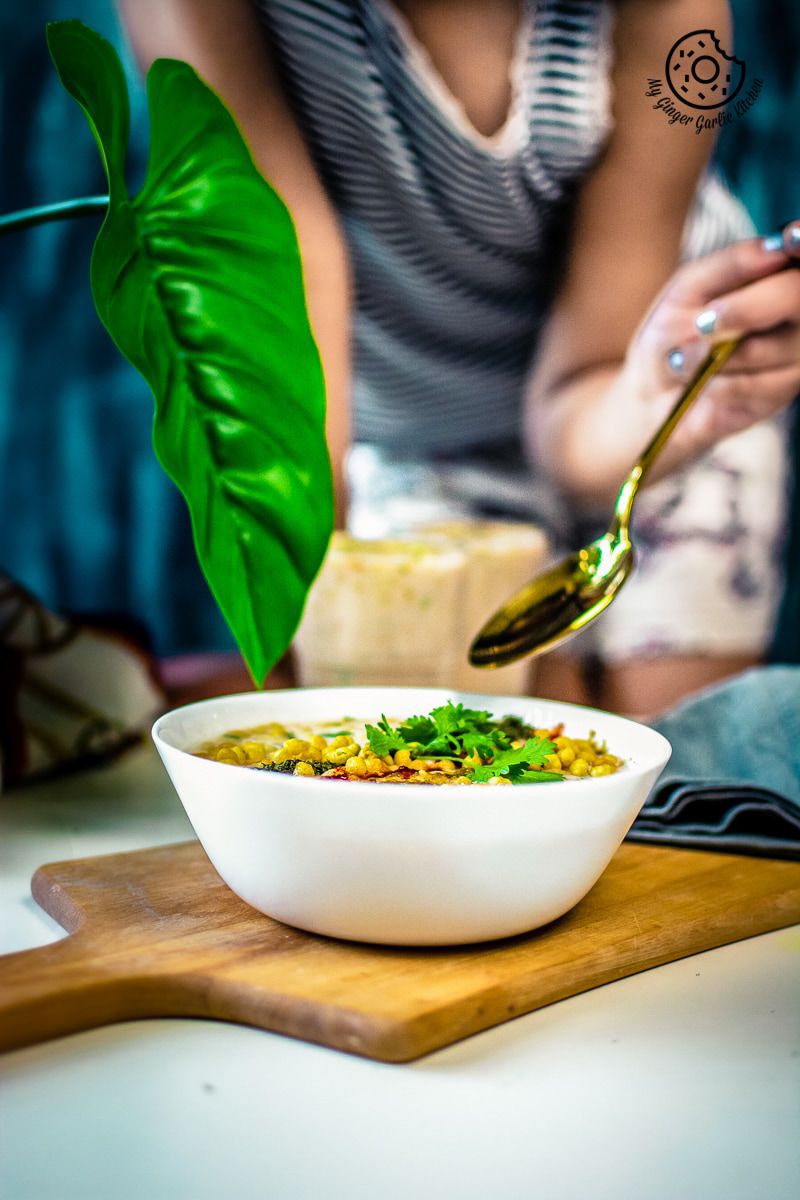
- Serve chilled with biryani, pulao or paratha.

Recipe Card
Boondi Raita Recipe - How to make Boondi ka Raita [Recipe]
★★★★★
(Rating: 5 from 6 reviews)
| Prep time 🕐 | Cook time 🕐 | Total time 🕐 |
|---|---|---|
| Category ☶ | Cuisine ♨ | Servings ☺ |
| Condiments | Indian | 6 |
| Nutrition Info ⊛ | Serving size ⊚ | |
| 79 calories | 1 |
INGREDIENTS
For Boondi Raita //
- 1/2 cup plain salted boondi
- 1.5 cups whisked plain yogurt/curd (dahi) (I have used full cream yogurt)
- 1/4 teaspoon black pepper powder (kali mirch powder)
- 1 teaspoon bhuna jeera powder (roasted cumin powder)
- 1/2 teaspoon black salt (kala namak)
- 1/2 teaspoon red chili powder (lal mirch powder)
- 2 tablespoons chopped coriander leaves (kata hua hara dhaniya)
- Salt to taste
For Garnish //
- Roasted cumin powder
- Red chili powder
- Dried mint powder
INSTRUCTIONS:
How to soak Boondi //
- Add 1/2 cup boondi to a large mixing bowl.
- Fill the bowl with 3 cups of hot water, and let it get soaked for 10 minutes.
How to make Boondi Raita //
- Add whisked yogurt to a mixing bowl.
- Next add ice cold water and whisk well.
- Now add ground black pepper, salt, black powder, red chili powder, and and chopped coriander leaves.
- Whisk everything well until combined.
- After 10 minutes, drain boondi using a slotted spoon or a colander. You can also lightly squeeze the soaked boondi. Now add the soaked boondi. Mix again until combined.
How to serve Boondi Raita //
- Garnish boondi raita with roasted cumin powder, chili powder, mint powder and coriander leaves.
- Serve chilled with biryani, pulao or paratha.
Watch Full Recipe Video:
NOTES:
- You can also add fruits and vegetables of your choice and make this fruity veggie version of Boondi Raita.
- If you want a mild version of boondi raita, then you can make a simple boondi raita by only adding only salt and cumin powder. Omit all the other spices.
- If using salted boondi, add less salt, because the boondi also has salt in it.
- It tastes best when served fresh, so serve this Boondi Raita immediately, or you can also refrigerate it for up to 1 day.
- I did not add any green chilies in this raita. But if you want it hotter, then feel free to add some chopped green chilies. If you are using green chilies, then I would advise you to skip the red chili powder, or else it would be very hot.
If this recipe helped you, then please spread the word by sharing and subscribing to us on YouTube to get more such Recipe Videos.
Your feedback is so helpful for me and other My Ginger Garlic Kitchen readers. So, for Facebook and Instagram, please mention @MyGingerGarlicKitchen or #mygingergarlickitchen. I would love to see your photos. :)
Author: Anupama
Recipe Source Link: https://www.mygingergarlickitchen.com/boondi-raita-recipe/
Questions or comments about this recipe:
Ask on