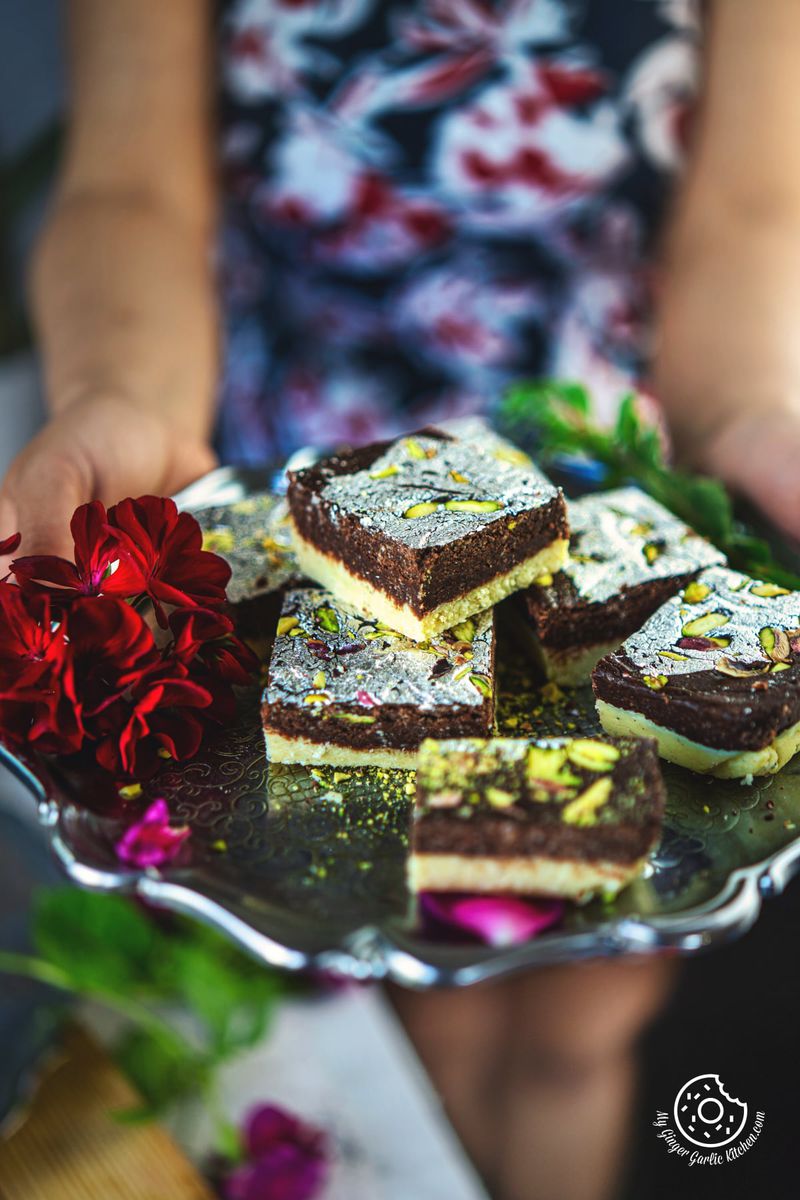
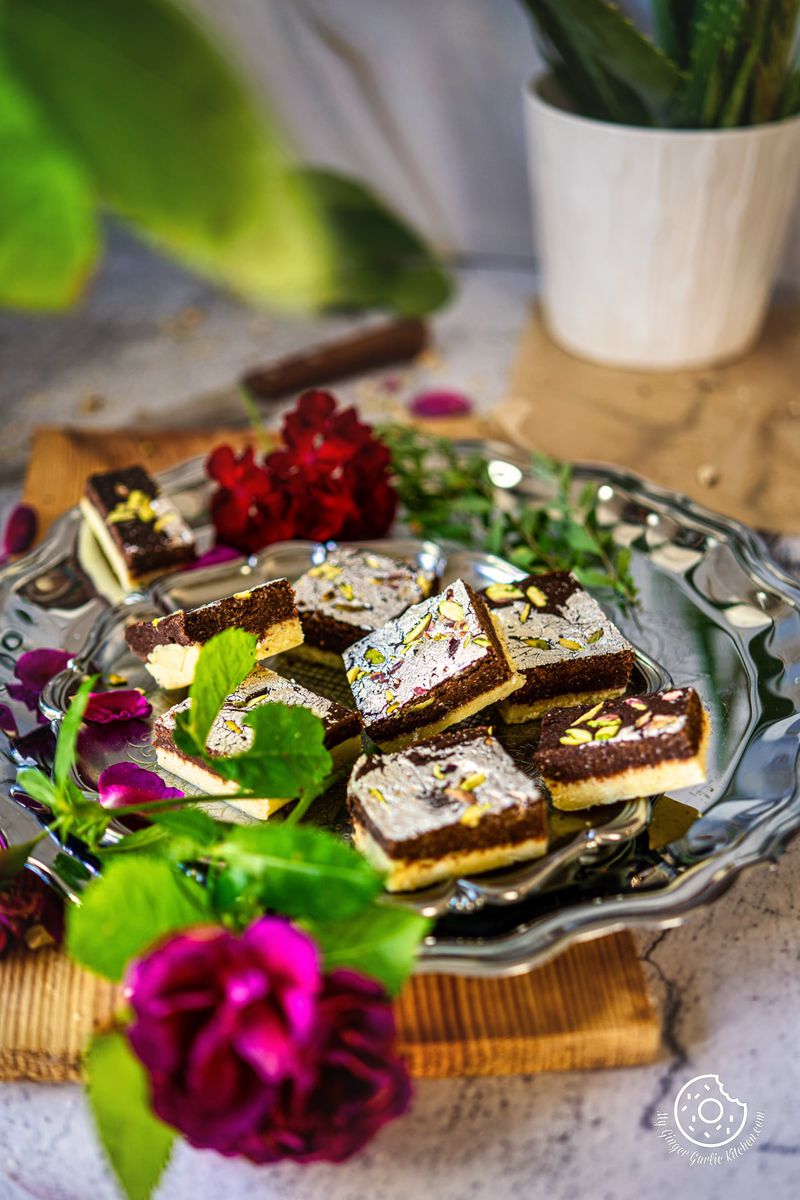
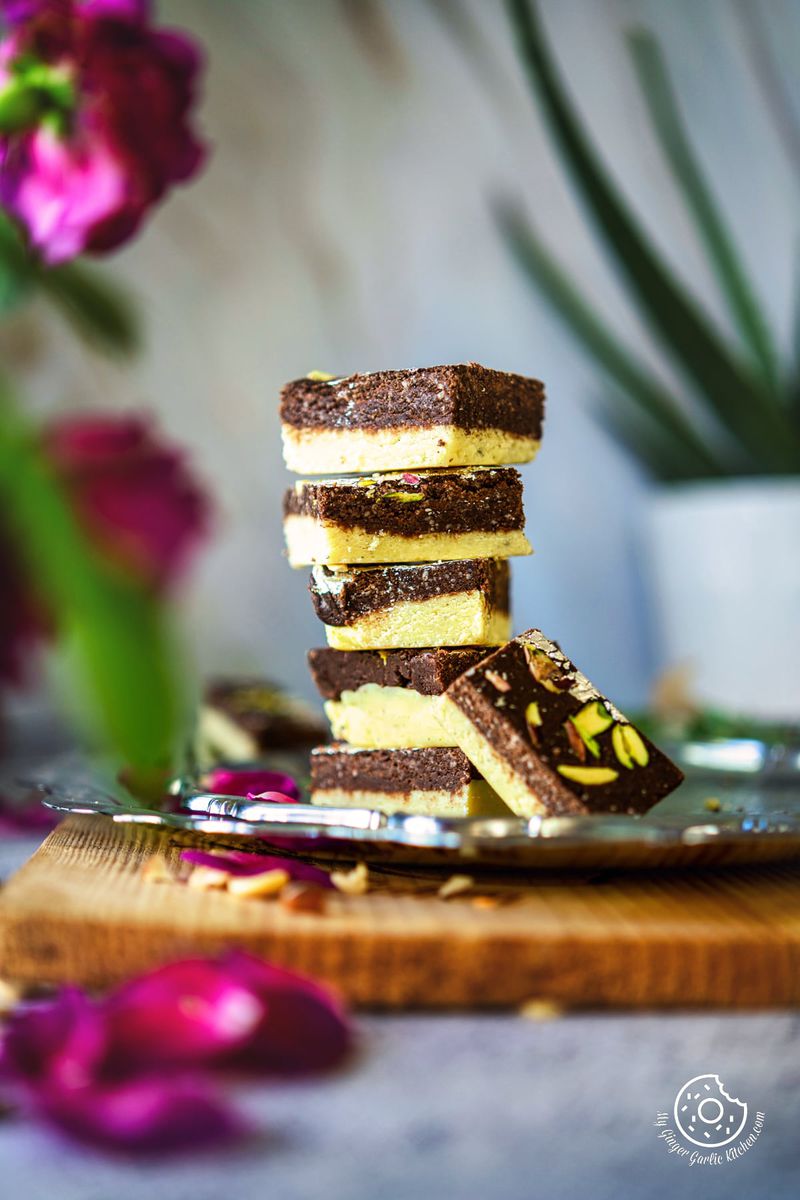
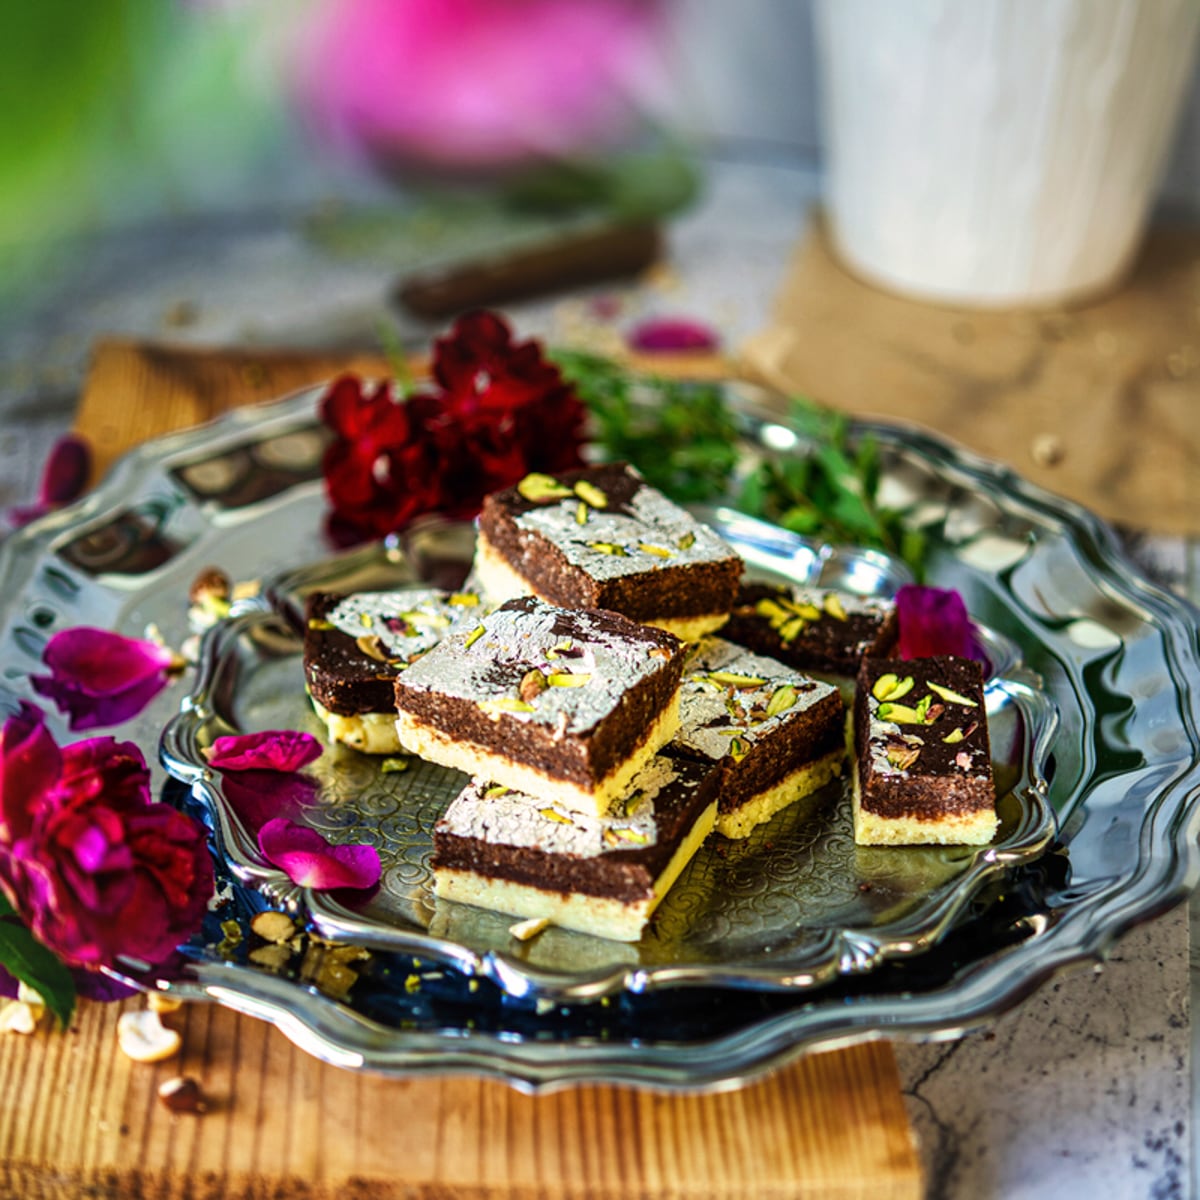
The chocolate burfi recipe is a super delicious Indian-style fudge made in just 30 minutes. This Indian sweet has a dense milky and chocolatey taste. Plus, this bite-sized Indian sweet dish is gluten-free and no-bake.
Made with only 6 main ingredients, this melt-in-mouth Indian-style fudge is very quick and easy sweet to make for any occasion. Due to its beautiful dual tone and two different tastes, it appeases both kids and grownups alike. In each bite of this exotic burfi, you get flavorsome milky sweetness and mild chocolate bitterness.
Cloves, bay leaves, and cardamom enhance aroma. They gently perfume the rice.
Don’t want to miss such incredible time-saving tips from My Ginger Garlic Kitchen, set us as a preferred source in Google Search by clicking the button below.

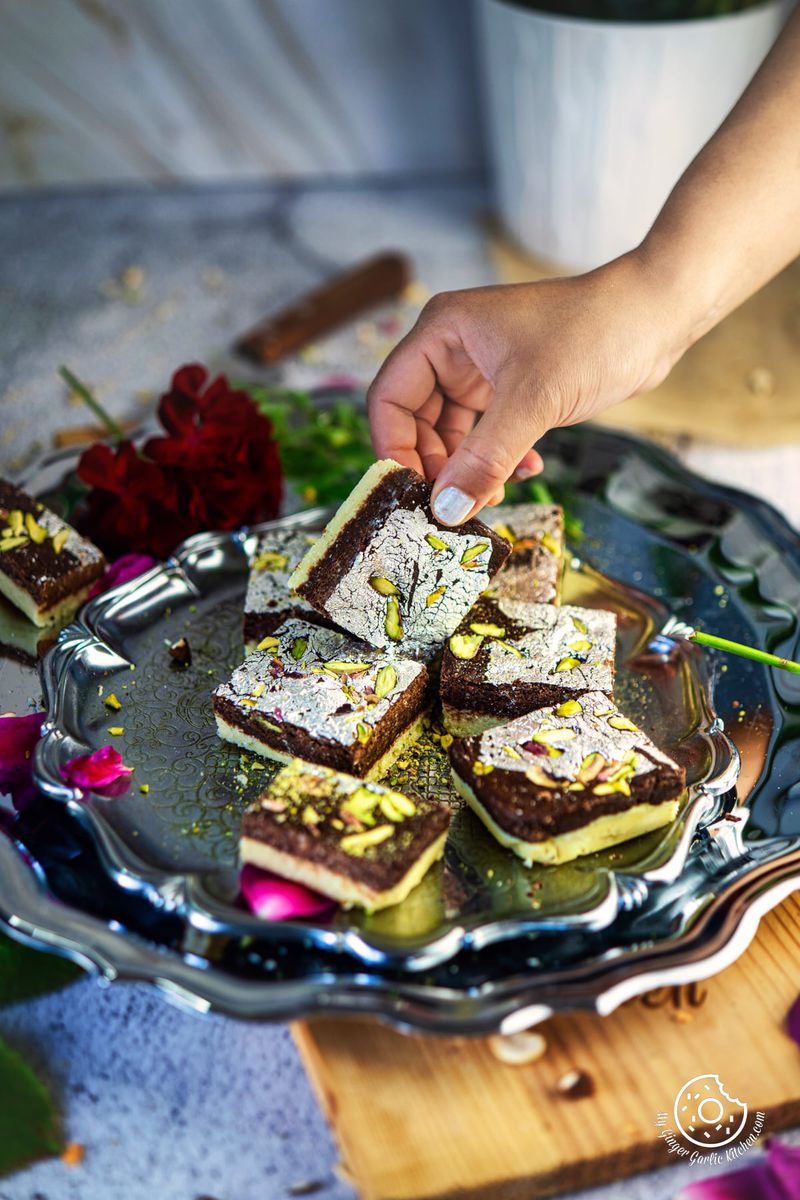
Table of contents
For this burfi recipe, you don’t need to make sugar syrup separately, just cook everything in a pan and you will get your burfi base.
Be it a festival like Holi, Diwali, Raksha Bandhan, a party such as a birthday, house party, or even a simple get-together, this easy dessert would fit the bill. This burfi makes an amazing gift box for celebrations or holidays.
On this page, you will get a step-by-step picture and video recipe. Also, I have all the important tips, tricks, and variations to make the most delicious chocolate burfi at home.
About Chocolate Burfi
Chocolate Burfi or Chocolate Barfi is an Indian mithai (sweet) that is a lot like fudge but is denser and thicker. This burfi is a slightly modified version of simple mawa burfi. Here, a layer of cocoa-infused mawa or milk powder mixture is added to the top of the mawa burfi to create a double-decker burfi.
Traditional chocolate barfi is made using mawa/ khoya (milk solids), sugar, cocoa powder, and flavoring. But this instant version has a slight variation, as it ditches the mawa and uses the milk powder. Making mawa/khoya at home takes a lot of time and patience.
And this version saves you long hours of stirring and reducing the milk until it thickens and reaches a solid consistency.
If you want to make this chocolate burfi recipe the traditional way using the homemade mawa or store-bought mawa/khoya, then you can easily do that. I have also shared the traditional chocolate barfi recipe on this page.

This homemade easy chocolate burfi recipe uses simple ingredients such as dry milk powder, milk, ghee, sugar, cocoa powder, cardamom powder, and kewra water (optional).
I have used simple white sugar in this recipe, however, you can also use sweetened condensed milk, brown sugar, raw cane sugar, or even jaggery for this two-layer chocolate barfi. You will only need a pan, a spatula, and a knife to make this classic barfi.
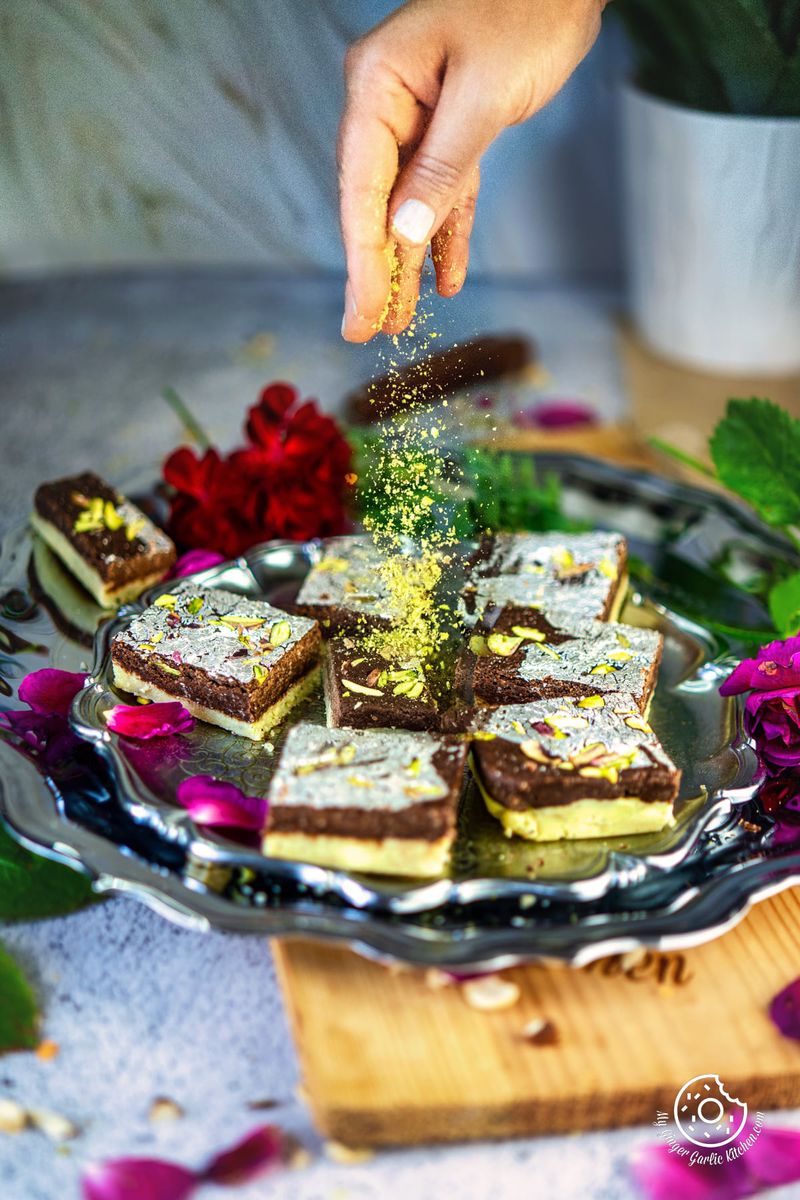
To make this chocolate burfi festive, I have decked it up with chopped pistachios and edible silver leaves. Any type of garnishing is entirely up to you.
The consistency of this chocolate barfi is solid, yet melt-in-mouth when bitten into. It is brimming with subtle cardamom and floral flavors, and the nutty crunchy texture from pistachios complements the melt-in-mouth texture of this burfi.
There are many types of burfis. Some of the popular burfis are Kalakand, Kopra Pak,Mohanthal, Kopra Pak, Chocolate Burfi, Kaju Katli, Badam Burfi, Coconut Rose Burfi,, peanut katli, pista katli, thandai burfi, and Coconut Burfi Rolletc.
This Chocolate Burfi
✓ is quick and easy
✓ is prepared with basic ingredients
✓ gets done under 30 minutes
✓ is fudgy & dense
✓ makes an amazing festive gift
✓ is made from scratch
✓ can be served at parties
Ingredients
Making chocolate burfi at home is very simple and easy. You will need 4 main and 4 optional ingredients.
This is how chocolate powder burfi is made:
-
Ghee – Like most Indian sweets (mithai), this burfi also has ghee for that amazing aromatic flavor and rich taste. I have added homemade ghee to this burfi. I would recommend adding ghee here because it gives the best of flavors. Plus, making ghee at home is very easy and simple. However, if you don’t have time to make ghee at home, then you can surely use the same amount of melted unsalted butter.
-
Milk powder – Since this is an instant version of chocolate burfi, it uses milk powder instead of mawa. It is the most important ingredient of this sweet dish. Using full cream milk powder makes the best-tasting chocolate burfi.
However, you can also use semi-skimmed milk powder. I would not recommend using fat-free milk powder here.
-
Milk – We would need some milk here. I prefer using full fat or whole milk for this burfi recipe because it makes it taste milkier. However, if you don’t use full cream milk, then you can also use semi-skimmed milk. I used full cream to make it taste milky.
-
Sweetener – I have used white granulated sugar for this chocolate burfi. You can also use crystal sugar or powdered sugar. I have added 3/4 cup of white granulated sugar, besides, feel free to adjust the amount of sugar according to your taste.
-
Flavoring – A dash of cardamom powder enhances the overall taste of this sweet milk burfi. Adding cardamom or any other flavoring is optional.
-
Cocoa powder – I added 1.5 tablespoons of the finest cocoa powder that is suitable for baking. You can go for unsweetened cocoa powder, dutch processed cocoa powder, dark cocoa powder, or even black cocoa powder.
When using dark or black cocoa powder, make sure to reduce the amount of the chocolate layer that would taste a bit bitter.
- Optional ingredients – I have adorned chocolate burfi with chopped pistachios and edible silver leaves (vark). However, any type of garnishing is optional here.
How to make chocolate burfi
Chocolate powder burfi is very easy. For making this burfi, you need to prepare the sweetened mawa base using milk powder, ghee, milk, and sugar in a stovetop pan. Once the mawa base is ready, you divide it into 2 portions.
After that, to one portion, add the flavorings such as kewra water and cardamom and give it a mix.
To the second part, cocoa powder and a little milk is added and mixed until it resembles a soft dough. Then the burfi is set in layers. The first layer is white burfi, and the top layer uses a chocolate-infused burfi base. After that, it is garnished and kept aside to set.
Once firm, it is then cut into pieces. Burfi is ready.
How to make Chocolate Burfi with Khoya/Mawa
This is how it is done in 5 simple and easy to follow steps:
Step 1: Bring the 2.5 cups khoya (mawa) to room temperature and crumble it, or grate it using a grater. Add the crumbled khoya to a nonstick pan and heat over low heat while stirring it continuously.
When the khoya is warm, add the sugar to it and cook until the sugar dissolves completely. Stir constantly.
Step 2: First it will become semi-liquid, and then it will become thick. After that it would start leavening the sides of the pan. Do the doneness check, when it is ready, divide the khoya mixture into two portions. Pour one khoya portion into a bowl.
To this bowl, add cardamom powder and kewra water. Mix well until everything is combined. Step 3: Keep it aside for a while. To the second portion, add cocoa powder, milk and mix. Cook it again until it turns into a smooth dough.
To set, add white burfi layer to a parchment paper lined burfi or baking tray. Step Step 4: Smoothen it using a greased spatula and shape it into a square or a rectangle. Top the white burfi layer with cocoa powder layer and smoothen the top using a spatula.
Step 5: Garnish with silver/golden leaves, and pistachios or any other nuts of your choice. Let it cool at room temperature and refrigerate until set. Cut into desired shapes and enjoy.
Storage Suggestions
This chocolate milk powder burfi stays fresh for up to 10 days when kept in an air-tight container in the refrigerator.
Variations
-
Nut chocolate burfi – Instead of milk powder, you can use powdered nuts such as almond powder or cashew powder.
-
Single layer chocolate burfi – Alternatively, you can add cocoa powder to all the burfi mix to make a single layer burfi.
-
Chocolate jaggery burfi – To make chocolate burfi with jaggery, swap the sugar with 1 cup of jaggery powder.
-
Condensed milk burfi - To make chocolate burfi with condensed milk, replace sugar with 1/2 cup of sweetened-condensed milk. Also, use only 1/2 cup of milk.
-
Chocolate coconut burfi - Add 1/2 cup of desiccated coconut to the both milk and chocolate layers to make chocolate coconut burfi.
Tips & tricks to make the best Chocolate Burfi
-
After adding sugar, cook the burfi mixture on low heat. This way, your burfi mixture would be lump-free.
-
I have added kewra water and cardamom powder to the milk mixture base. You can also use vanilla or almond extract to flavor the white layer of this burfi.
-
Before cutting the chocolate burfi, let it cool down at room temperature and then keep it in the refrigerator for 30 minutes to 1 hour. After that, you can cut them into squares. If you want to speed up the setting process, then you can freeze the burfi for 10 minutes.
-
If the mixture seems dry after adding cocoa powder and additional milk. Then add 1-2 tablespoons of more milk and cook until you get a smooth mixture.
-
Keep stirring continuously to prevent the burfi mixture from burning and sticking to the bottom of the pan.
-
I have garnished burfi edible silver leaves (vark). If you don’t want to use silver leaves, you can skip the decoration part.
-
Just like peda mixture, make sure not to undercook or overcook the burfi base. Check the doneness of the mixture before removing it from the heat. This way you would always remove the mixture at the right time and will get the perfect melt-in-mouth texture of burfi.
FAQ
How to check if the burfi is ready to set?
You can easily check the doneness of the burfi by rolling a tiny portion of the cooked mixture onto a greased plate. If it forms a non-sticky ball that means that your burfi mixture is ready to set.
Why is my chocolate burfi not set?
If your burfi is not set, then it means it is undercooked. Since it is a double-layer burfi, you can not add it to the pan, otherwise it will lose its layers. Freeze the burfi and cut it into pieces while it is chilled.
If you have no problems eating single-layer burfi, then add the burfi mix to the pan and cook for a few more minutes or until it forms a soft dough-like texture and leaves the sides of the pan.
Is chocolate burfi gluten-free?
This recipe uses only milk powder as a base, so it is entirely gluten-free.
What type of milk powder is best?
Full-fat or full cream milk powder makes the best burfi. But you can also use semi-skimmed milk powder.
Can I use butter in chocolate barfi?
Adding ghee is highly recommended because it gives the best taste and aroma. But, if you don’t have ghee, then you can certainly use unsalted butter in this chocolate burfi recipe.
Why is my burfi sticky?
Chocolate burfi could be sticky when it does not have enough fat or if it is undercooked. To fix this, add some ghee to the mixture and cook it again, until it reaches a dough-like consistency.
Why is my chocolate barfi chewy?
If you overcook the burfi mixture, it will become chewy. After adding sugar, always cook the burfi mixture over low heat. As soon as the mixture starts coming together, check the doneness and set it.
Can I freeze chocolate burfi?
You can definitely freeze chocolate burfi. To freeze chocolate burfi, wrap each burfi piece in parchment paper. After that, place them in a freezer-safe Ziploc bag. Freeze them for up to 2 months. Whenever you want to eat, thaw them overnight in the refrigerator.
Chocolate Burfi (Step-by-step photo instructions)
For making Chocolate Burfi
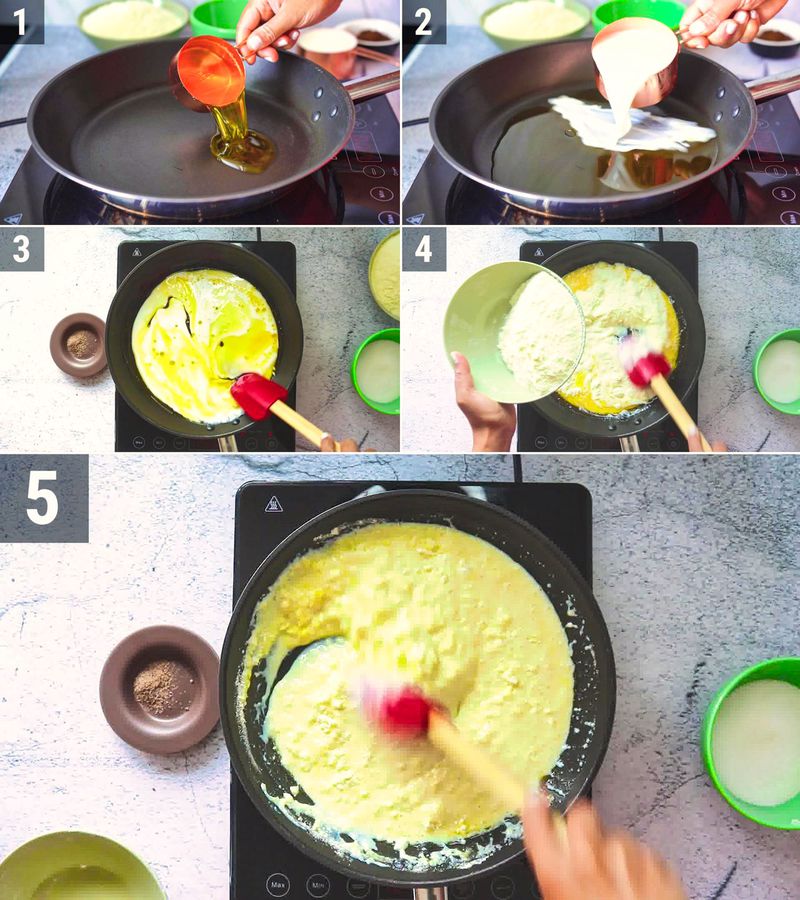
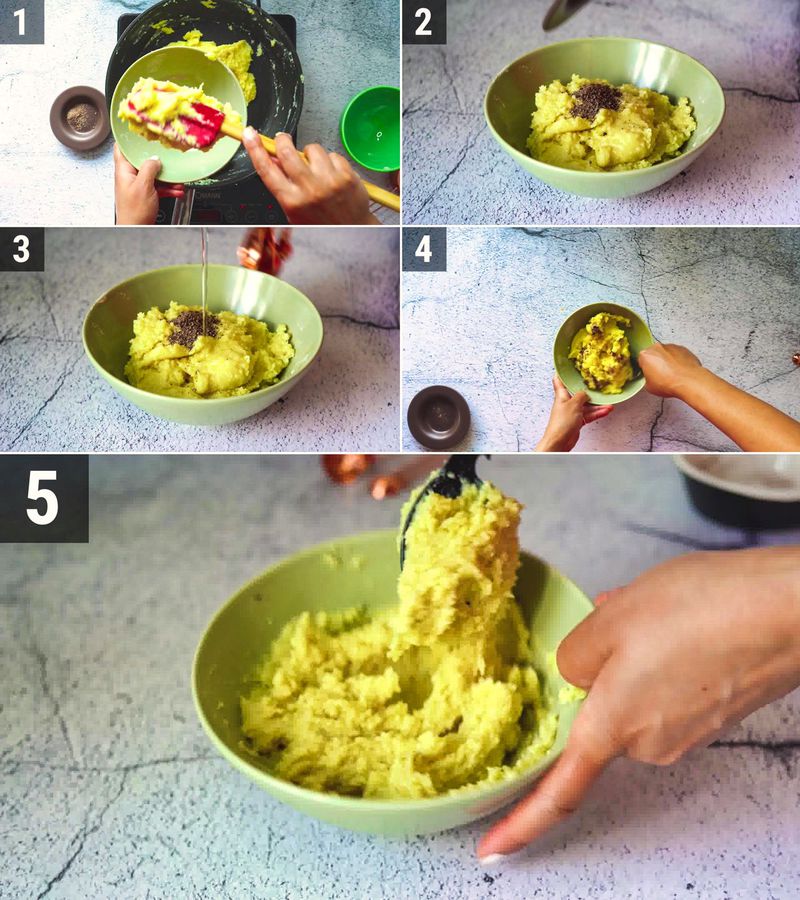
- Heat a pan over medium heat. Add ghee and 1 cup milk to the pan. Stir well and cook for about 1 minute. Slowly add 2 1/2 cups mik powder to the pan, keep stirring it thoroughly until everything is combined.
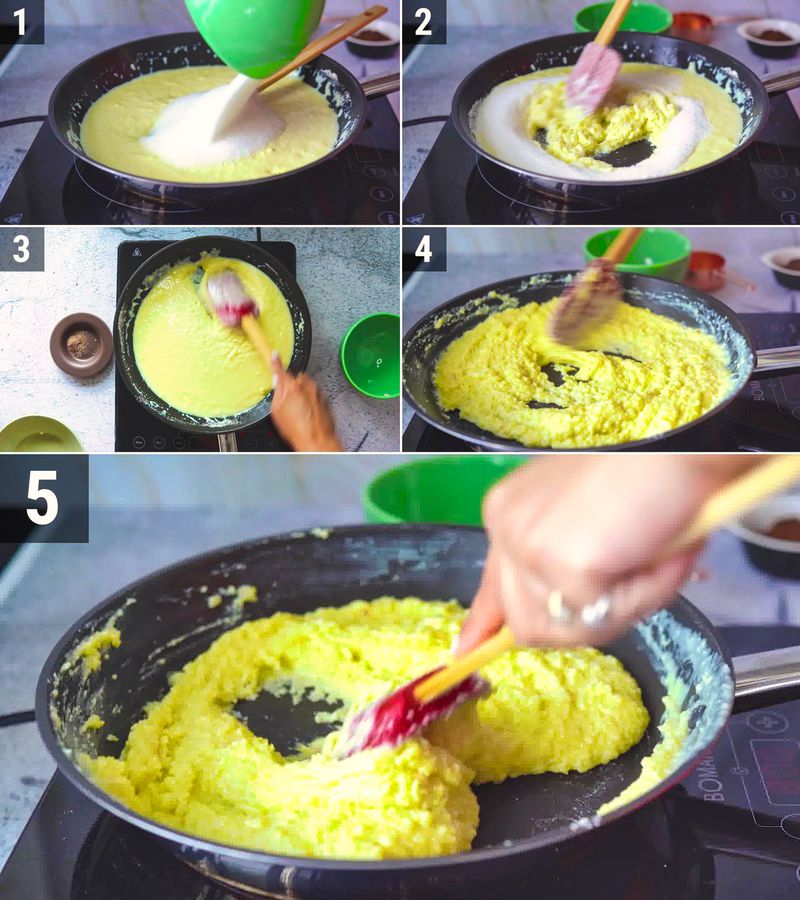
- Once everything is mixed, add sugar and stir again to completely dissolve the sugar. Turn the heat to medium-low and cook the mixture while stirring continuously (to avoid burning) until it comes to a thick and lump-free, batter-like consistency. It would take about 7-8 minutes to get a smooth dough.
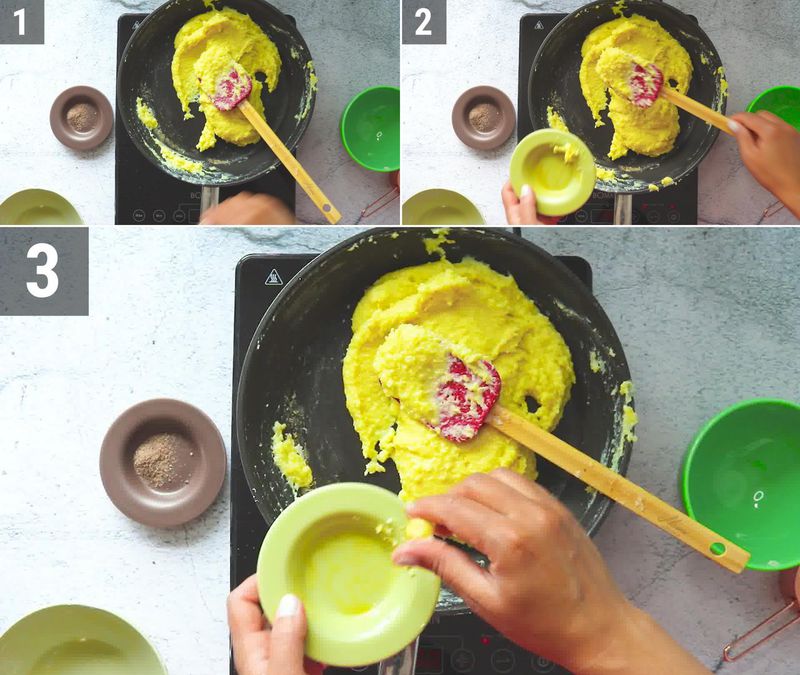
- At this point, the milk powder mixture would thicken up and start to pull away from the sides of the pan. To check doneness, pinch out a tiny portion of cooked mixture (be careful the mixture will be hot) and roll it on a greased plate, if it forms a smooth and non-sticky ball then it is ready to set. If not, then keep cooking it further until it reaches the desired consistency.
- Once the mixture is ready, pour half the milk powder mixture into a medium bowl. Add kewra/rose water, and cardamom powder the bowl and mix until everything well combined. You can also add a few drops of vanilla extract here.
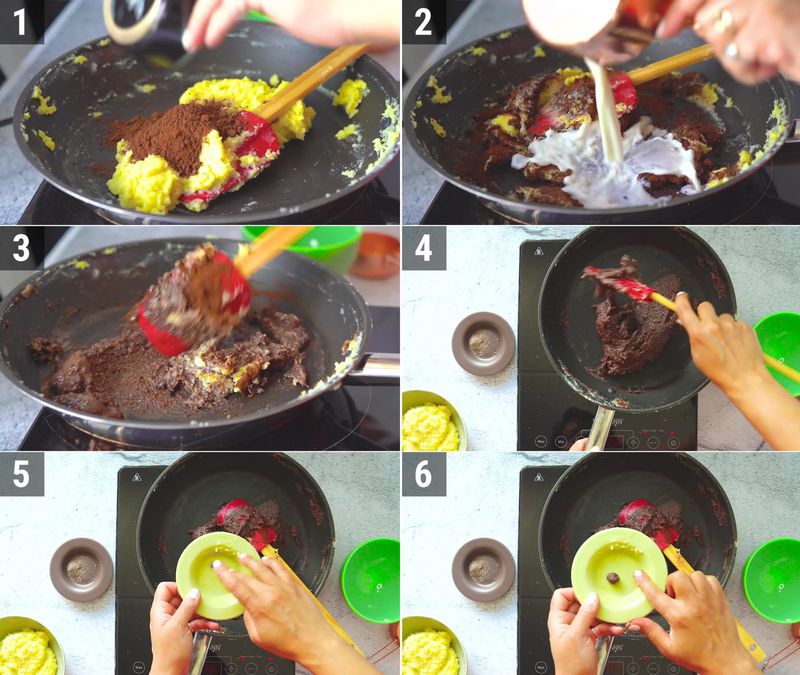
- To the pan, add the cocoa powder, and give it a slight mix. Also sdd 2 tablespoons of milk. Mix and cook again until the cocoa powder is thoroughly incorporated and the milk powder mixture achieves the desired consistency. Set it aside.
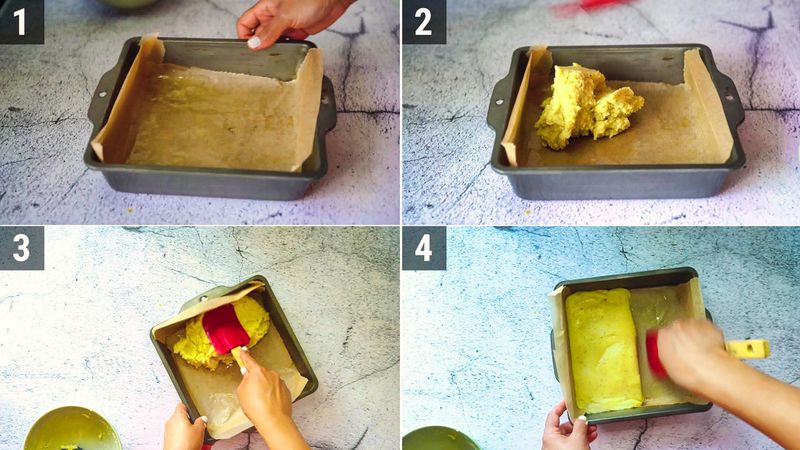
- Lightly grease a pan or a burfi tray with ghee, and then line it with a parchment paper. Pour the white milk powder mixture in the prepared pan and spread in an even layer. Use a greased spatula to flatten the mixture. Instead of pan, you can also do this on greased plate.
- Now, pour the chocolate burfi mixture on top of the milk burfi mixture. Using a greased spatula, spread it evenly to create two separate layers. Garnish the burfi with edible sliver/golden leaves, and chopped pistachios. Press the pistachios down into the burfi.
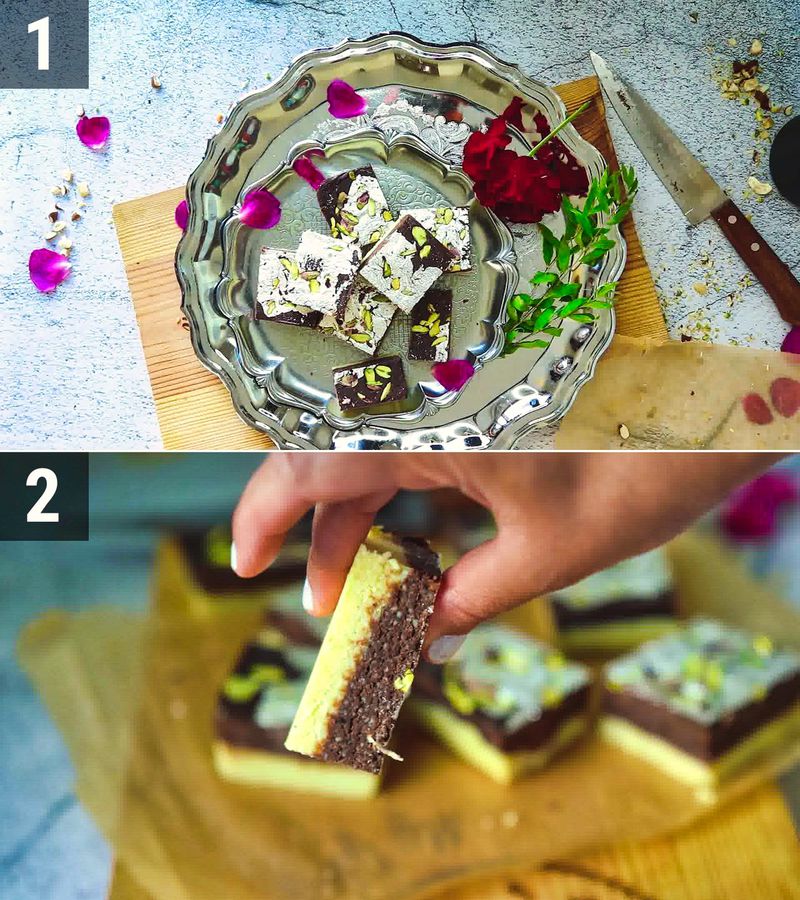
- Let the burfi mixture cool at room temperature, and then refrigerate for 30 minutes to 1 hour. To fasten the setting process, freeze the burfi for 10 minutes. Once the chocolate burfi has set, remove the burfi from the pan and place it on a wooden chopping board. Then trim the edges, and cut the burfi into even squares, or in rectangles. You can cut them in any desired shapes. Cut into 16 pieces.
- Keep the chocolate burfi refrigerated. The burfi stays fresh for up to 8-10 days when stored in the refrigerator in and air-tight container.


Recipe Card
Chocolate Burfi [Recipe]
★★★★★
(Rating: 5 from 3 reviews)
| Prep time 🕐 | Cook time 🕐 | Total time 🕐 |
|---|---|---|
| Category ☶ | Cuisine ♨ | Servings ☺ |
| Desserts | Indian | 8 large 12 small |
| Nutrition Info ⊛ | Serving size ⊚ | |
| 139 calories | 1 |
INGREDIENTS
For Chocolate Burfi
- 1/3 cup ghee
- 1 cup + 3 tablespoons milk
- 1.5 tablespoons cocoa powder
- 3/4 cup granulated or crystal sugar
- 2 1/2 cups powdered milk
- A few drops rose/kewra water
- 1/4 teaspoon cardamom powder
- 1 teaspoon ghee for greasing the pan
INSTRUCTIONS:
For making Chocolate Burfi
- Heat a pan over medium heat. Add ghee and 1 cup milk to the pan. Stir well and cook for about 1 minute. Slowly add 2 1/2 cups mik powder to the pan, keep stirring it thoroughly until everything is combined.
- Once everything is mixed, add sugar and stir again to completely dissolve the sugar. Turn the heat to medium-low and cook the mixture while stirring continuously (to avoid burning) until it comes to a thick and lump-free, batter-like consistency. It would take about 7-8 minutes to get a smooth dough.
- At this point, the milk powder mixture would thicken up and start to pull away from the sides of the pan. To check doneness, pinch out a tiny portion of cooked mixture (be careful the mixture will be hot) and roll it on a greased plate, if it forms a smooth and non-sticky ball then it is ready to set. If not, then keep cooking it further until it reaches the desired consistency.
- Once the mixture is ready, pour half the milk powder mixture into a medium bowl. Add kewra/rose water, and cardamom powder the bowl and mix until everything well combined. You can also add a few drops of vanilla extract here.
- To the pan, add the cocoa powder, and give it a slight mix. Also sdd 2 tablespoons of milk. Mix and cook again until the cocoa powder is thoroughly incorporated and the milk powder mixture achieves the desired consistency. Set it aside.
- Lightly grease a pan or a burfi tray with ghee, and then line it with a parchment paper. Pour the white milk powder mixture in the prepared pan and spread in an even layer. Use a greased spatula to flatten the mixture. Instead of pan, you can also do this on greased plate.
- Now, pour the chocolate burfi mixture on top of the milk burfi mixture. Using a greased spatula, spread it evenly to create two separate layers. Garnish the burfi with edible sliver/golden leaves, and chopped pistachios. Press the pistachios down into the burfi.
- Let the burfi mixture cool at room temperature, and then refrigerate for 30 minutes to 1 hour. To fasten the setting process, freeze the burfi for 10 minutes. Once the chocolate burfi has set, remove the burfi from the pan and place it on a wooden chopping board. Then trim the edges, and cut the burfi into even squares, or in rectangles. You can cut them in any desired shapes. Cut into 16 pieces.
- Keep the chocolate burfi refrigerated. The burfi stays fresh for up to 8-10 days when stored in the refrigerator in and air-tight container.
Watch Full Recipe Video:
NOTES:
- Keep stirring continuously to prevent the burfi mixture from burning and sticking to the bottom of the pan.
- I have garnished burfi edible silver leaves (vark). If you don't want to use silver leaves, you can skip the decoration part.
- Make sure not to undercook or overcook the burfi base. Check the doneness of the mixture before removing it from the heat. This way you would always remove the mixture at the right time and will get the perfect melt-in-mouth texture of burfi.
NUTRITION (Per Serving):
Calories: 139kcal | Fat: 6.5g | Carbohydrates: 19.5g | Protein: 1.4g | Fiber: 1g | Sugar: 7.9g | Sodium: 105.2mg
If this recipe helped you, then please spread the word by sharing and subscribing to us on YouTube to get more such Recipe Videos.
Your feedback is so helpful for me and other My Ginger Garlic Kitchen readers. So, for Facebook and Instagram, please mention @MyGingerGarlicKitchen or #mygingergarlickitchen. I would love to see your photos. :)
Author: Anupama
Recipe Source Link: https://www.mygingergarlickitchen.com/chocolate-burfi/

Questions or comments about this recipe:
Ask on