This easiest double-layer coconut burfi is ready in under 25 minutes. An easy to make, quick and delightful dessert to celebrate any occasion! Simple and toothsome Indian fudge recipe prepared mainly with grated coconut, sugar, and milk.
Salting draws out moisture and neutralizes bitterness. This leads to smoother, sweeter dishes.
Don’t want to miss such incredible time-saving tips from My Ginger Garlic Kitchen, set us as a preferred source in Google Search by clicking the button below.

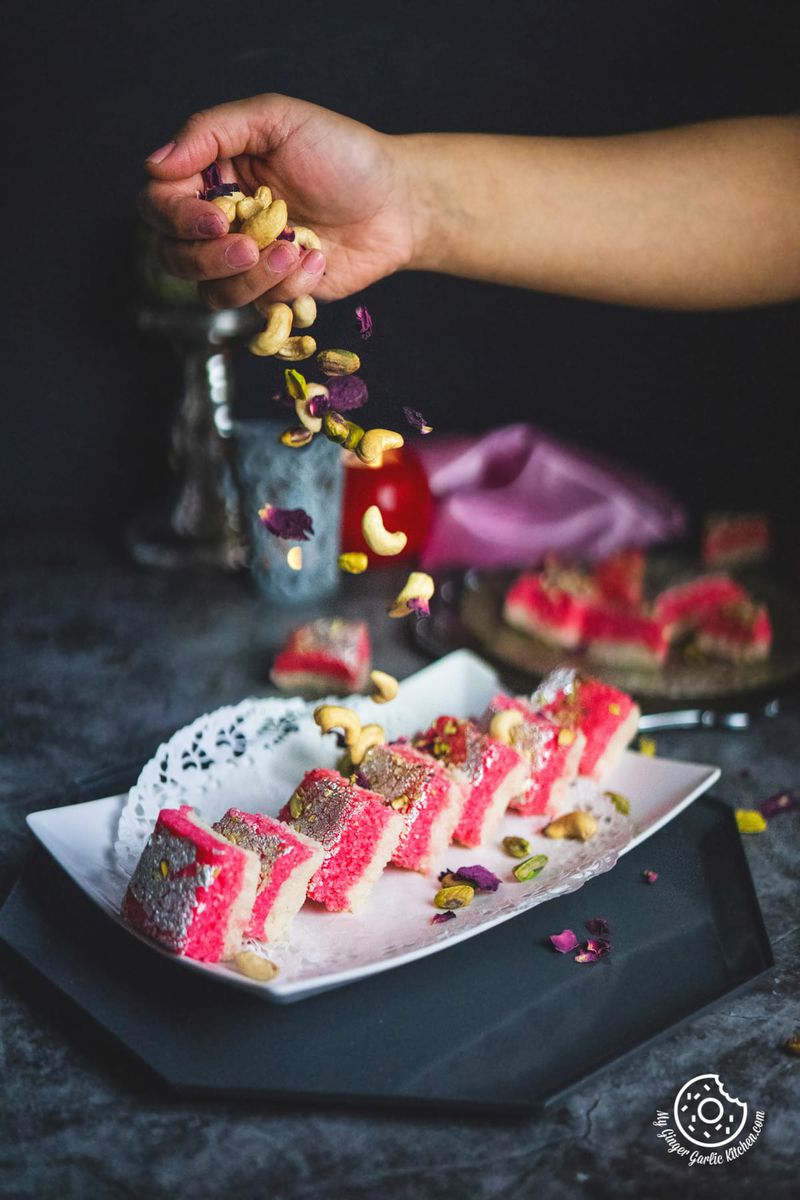
Table of contents
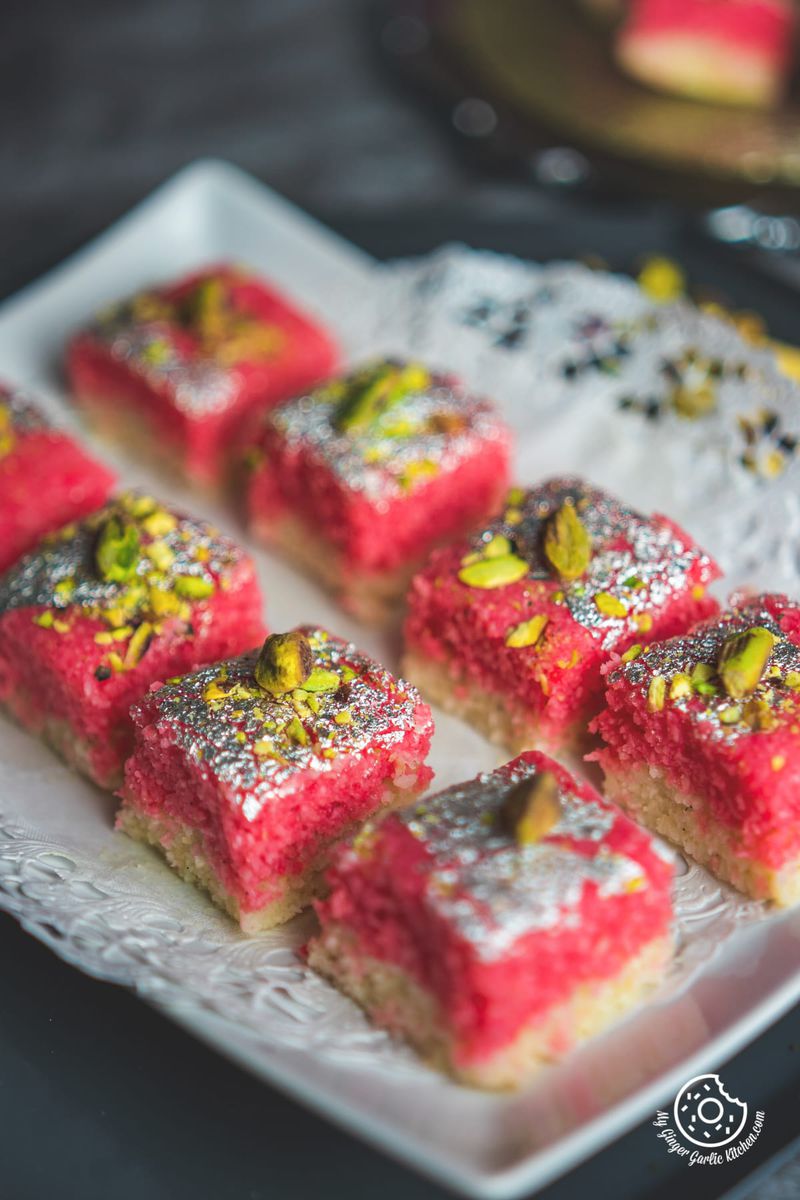
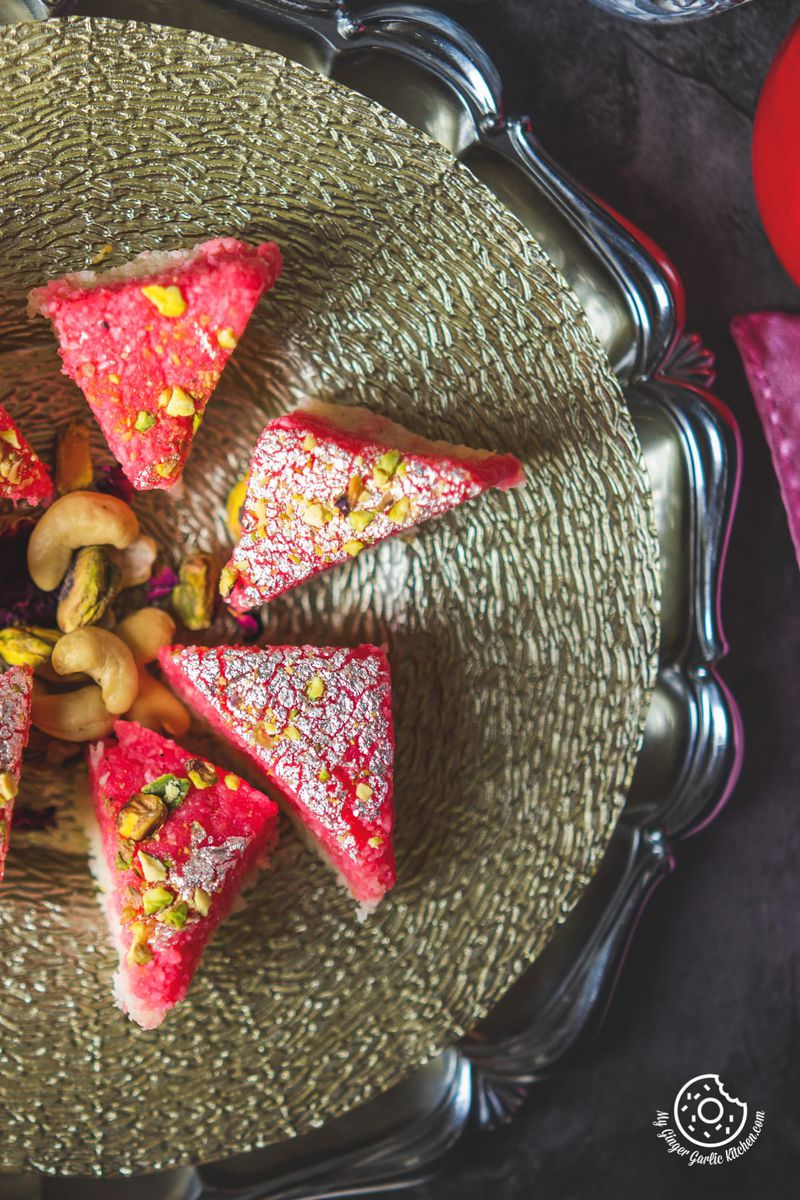
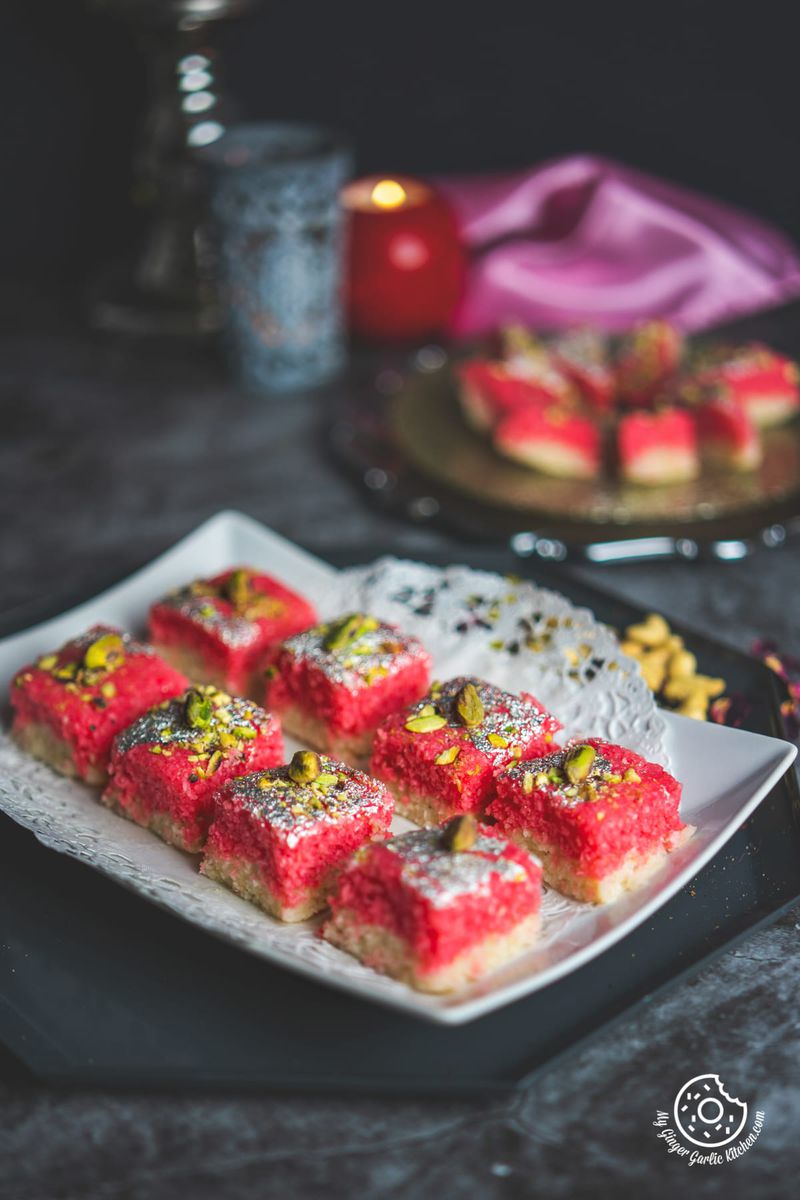
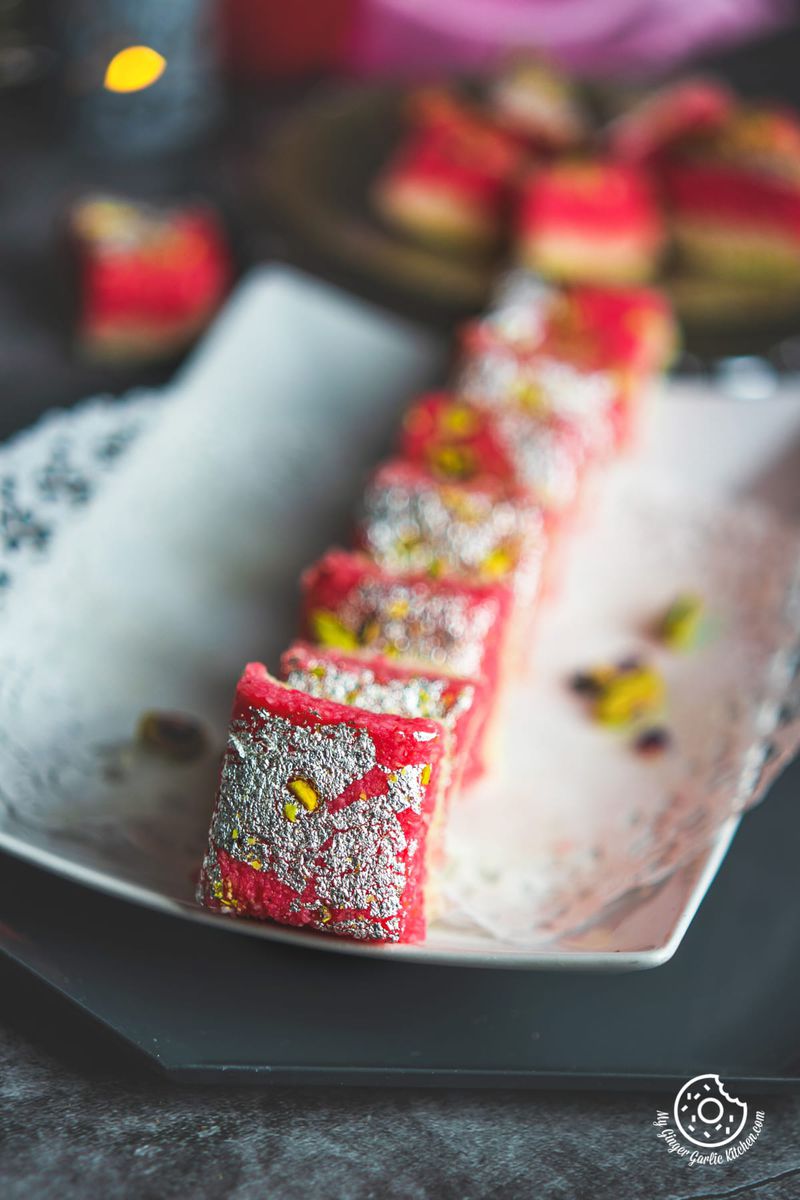
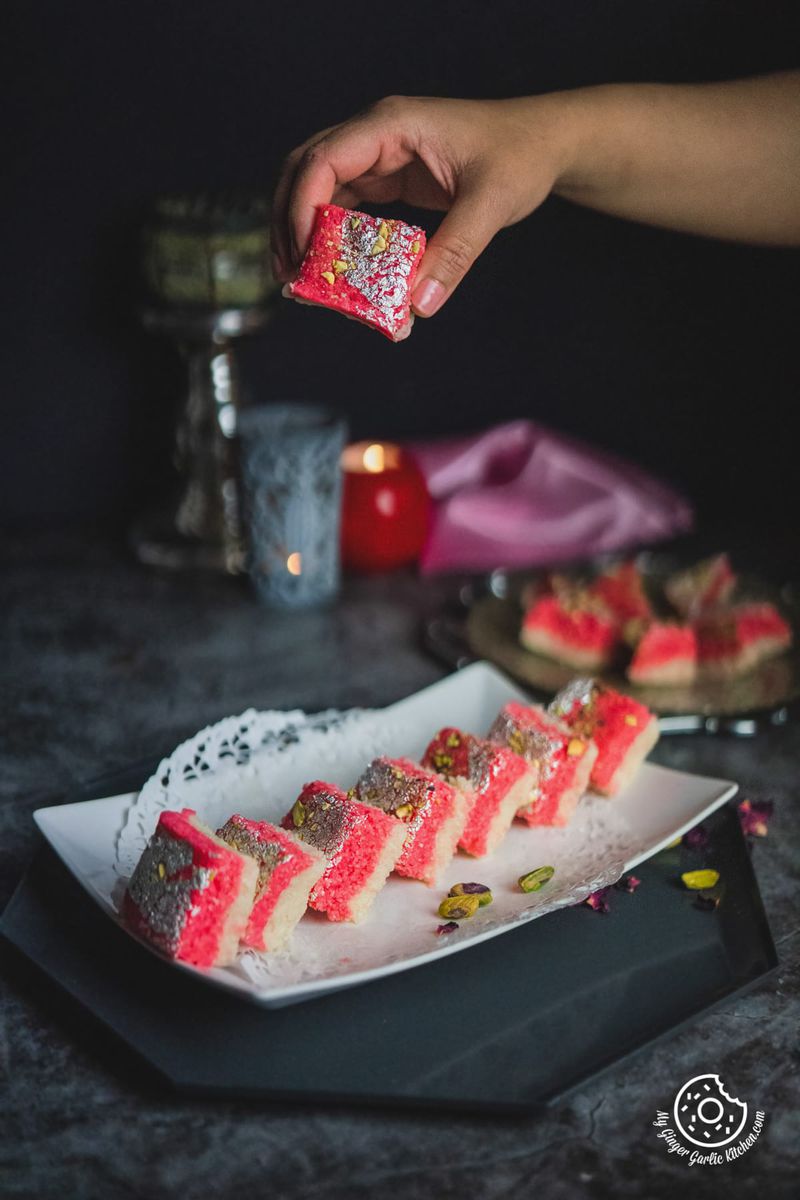
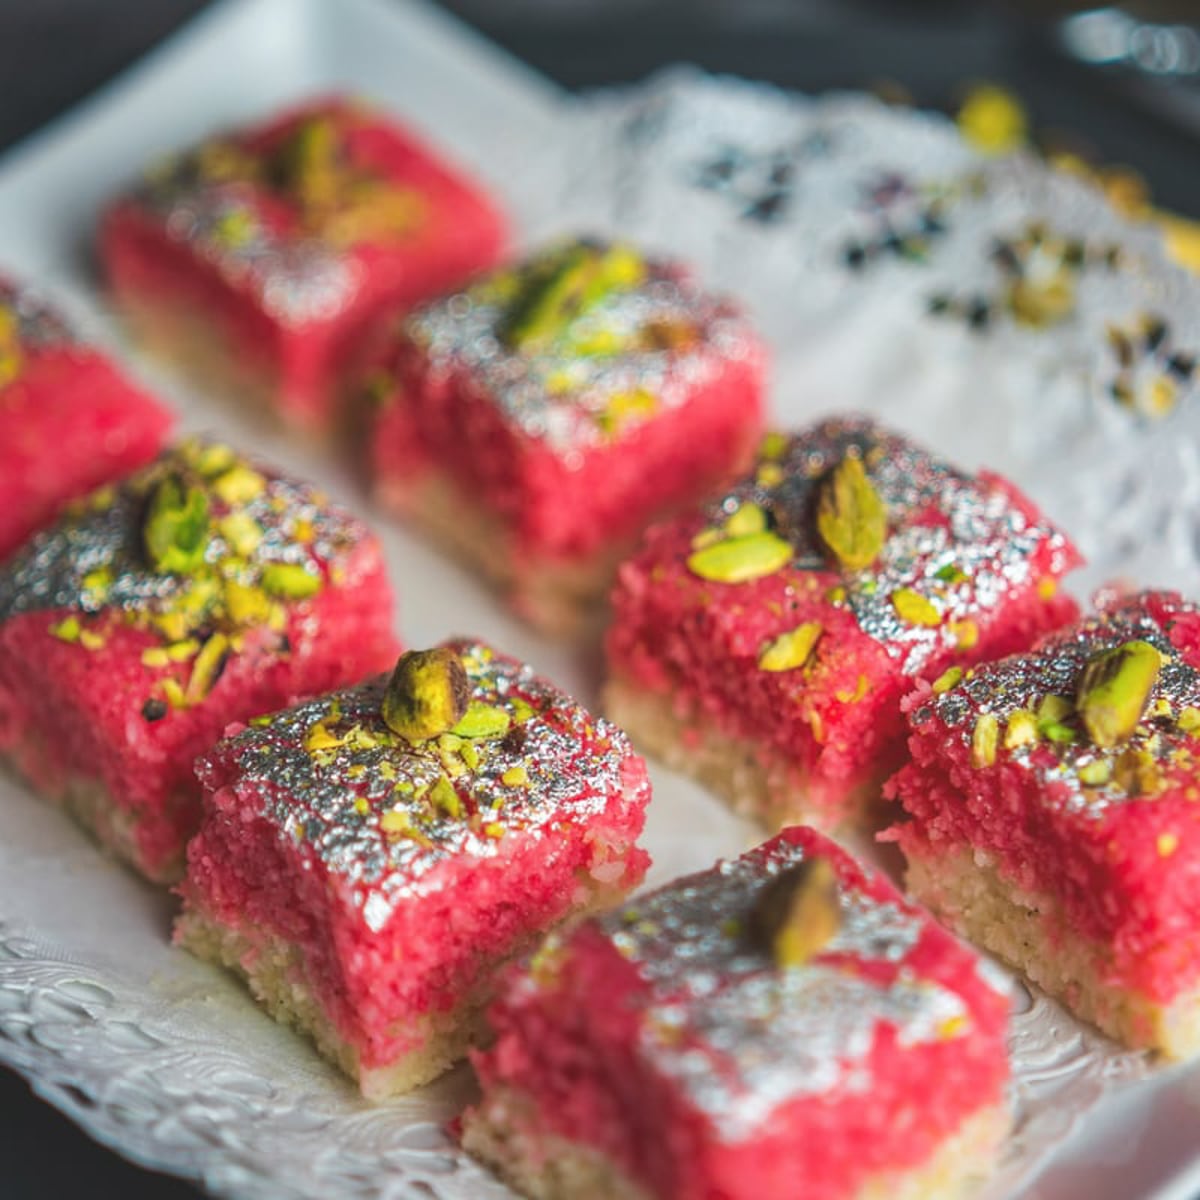
Layered Coconut Burfi — An Indian style classic coconut fudge infused with a touch of rose and cardamom, adorned with edible silver leaves and garnished with pistachios. This pretty layered coconut burfi is a perfect example of eye candy!
Gorgeous colors, flavors, textures, sweet and juicy tastes of this layered coconut burfi, are sure to please your eyes and spoil your taste glands.
This Layered Coconut Burfi would make a lovely treat for Diwali, Holi, or any other festival. They are also great for gifting.
Double layered Coconut Burfi or Nariyal Burfi is a traditional Indian sweet (mithai) made with coconut, milk, sugar, and milk powder. No condensed milk, no ghee or butter, not so many additives, and still tastes so great.
This page has step-by-step photo instructions and a video recipe, tips and tricks to help you make your best Layered Coconut Burfi.
Love Indian dessert? Then might also like these sweets: almond flour cookies, Badam Burfi, 3 Ingredient Almond Flour Cookies, and Coconut Burfi Roll, Chocolate Burfi, and thandai burfi, badam ladoo.
What is Coconut Burfi?
Coconut Burfi or Barfi is an Indian Fudge made with coconut, milk, sugar. The traditional version of the coconut burfi recipe involves grating coconut, making sugar syrup, and preparing mawa (khoya).
Coconut burfi might be one of the easiest and tastiest Indian sweet recipes made with minimal ingredients that are easily available in any home. The ease, delicate taste, simplicity, and humble ingredients of this coconut burfi makes it a staple at every Indian household. Coconut Burfi made with mawa tastes a lot like Kopra Pak.
More Delicious coconut recipes you may love to check out:
What is Layered Coconut Burfi?
Double Layered Coconut Burfi is a variant of coconut burfi where coconut burfi is set into two layers. This recipe I am sharing today is an Instant version of coconut burfi. You don’t need any mawa, condensed milk, or ghee for making this.
This desiccated coconut burfi is an Instant version of coconut burfi, but it tastes like the traditional one. Here are the secrets to make it taste like the store-bought coconut burfi.
-
In this recipe, I have cooked desiccated coconut in sweetened and slightly thickened milk. When you add the desiccated coconut to boiling sweetened milk, it acts as condensed milk here and helps in giving it a touch of moist fresh coconut.
-
I have also added some cream and milk powder to this, which gives this burfi richness and milky taste similar to coconut burfi made with mawa/khoya. It also helps in holding the shape of coconut burfi.
You can simply make this easy coconut fudge in a single layer, without any color. It would still taste great. I wanted to go a bit fancy, so I added a pink color to the top layer of burfi.
This is just because I grew up eating coconut burfi always in two layers and the top layer was always pink colored. This is how coconut burfi is sold in sweet shops in India.
What are the features of this Layered Coconut Burfi?
This Layered Coconut Burfi
✓ has only 7 simple ingredients
✓ tastes delicious and so easy to make
✓ has dominant coconut and delicate rose cardamom flavorings
✓ is ready under 25 minutes
✓ looks so pretty and makes a lovely holiday gift
✓ has a lightness that won’t make you feel heavy
✓ makes a wonderful after meal dessert
What are the ingredients needed for layered coconut burfi?
This easy to make layered coconut burfi is made with 7 very handy ingredients.
These ingredients are:
-
Desiccated coconut
-
Milk
-
Sugar
-
Cream
-
Cardamom powder
-
Rose essence diluted with pink food color
-
Milk powder
How to make Layered Dry Coconut Burfi?
To make layered dry coconut burfi, all you need to do is some stirring and cooking coconut with milk and sugars.
This is how you can make layered coconut burfi in 7 easy and simple steps:
Step 1: Dry roast coconut.
Step 2: Boil milk with sugar. Add coconut to the sweetened milk and cook.
Step 3: Add milk powder, and cream and cook.
Step 4: Add cardamom and cook more. Divide the mixture into 2 portions.
Step 5: Place half of the mixture in a greased tray lined with parchment paper. Spread it evenly, and press to set.
Step 6: Add rose essence with food color to the second portion and mix well. Pour it over the white coconut cardamom layer. Spread to flatten with a spatula until it completely covers the layer below.
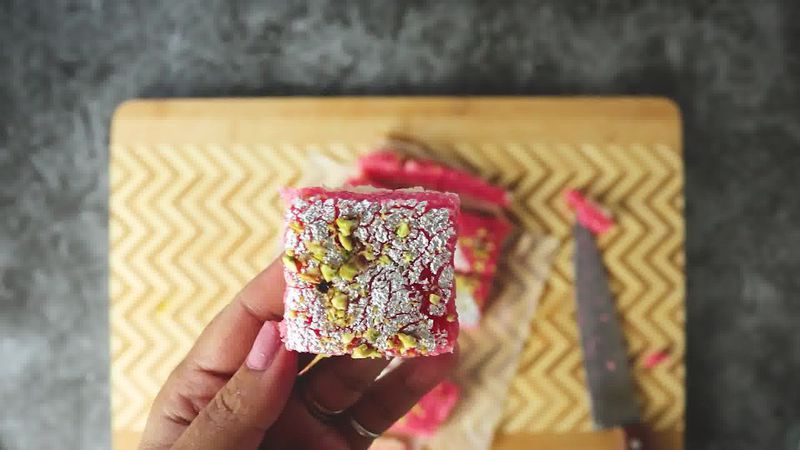
Step 7: Garnish with edible silver/golden leaves and pistachios. (optional). Let it cool. Slice and enjoy it!
You can get the detailed recipe with step-by-step images and recipe video tutorial in the recipe box on this page.
How to store Layered Coconut Burfi?
This layered coconut burfi stays fresh for up to 3 days at room temperature when stored in a dry airtight container. You can also refrigerate it for up to 7-8 days. Make sure to keep it covered all the time.
How to make Layered Coconut Burfi vegan?
To make coconut burfi vegan, replace the milk with coconut milk and cream with coconut cream. You can omit the milk powder.
What are the tips, tricks, and variations to make layered coconut burfi?
-
I have used desiccated coconut in this recipe, but if you have fresh coconut then feel free to use that.
-
If you don’t want to use the cream in this burfi, then replace it with the same amount of milk.
-
Typical coconut burfi has (cow/buffalo) milk, so I used regular milk and cream in this recipe. But if you want to make it vegan, then use coconut milk and coconut cream. The addition of coconut milk and coconut cream intensifies the coconut flavors in this sweet.
-
If you want a nuttier crunch, then you can also add some chopped almonds, cashews, and pistachios to this coconut burfi. I love coconut burfi without any addons, so I generally don’t add them to this recipe.
-
I have used rose essence for the pink layer of this coconut burfi. But you can also use rose water or rose syrup.
-
If you don’t like rose flavorings, then you can either omit the rose layer or replace it with a saffron layer. To make the saffron layer, add saffron soaked milk (8-10 saffron strands soaked in 2 tablespoons of hot milk) to the top layer and pour it over the white coconut layer.
-
I have used store-bought cream here, but you can also use fresh milk cream (malai).
Layered Coconut Burfi (Step-by-step photo instructions)
How to Make Layered Coconut Burfi:
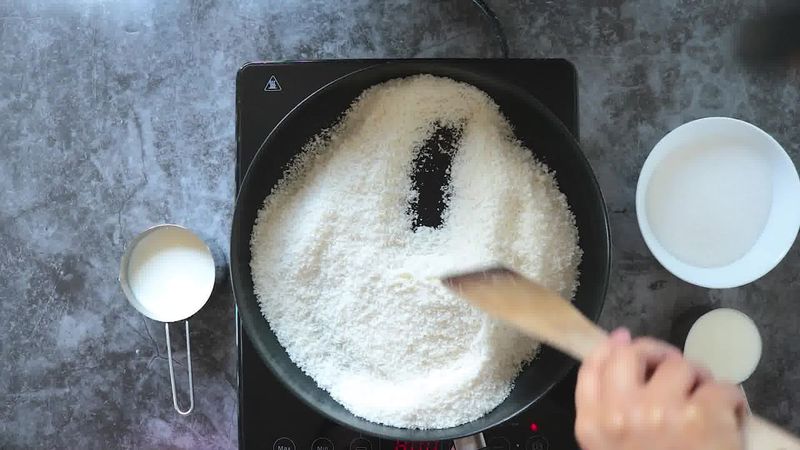
- Place a large heavy-bottomed pan over low heat. Add coconut and dry roast over medium heat for 2 minutes or until fragrant. Do not change the color of coconut, it should look white after roasting.
- Transfer the roasted coconut to a plate.
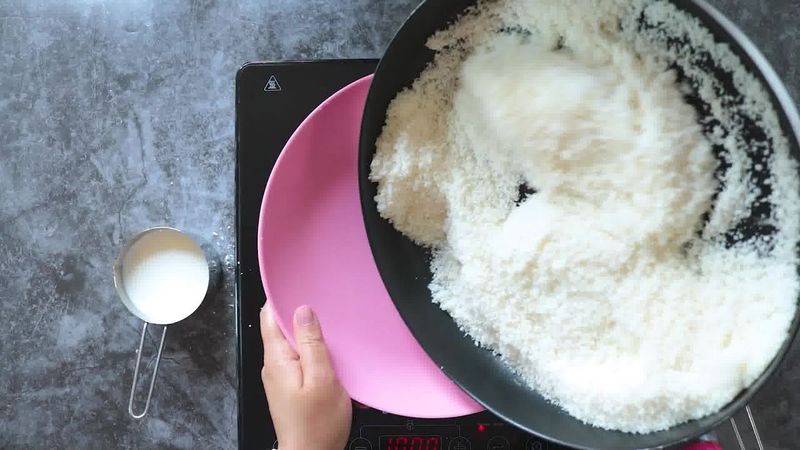
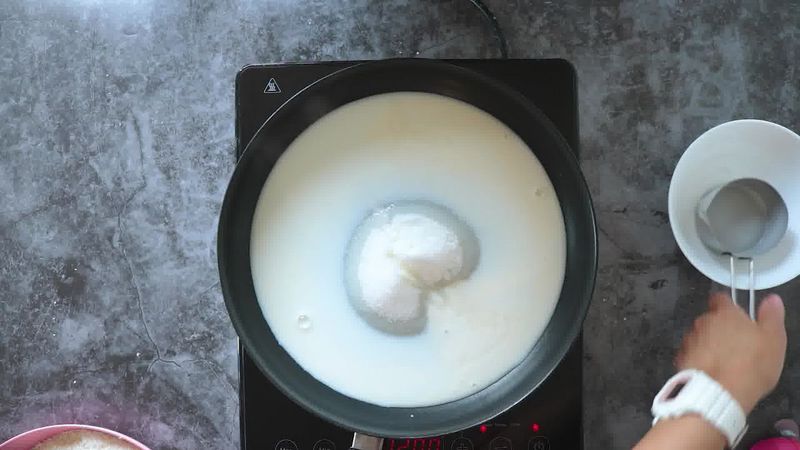
- Turn the heat to medium, and in the same pan, add milk, cream, and sugar.
- Stir well, and let the sugar melt.
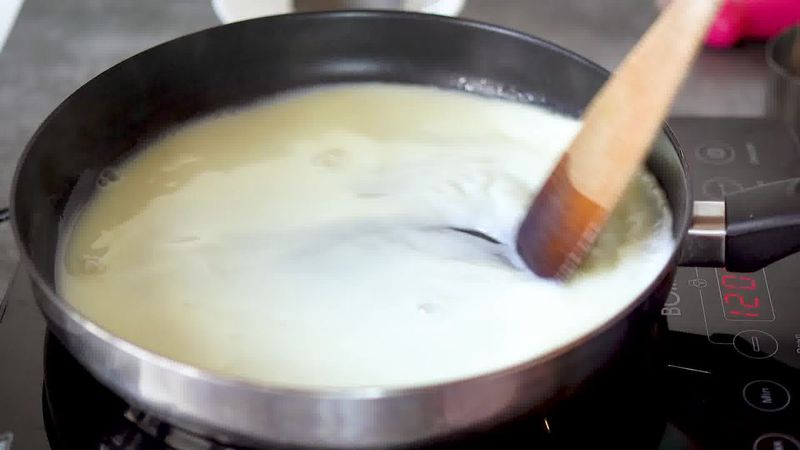
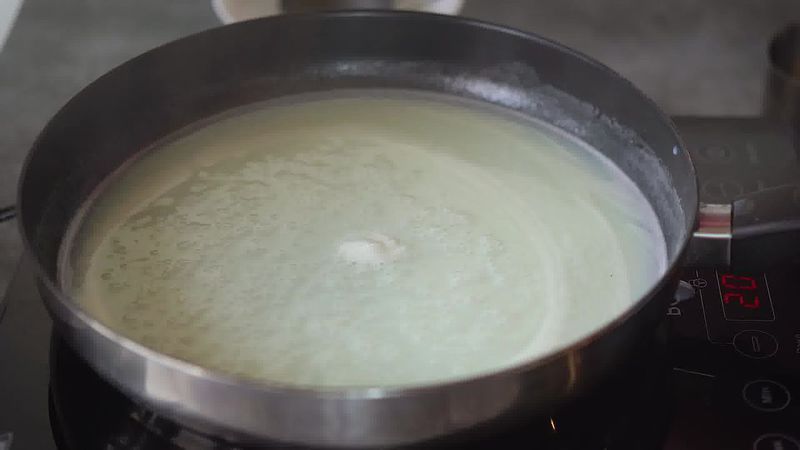
- Boil the milk until it is thick and reduced to 1/2 of its volume.
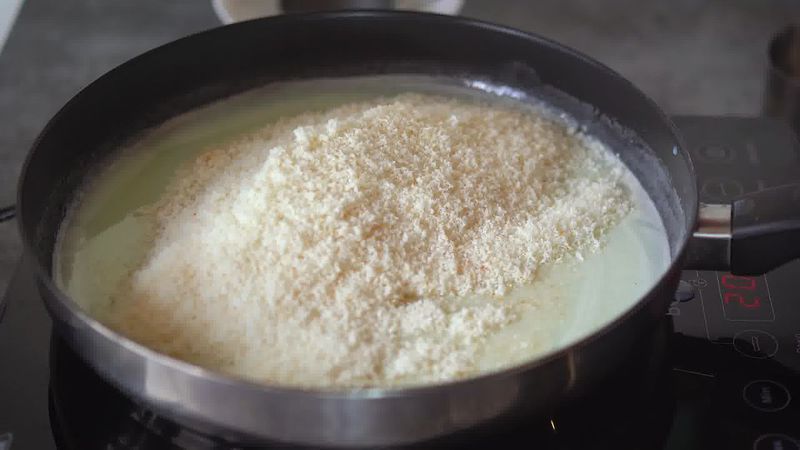
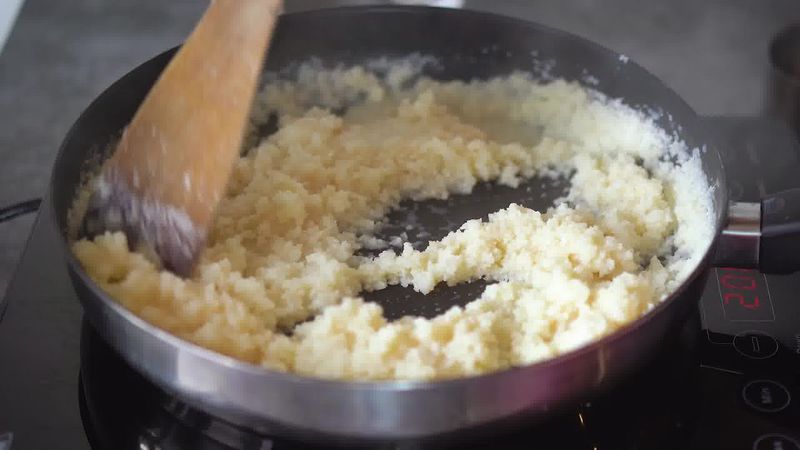
- Add roasted desiccated coconut and stir well.
- Cook for 2-3 minutes.
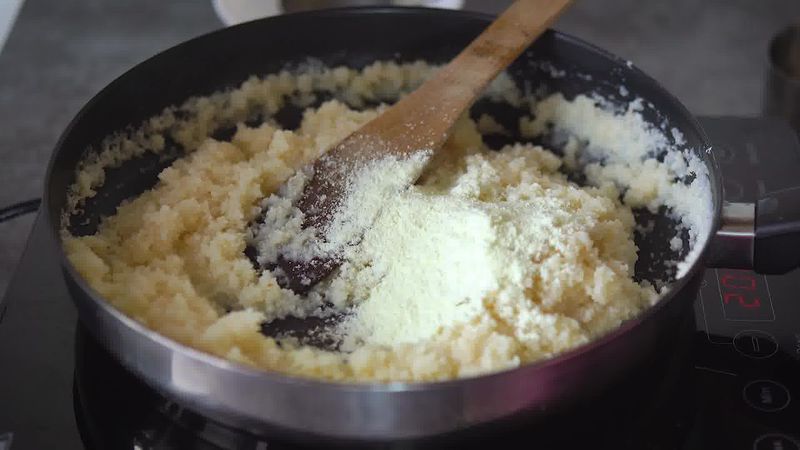
- Now add powdered milk and stir well.
- Keep stirring and cooking continuously for 2 minutes or until the mixture gets dry and lumpy. It should have semi-solid consistency.
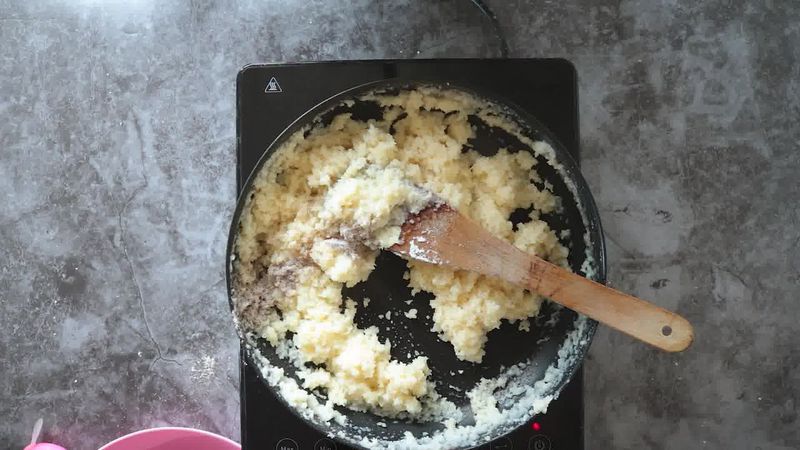
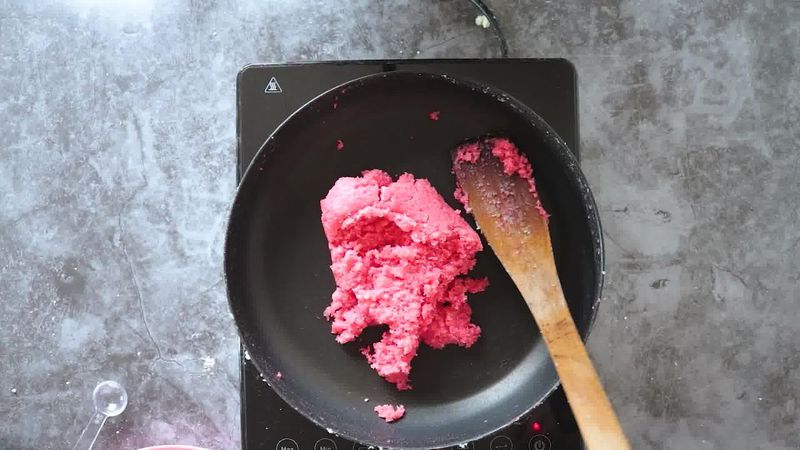
- Add cardamom powder and mix well.
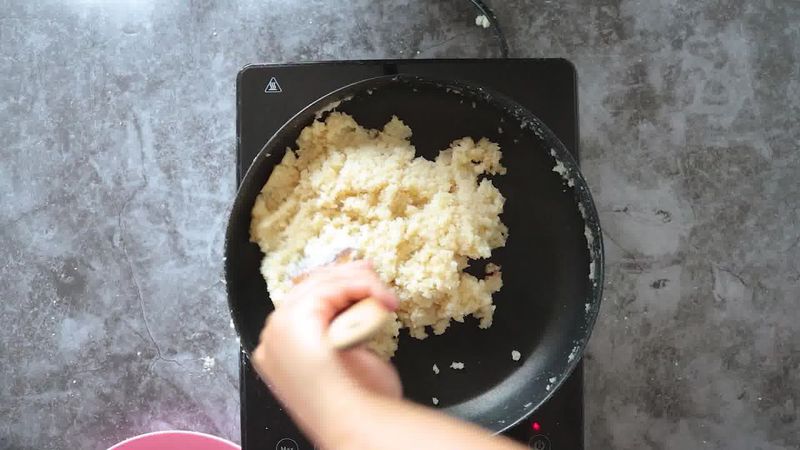
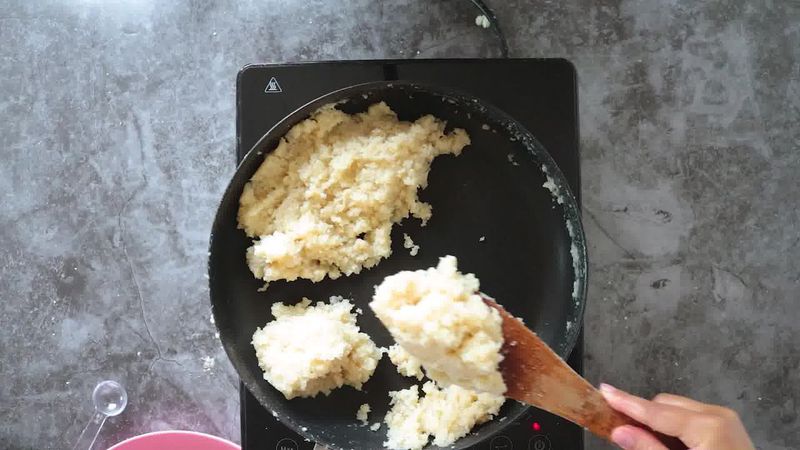
- Cook again, stirring continuously, for 3-4 minutes until the mixture becomes thick and it starts to leave sides of the pan.
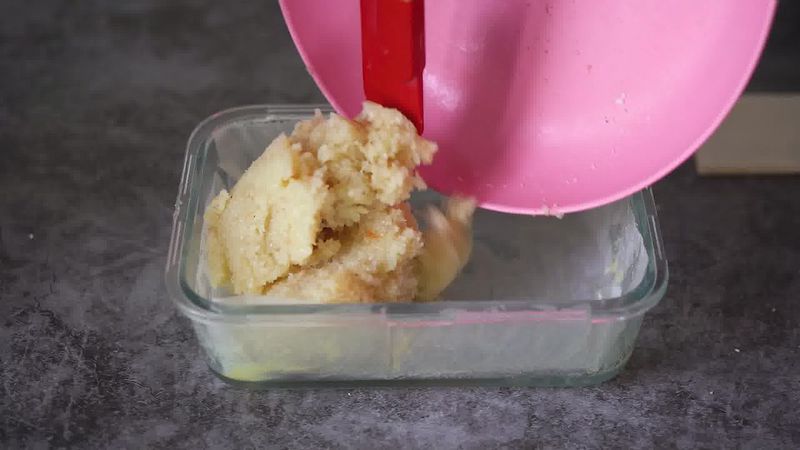
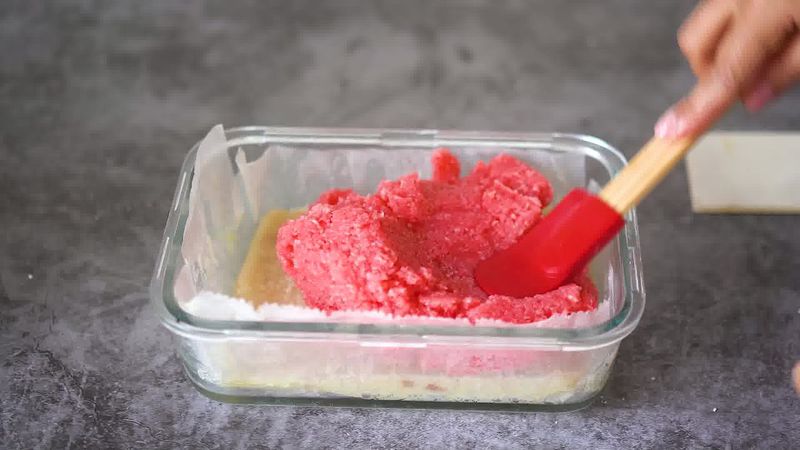
- Divide the mixture into 2 equal portions. Remove one portion from the pan.
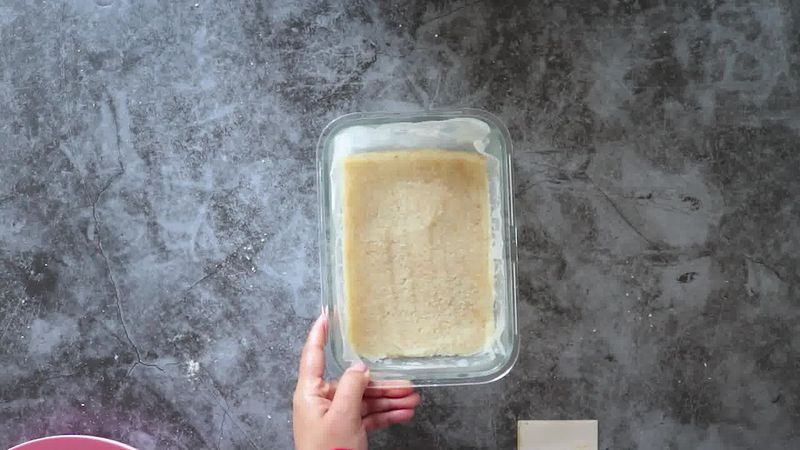
- Grease and line a pan/container with parchment paper. Transfer this white coconut cardamom mixture into the prepared pan/container. Spread it in an even single layer with the help of a spatula.
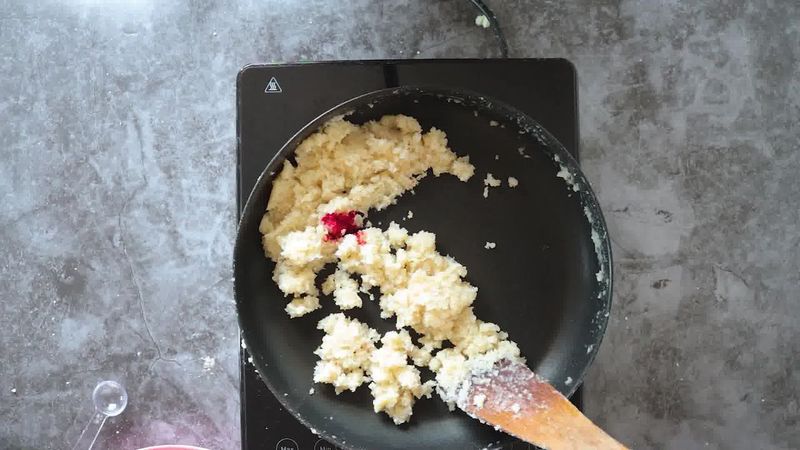
- Add a 1/4 teaspoon rose essence diluted with pink color to the other half of the coconut mixture.
- Mix well and cook for 1 minute.
- Transfer this pink colored coconut mixture on top of the white layer.
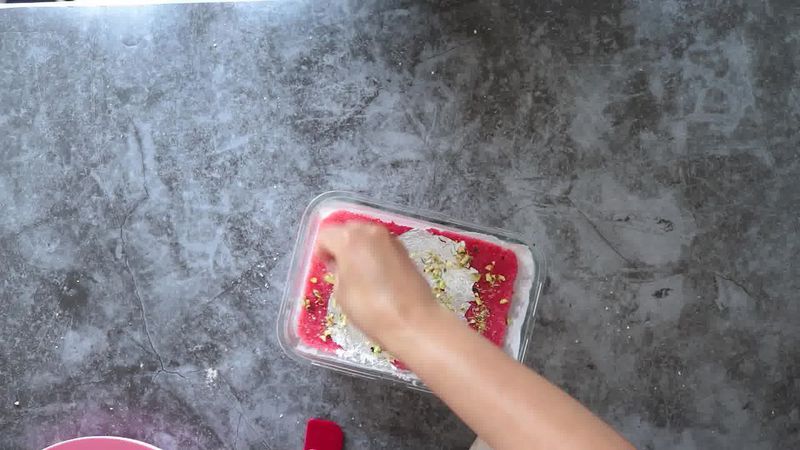
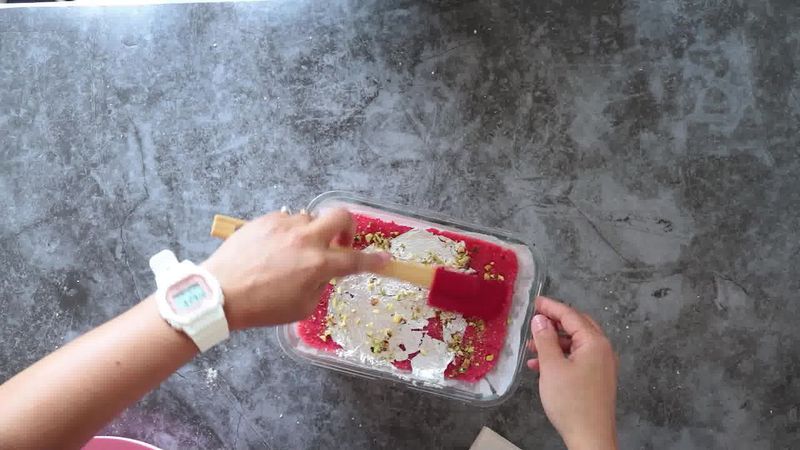
- Spread it in an even single layer with the help of a spatula until it completely covers the white coconut layer below. Smoothen the top.
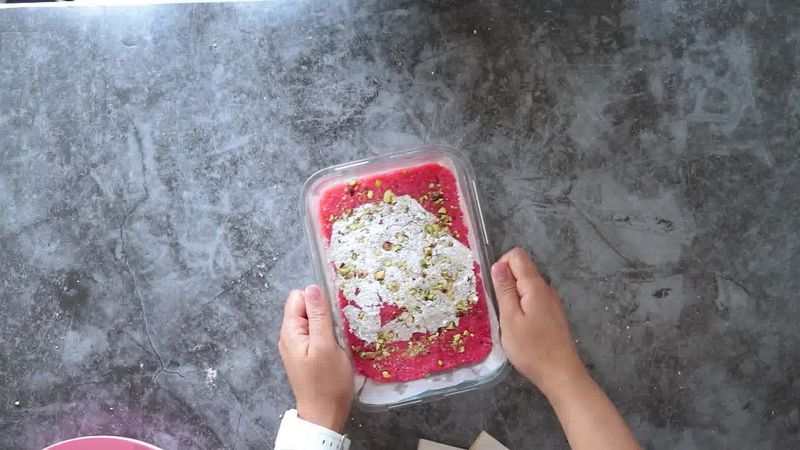
- Garnish with edible silver leaves and chopped pistachios. Gently press down with a spatula so that nuts stick to the burfi.
- Let it set for about two hours at room temperature, or 1 hour in the refrigerator or 15 minutes in the freezer.
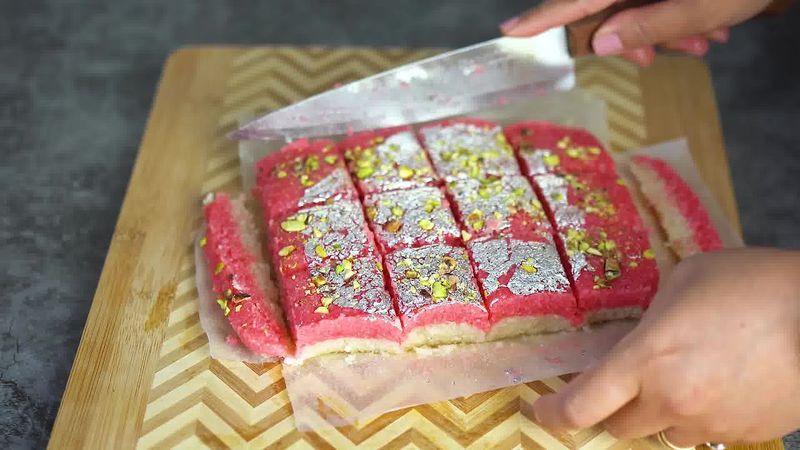
- Remove the burfi from the pan. Cut into desired shapes.
- Serve layered coconut burfi or store in a refrigerator for up to 7-8 days.
Recipe Card
Layered Coconut Burfi [Recipe]
★★★★★
(Rating: 5 from 26 reviews)
| Prep time 🕐 | Cook time 🕐 | Total time 🕐 |
|---|---|---|
| Category ☶ | Cuisine ♨ | Servings ☺ |
| Desserts | Indian | 12 Burfi |
| Nutrition Info ⊛ | Serving size ⊚ | |
| 76 calories | 1 Burfi |
INGREDIENTS
For Layered Coconut Burfi:
- 3 cups desiccated coconut (You can also use freshly grated coconut)
- 3/4 cup milk
- 3/4 cup cream
- 3/4 cup sugar
- 1/2 teaspoon cardamom powder
- 2 tablespoons of milk powder
- Silver varq (edible silver leaves) & pistachio as required
- Rose essence & pink color (I diluted a few drops of pink color with 1/4 teaspoon of rose essence)
INSTRUCTIONS:
How to Make Layered Coconut Burfi:
- Place a large heavy-bottomed pan over low heat. Add coconut and dry roast over medium heat for 2 minutes or until fragrant. Do not change the color of coconut, it should look white after roasting.
- Transfer the roasted coconut to a plate.
- Turn the heat to medium, and in the same pan, add milk, cream, and sugar.
- Stir well, and let the sugar melt.
- Boil the milk until it is thick and reduced to 1/2 of its volume.
- Add roasted desiccated coconut and stir well.
- Cook for 2-3 minutes.
- Now add powdered milk and stir well.
- Keep stirring and cooking continuously for 2 minutes or until the mixture gets dry and lumpy. It should have semi-solid consistency.
- Add cardamom powder and mix well.
- Cook again, stirring continuously, for 3-4 minutes until the mixture becomes thick and it starts to leave sides of the pan.
- Divide the mixture into 2 equal portions. Remove one portion from the pan.
- Grease and line a pan/container with parchment paper. Transfer this white coconut cardamom mixture into the prepared pan/container. Spread it in an even single layer with the help of a spatula.
- Add a 1/4 teaspoon rose essence diluted with pink color to the other half of the coconut mixture.
- Mix well and cook for 1 minute.
- Transfer this pink colored coconut mixture on top of the white layer.
- Spread it in an even single layer with the help of a spatula until it completely covers the white coconut layer below. Smoothen the top.
- Garnish with edible silver leaves and chopped pistachios. Gently press down with a spatula so that nuts stick to the burfi.
- Let it set for about two hours at room temperature, or 1 hour in the refrigerator or 15 minutes in the freezer.
- Remove the burfi from the pan. Cut into desired shapes.
- Serve layered coconut burfi or store in a refrigerator for up to 7-8 days.
Watch Full Recipe Video:
NOTES:
- I have used desiccated coconut in this recipe, but if you have fresh coconut then feel free to use that.
- If you don't want to use the cream in this burfi, then replace it with the same amount of milk.
- Typical coconut burfi has (cow/buffalo) milk, so I used regular milk and cream in this recipe. But if you want to make it vegan, then use coconut milk and coconut cream. The addition of coconut milk and coconut cream intensifies the coconut flavors in this sweet.
- If you want a nuttier crunch, then you can also add some chopped almonds, cashews, and pistachios to this coconut burfi. I love coconut burfi without any addons, so I generally don't add them to this recipe.
- I have used rose essence for the pink layer of this coconut burfi. But you can also use rose water or rose syrup.
If this recipe helped you, then please spread the word by sharing and subscribing to us on YouTube to get more such Recipe Videos.
Your feedback is so helpful for me and other My Ginger Garlic Kitchen readers. So, for Facebook and Instagram, please mention @MyGingerGarlicKitchen or #mygingergarlickitchen. I would love to see your photos. :)
Author: Anupama
Recipe Source Link: https://www.mygingergarlickitchen.com/layered-coconut-burfi/
Questions or comments about this recipe:
Ask on