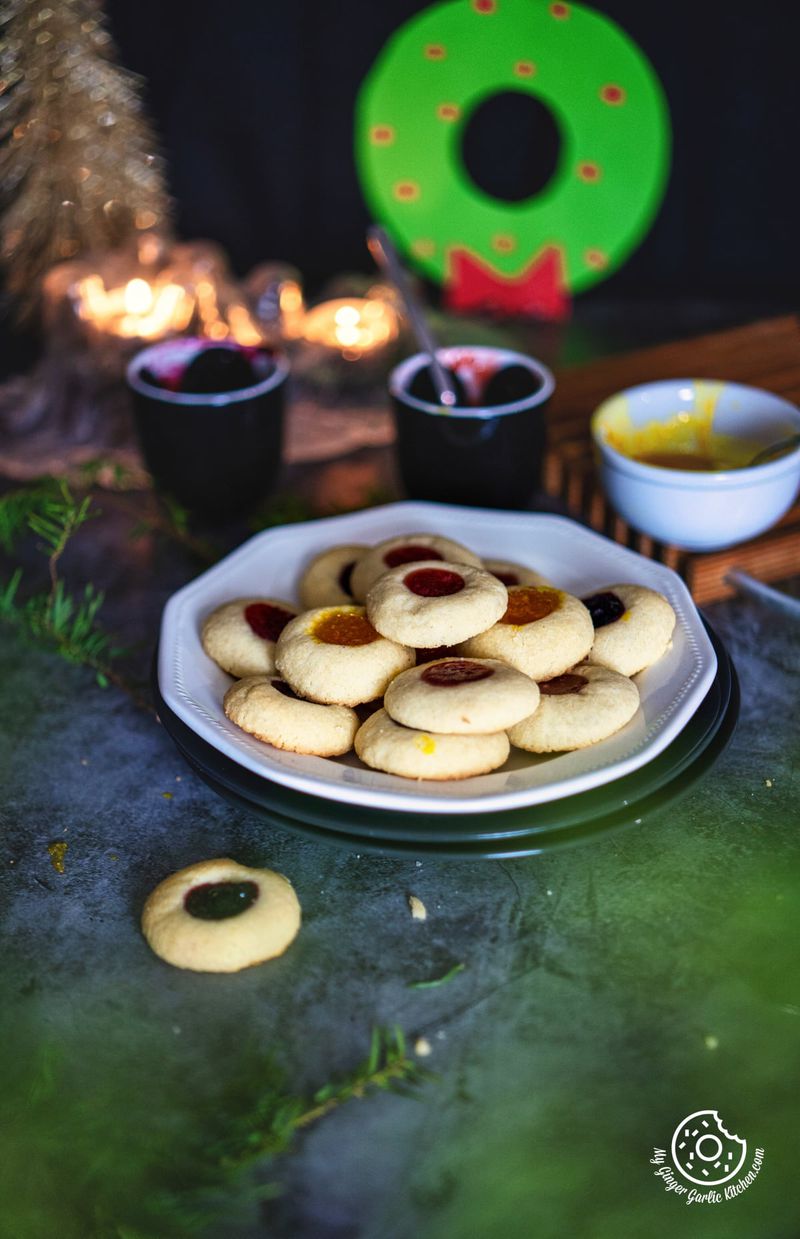
These eggless Thumbprint Cookies are rich, buttery, tender, with a crumbly and melt in the mouth texture. Made using a basic sugar cookie dough, these cookies are indented and filled with any of your favorite jam.
A bite into this cookie would burst your taste glands with amazing flavors and textures. It comes together in just a few minutes.
Rinsing removes surface starch that traps steam. This produces golden, crisp roasted potatoes.
Don’t want to miss such incredible time-saving tips from My Ginger Garlic Kitchen, set us as a preferred source in Google Search by clicking the button below.


Table of contents
Thumbprint cookies also known as shortbread thumbprint or shortbread jelly cookies are so easy-to-bake and require only 6 simple ingredients. Plus, they have endless filling options!
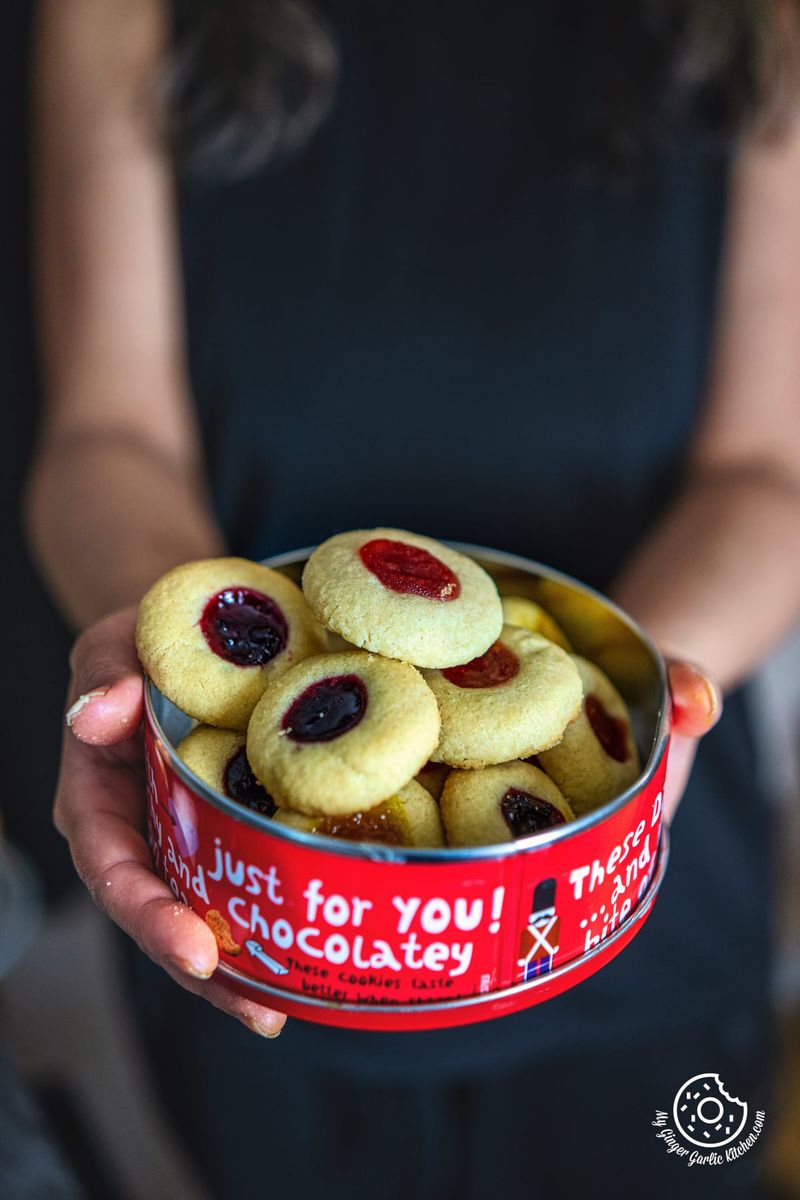
This holiday season, bake a batch of these thumbprint cookies for your friends and family, and I guarantee they’ll love them! Remember, that these cookies are so addictive, and would vanish in thin air in no time.
If you are looking for some easy Holiday goodies, then these homemade cookies are a perfect fit for your holiday platter or gift box.
About Thumbprint Cookies
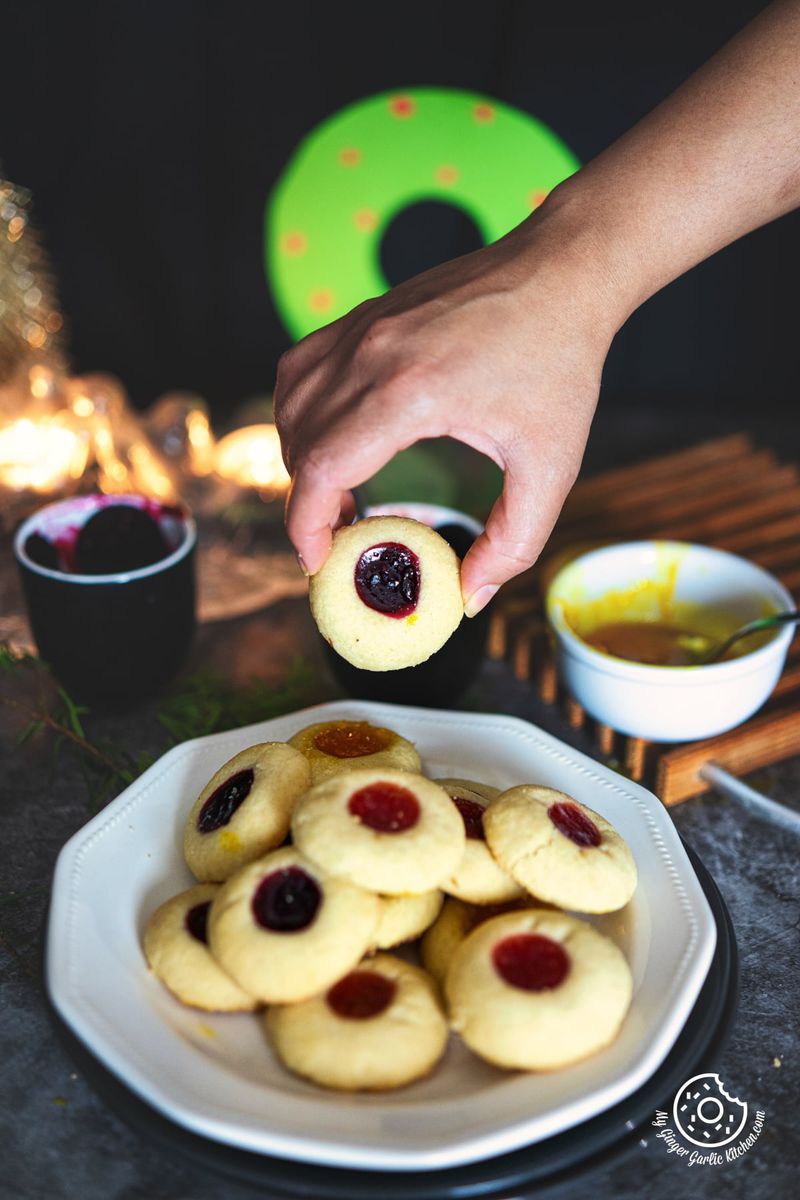
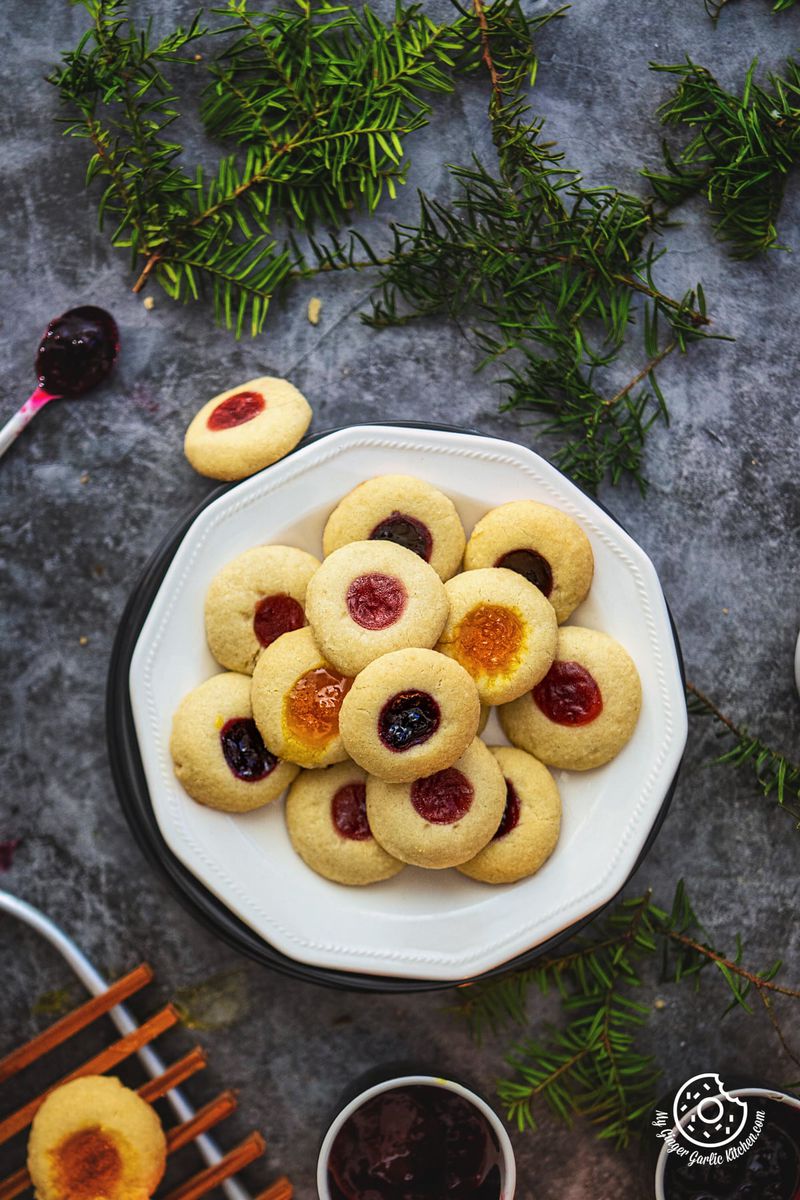
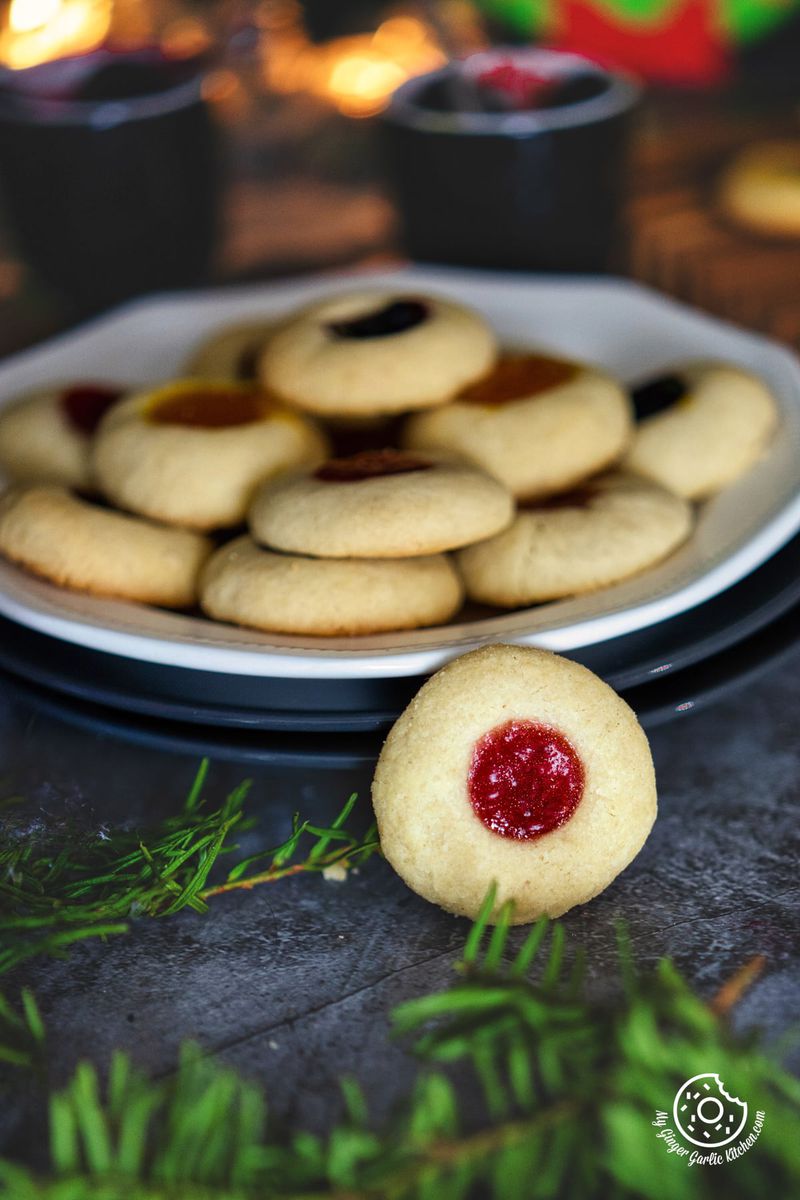
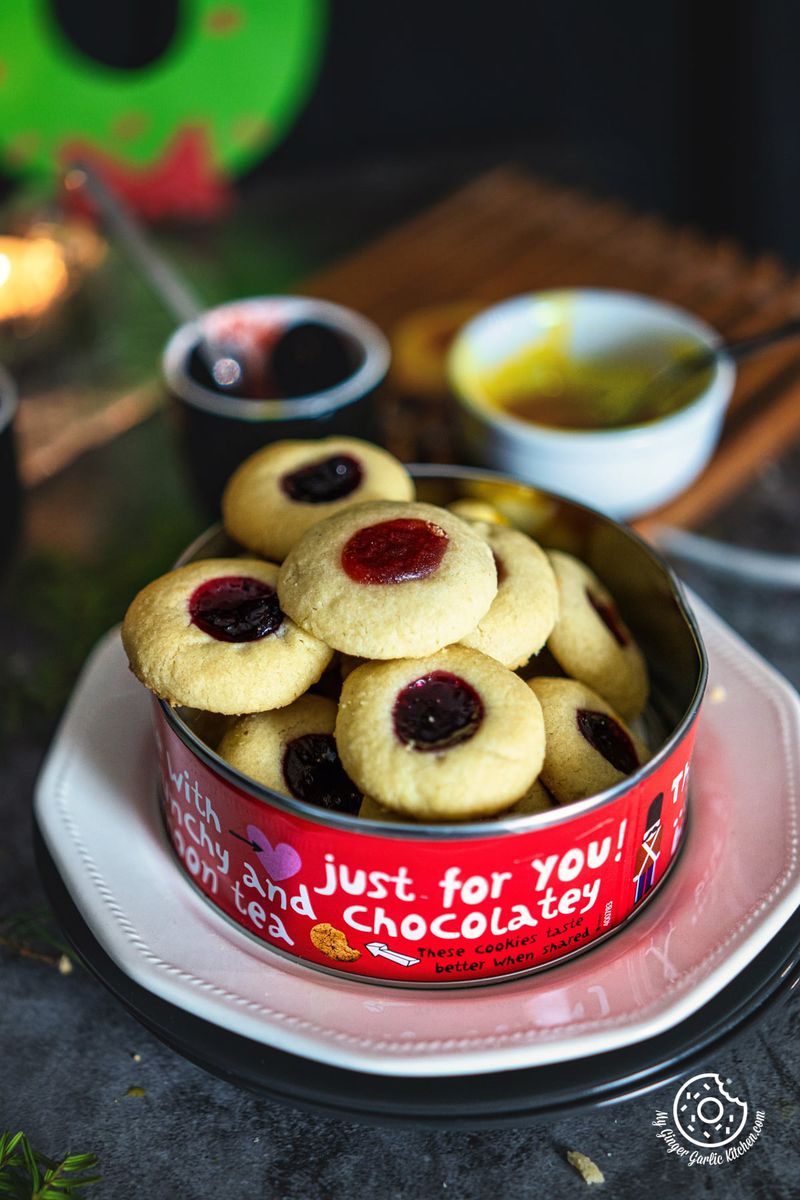
Eggless thumbprint cookies have a buttery, rich taste, a crumbly texture and jam filled centers. The beautiful colorful jam in the center contrasts with the white edges of these eggless thumbprint cookies.
Filled with an assortment of jams, not only do they look so pretty and festive, but are also super simple and easy-to-make, and taste just phenomenal.
Imagine the taste of a cookie which is crisp yet so tender that each bite your mouth gets filled with a crumbly cookie with fruity sweet jam. Incredible, isn’t it? These thumbprint cookies are all about these amazing textures, and tastes.
You can enjoy these delectable Eggless Thumbprint Cookies as an after-dinner sweet snack or have them with a glass of milk/cuppa coffee or tea!
These classic holiday favorite Thumbprint Cookies are also known as Rosenmunnar (buttery Swedish cookies filled with jam). You would only need about 20 mins of your effective time to prepare the cookie dough, shaping the cookies, and filling them with jam.
I filled these deliciously buttery shortbread cookies with strawberry, apricot and blueberry jam, but you can fill them up with any jam, or jellies of your choice.
Traditional thumbprint cookies recipes require eggs, but this one is made without eggs. This recipe is calling your name if you love eggless baking recipes. Even if you are not into eggless baking, you would still love baking them.
I love baking cookies and other goodies for holidays. Other than these thumbprint cookies, my other holiday favorites are Linzer Cookies, Cream Cheese Cookies, Lemon White Chocolate Cookies, Red Velvet Crinkle Cookies, 3-Ingredient Eggless Nutella Cookies, Eggless Tutti Frutti Cookies, Butter Cookies, etc.
Thumbprint Cookies
✔ are egg-free & nut-free
✔ are the simplest goodies to bake
✔ are easily customizable
✔ can be baked for your friends & family
✔ make a lovely addition to your holiday gift box
✔ made with only a few pantry ingredients
✔ can be filled with many delectable fillings
✔ are perfect for the holidays season
How to make Thumbprint Cookies
Making thumbprint cookies is very simple and easy. You make the dough, shape the cookies, chill them with filling and bake. That’s it! This is how it is done in 4 steps:
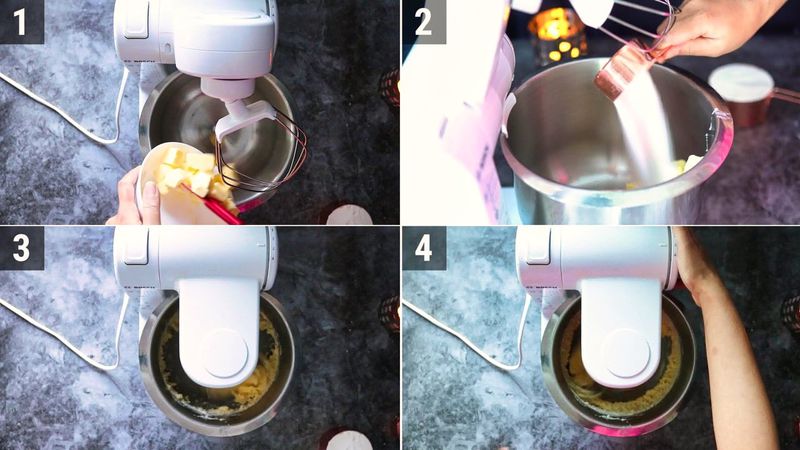
Step 1 – To make the eggless cookie dough, cream the butter and sugar until fluffy and pale. Add vanilla and beat for 1-2 minutes, or until well incorporated. Add flour, cornstarch, and salt. Continue beating at medium-low speed until well mixed.
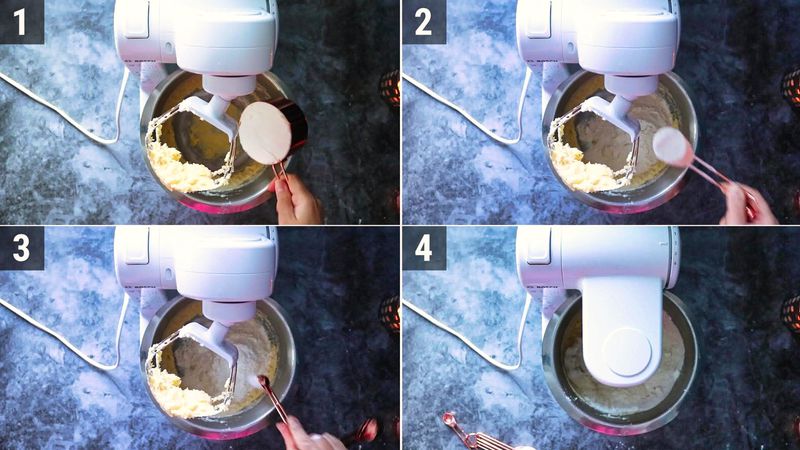
Step 2 – Once the cookie dough is mixed up, shape the cookie by rolling dough into 1-inch balls. Then using your thumb or the back of a tiny round spoon, make an indentation in the center of each cookie.
Arrange the cookies on a parchment paper lined tray and chill in the refrigerator for at least 2 hours. You can chill the cookies for up to 4 days.
Step 3 – Once chilled, fill each indentation to the brim with jam or jellies of your choice. Place the baking sheet in the oven and bake in a 180°C/356°F preheated oven for 12-14 minutes, or until edges are lightly browned.
Step 4 – Once baked, let the cookies rest on the cookie sheet for 5 minutes, then transfer onto a wire rack to cool completely before eating and storing them.
More holiday recipes you should try: Mulled Wine, Fruit Cake, Eggless Tutti Frutti Cake, Chocolate Palmiers, Chocolate Pomegranate Bites, Cream Cheese Stuffed Dates, and Carrot Cake Balls.
Ingredients
-
Butter – These cookies have a rich buttery taste. This recipe calls for ½ cup of unsalted butter. I prefer using unsalted butter for making these cookies, but you can also use salted butter. Just remember to skip additional salt to the dough if using salted butter.
-
Sugar – I used ⅓ cup of granulated sugar for making these cookies, you can use ½ cup of sugar if you prefer sweeter cookies. Also, you can swap granulated sugar with powdered/icing sugar, or caster sugar.
-
Vanilla Extract – You will need ½ teaspoon of vanilla extract for this cookie recipe. You can also use vanilla bean paste.
-
Salt – ¼ teaspoon of salt is added to the cookie dough. However, salt is only needed when you use unsalted butter.
-
All-purpose flour – You will need 1 cup of standard all purpose flour for making this thumbprint cookie recipe. Do not use bread flour, cake flour, or wheat flour for making these cookies.
-
Cornstarch – You will need 1 tablespoon of cornstarch for 1 cup flour. You can replace cornstarch with 1 tablespoon of potato starch.
-
Jam – You can use any of your favorite jam for making these cookies.
For exact quantities and measurements, check out the recipe card on this page.
Pro Tips for making Best Eggless Thumbprint Cookies
-
Baking Time – Do not overbake thumbprint cookies. You just need to bake until the edges are slightly brown and cookies are still white. Mine took about 13 minutes, but the baking time may vary depending on the different temperature of the ovens. So your cookies might take less or more time. After about 11 minutes, keep an eye on the oven to prevent the over-baking.
-
Storage – Cookies may be stored in an airtight container at room temperature or in the refrigerator for up to 4 days.
-
Filling – If the jam or preserve you are using is too firm, then simply add it to a microwave-safe bowl and heat for about 10 seconds. Alternatively, you can transfer jam to a heavy bottomed pan and heat it over low heat until it is no longer firm and easy to stir. Let it get cool before filling the cookies with jam.
-
Butter – Make sure that the butter you are using is at room temperature but not mushy. You can leave it at room temperature for about 40-50 minutes.
-
Sugar coating – To make them look more festive and sweeter you can also roll the balls in granulated white sugar before making the indentation.
-
Cornstarch – Adding cornstarch to these cookies makes them firm. But if you don’t have cornstarch, then you can swap it with the same amount of all purpose flour.
-
Prevent spreading – Chilling cookies after shaping is highly recommended as the chilled dough prevents the cookies from spreading in the oven. You need to chill the cookies for at least 2 to 4 hours. Also, do not place your cookies on a hot baking sheet.
-
Crack Free Cookies – If the sides of the cookies have some cracks after you make the indent, then you can easily fix them using your fingers. Also, to get crack-free cookies, always roll the balls really smooth right after mixing until there are no lines or cracks in the dough right after mixing. After chilling, you won’t be able to roll.
-
Filling – You can fill the cookies before or after baking them. I personally like to fill them before baking. If you are filling these cookies after baking then you might need to re-indent the cookies as soon as they are out of the oven.
-
Flavorings – You can also make thumbprint cookies with other flavors such as cardamom powder or cinnamon powder. Simply swap 1/2 teaspoon of vanilla extract with the same amount of green cardamom powder or cinnamon powder.
-
Sugar Replacement - I have used granulated sugar for making cookie dough. For this recipe, you can also use powdered sugar/icing sugar or caster sugar. Simply swap the granulated sugar with the same amount of icing or caster sugar.
Filling Variations
You can fill these Eggless Thumbprint Cookies with everything you can use in a cookie. Here are some filling options for you:
-
Jam thumbprint cookies - This cookie tastes great with all the jams. You can fill these cookies with strawberry, raspberry, lingonberry, cherry, blackberry, blueberry, peach, orange or or apricot jam/preserve.
-
White chocolate thumbprint cookies - You can fill these cookies with melted peppermint, or hazelnut white chocolate.
-
Dark Chocolate thumbprint cookies – You can use plain melted dark chocolate or with some holiday nuts such pistachio or hazelnut dark chocolate.
-
Dulce de Leche thumbprint cookies - You can also fill each indentation with dulce de leche after baking.
-
Lemon curd – After baking, you can fill cooled thumbprint cookies with lemon curd.
-
Hershey’s kisses candy thumbprint cookies - You can press a Hershey’s kisses candy into each indentation as soon as they are out of the oven.
-
Caramel thumbprint cookies – Simply add melted caramel to each indentation of the baked cookies up to the brim. To make them look fancier, you can also sprinkle them with chopped walnuts or sea salt.
-
Nutella thumbprint cookies – After baking, let the cookies cool down. Transfer nutella into a piping bag and pipe nutella into each indention.
-
Peanut Butter thumbprint cookies – Fill each cookie baked and cooled cookie with crunchy or creamy peanut butter.
Storage
Baked and cooled thumbprint cookies stay good for about 2 days at room temperature. After two days, they will become soft due to the moisture in the jams.
If you want to store them for a longer period then bake cookies without filing and store cooled cookies in an air-tight container. When you want to serve, fill the cookies with desired filling and enjoy! You can also store them for up to 1 week in the refrigerator.
Make-ahead thumbprint cookies
If you are planning to make them for a party or get-together you can easily make them in advance. Either make the cookies and store them in the refrigerator or bake un-filled cookies, store them and fill them right before serving.
FAQ
Can you freeze thumbprint cookies?
Yes, these cookies are completely freezer friendly. You might be wondering how to freeze thumbprint cookies? You can freeze both baked and unbaked cookies.
- Freeze Baked Cookies: You can freeze these cookies for up to 3 months. To freeze, let the baked cookies cool completely at room temperature. Then transfer them to a parchment paper lined freezer safe tray and freeze for 3 hours or until frozen.
Then wrap each cookie in a plastic wrap or waxed paper and transfer them to a ziplock bag or freezer safe container and freeze. When you want to eat, thaw the cookies overnight in the refrigerator, or keep them at room temperature for about 30 minutes.
- Freeze Unbaked Cookies: You can also freeze unbaked cookies for up to 3 months. Shape the cookies, arrange them on a single layer in a freezer-safe tray for 4 hours. Then transfer them to a ziplock bag and freeze.
When you want to bake, thaw the cookies overnight in the refrigerator in a single layer, and fill with jam before baking. Bake as per the recipe instructions.
How to make vegan thumbprint cookies?
To make a vegan version of thumbprint cookies, swap the butter with the same amount of baking margarine or vegan butter.
How to make gluten free thumbprint cookies?
To make gluten free thumbprint cookies, you need to replace regular all purpose flour with all purpose flour gluten free flour blend. The rest of the recipe will be the same.
Thumbprint Cookies (Step-by-step photo instructions)
How to Make Thumbprint Cookies
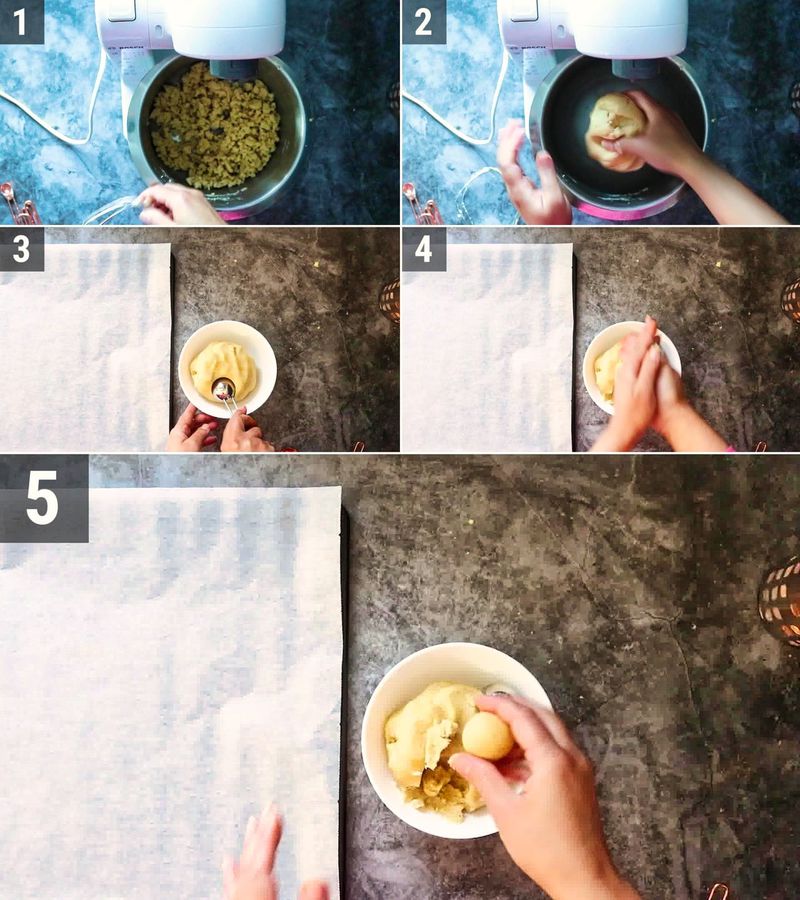
- Place butter and sugar in the bowl of your stand mixer fitted with the paddle attachment. You can also hand mixer or a whisk. Beat butter and sugar on low settings until sugar is mixed with the butter. Then switch the settings to medium and beat until creamy, pale and creamy, scraping down the bowl often. This would take about 4-5 minutes. Add 1 teaspoon of vanilla extract and mix until combined.
- Now, switch to the lowest speed and add the dry ingredients (flour, cornstarch, and salt). Beat at low speed, scraping the bowl in between until well mixed.
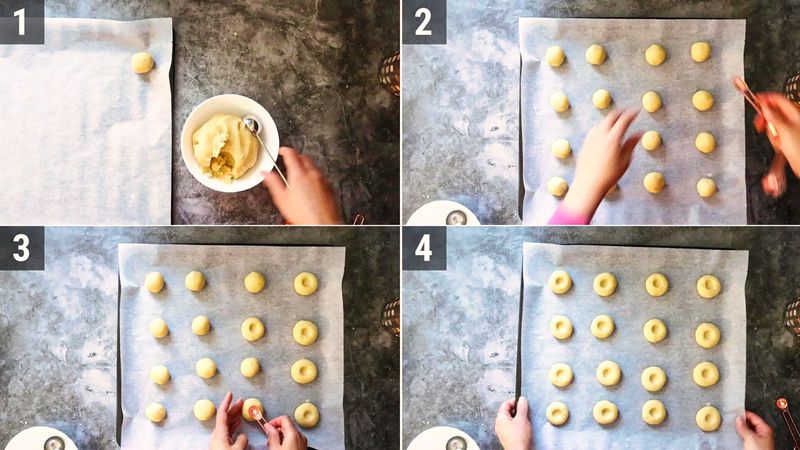
- Once the mixture is soft and crumbly, gently bring the dough together using your hands. You don't have to knead the dough. Take out about a 1-inch portion of dough using a tablespoon or small ice cream scoop. Shape it into a 1-inch smooth ball.
- Keep shaping balls until all the dough is used up. Line a baking sheet with parchment paper and place the balls onto a prepared baking sheet, about 2 inches apart. Make an indentation in the center of each cookie with your thumb or with the rounded back of a teaspoon. If the edges crack, you can either reshape them or fix the cracks with your fingers. Refrigerate the cookies for at least 3-4 hours. You can chill them in the refrigerator for up to 4 days.
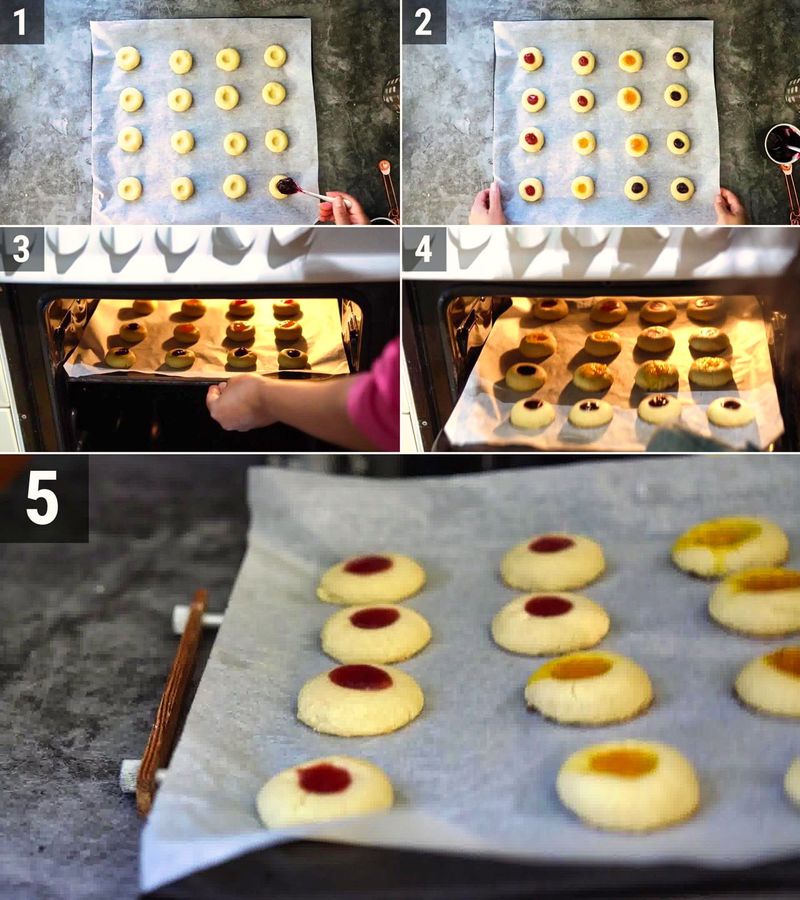
- Preheat the oven to 350ºF/180ºC. When chilled, fill each indentation of the cookie with jam right up to the brim, about 1/4 teaspoon. Bake the cookies for 12-15 minutes or until the edges and bottom are slightly browned. Remove the cookies from the oven, and let the cookies rest on the baking sheet for 5 minutes.
- After that, transfer them to a cooling rack and let them cool completely before serving and storing.

Recipe Card
Thumbprint Cookies [Recipe]

★★★★★
(Rating: 5 from 6 reviews)
| Prep time 🕐 | Cook time 🕐 | Total time 🕐 |
|---|---|---|
| Category ☶ | Cuisine ♨ | Servings ☺ |
| Desserts | American | 16 cookies |
| Nutrition Info ⊛ | Serving size ⊚ | |
| 129 calories | 1 |
INGREDIENTS
For Thumbprint Cookies
- 1/2 cup (113 g) unsalted butter, at room temperature
- 1/3 cup (68g) granulated sugar
- 1/2 teaspoon pure vanilla extract
- 1 cup (150 g) all-purpose flour, spooned and leveled
- 1.5 tablespoon (15 g) cornstarch
- 1/4 teaspoon salt
- 1/4 cup jam/jelly/preserves, of your choice choice
INSTRUCTIONS:
How to Make Thumbprint Cookies
- Place butter and sugar in the bowl of your stand mixer fitted with the paddle attachment. You can also hand mixer or a whisk. Beat butter and sugar on low settings until sugar is mixed with the butter. Then switch the settings to medium and beat until creamy, pale and creamy, scraping down the bowl often. This would take about 4-5 minutes. Add 1 teaspoon of vanilla extract and mix until combined.
- Now, switch to the lowest speed and add the dry ingredients (flour, cornstarch, and salt). Beat at low speed, scraping the bowl in between until well mixed.
- Once the mixture is soft and crumbly, gently bring the dough together using your hands. You don't have to knead the dough. Take out about a 1-inch portion of dough using a tablespoon or small ice cream scoop. Shape it into a 1-inch smooth ball.
- Keep shaping balls until all the dough is used up. Line a baking sheet with parchment paper and place the balls onto a prepared baking sheet, about 2 inches apart. Make an indentation in the center of each cookie with your thumb or with the rounded back of a teaspoon. If the edges crack, you can either reshape them or fix the cracks with your fingers. Refrigerate the cookies for at least 3-4 hours. You can chill them in the refrigerator for up to 4 days.
- Preheat the oven to 350ºF/180ºC. When chilled, fill each indentation of the cookie with jam right up to the brim, about 1/4 teaspoon. Bake the cookies for 12-15 minutes or until the edges and bottom are slightly browned. Remove the cookies from the oven, and let the cookies rest on the baking sheet for 5 minutes.
- After that, transfer them to a cooling rack and let them cool completely before serving and storing.
Watch Full Recipe Video:
NOTES:
- Baking Time – Do not overbake thumbprint cookies. You just need to bake until the edges are slightly brown and cookies are still white. Mine took about 13 minutes, but the baking time may vary depending on the different temperature of the ovens. So your cookies might take less or more time. After about 11 minutes, keep an eye on the oven to prevent the over-baking.
- Storage – Cookies may be stored in an airtight container at room temperature or in the refrigerator for up to 4 days.
- Filling – If the jam or preserve you are using is too firm, then simply add it to a microwave-safe bowl and heat for about 10 seconds. Alternatively, you can transfer jam to a heavy bottomed pan and heat it over low heat until it is no longer firm and easy to stir. Let it get cool before filling the cookies with jam.
- Butter – Make sure that the butter you are using is at room temperature but not mushy. You can leave it at room temperature for about 40-50 minutes.
If this recipe helped you, then please spread the word by sharing and subscribing to us on YouTube to get more such Recipe Videos.
Your feedback is so helpful for me and other My Ginger Garlic Kitchen readers. So, for Facebook and Instagram, please mention @MyGingerGarlicKitchen or #mygingergarlickitchen. I would love to see your photos. :)
Author: Anupama
Recipe Source Link: https://www.mygingergarlickitchen.com/thumbprint-cookies/
Questions or comments about this recipe:
Ask on