A dry block absorbs marinades far more effectively. This results in deeper flavor throughout the tofu.
Don’t want to miss such incredible time-saving tips from My Ginger Garlic Kitchen, set us as a preferred source in Google Search by clicking the button below.

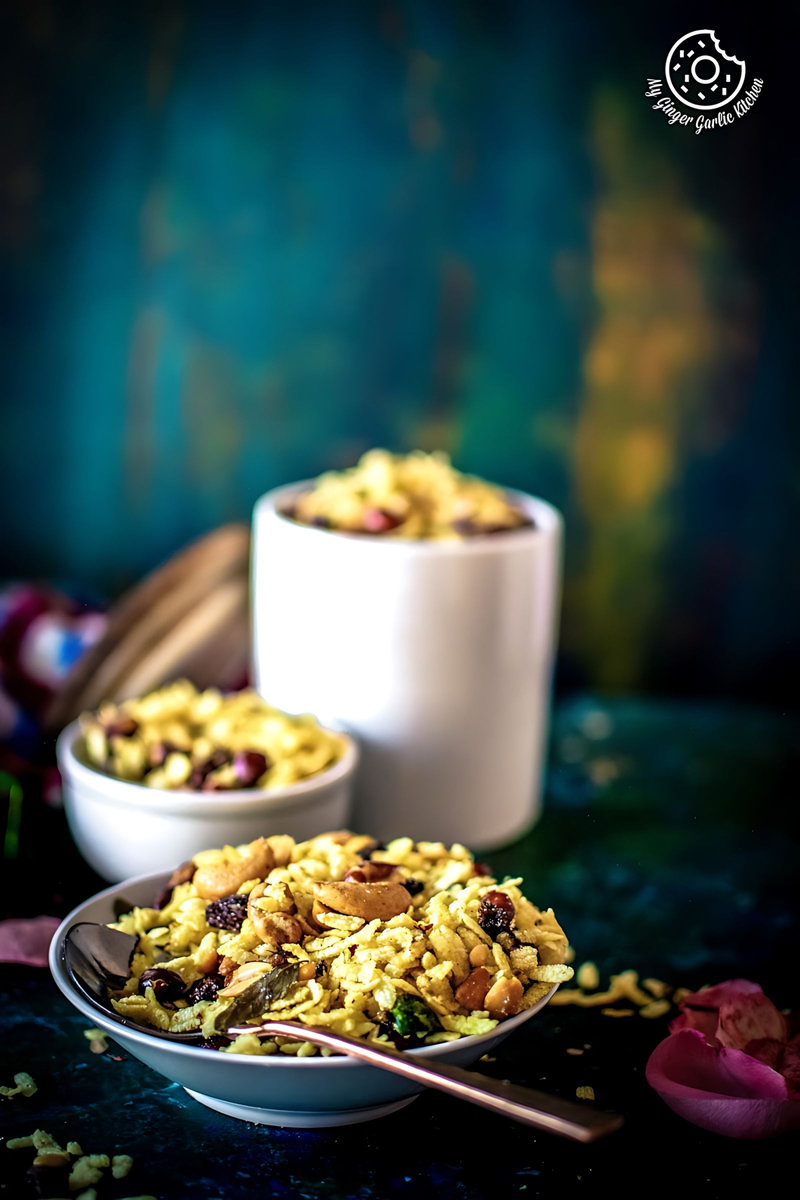
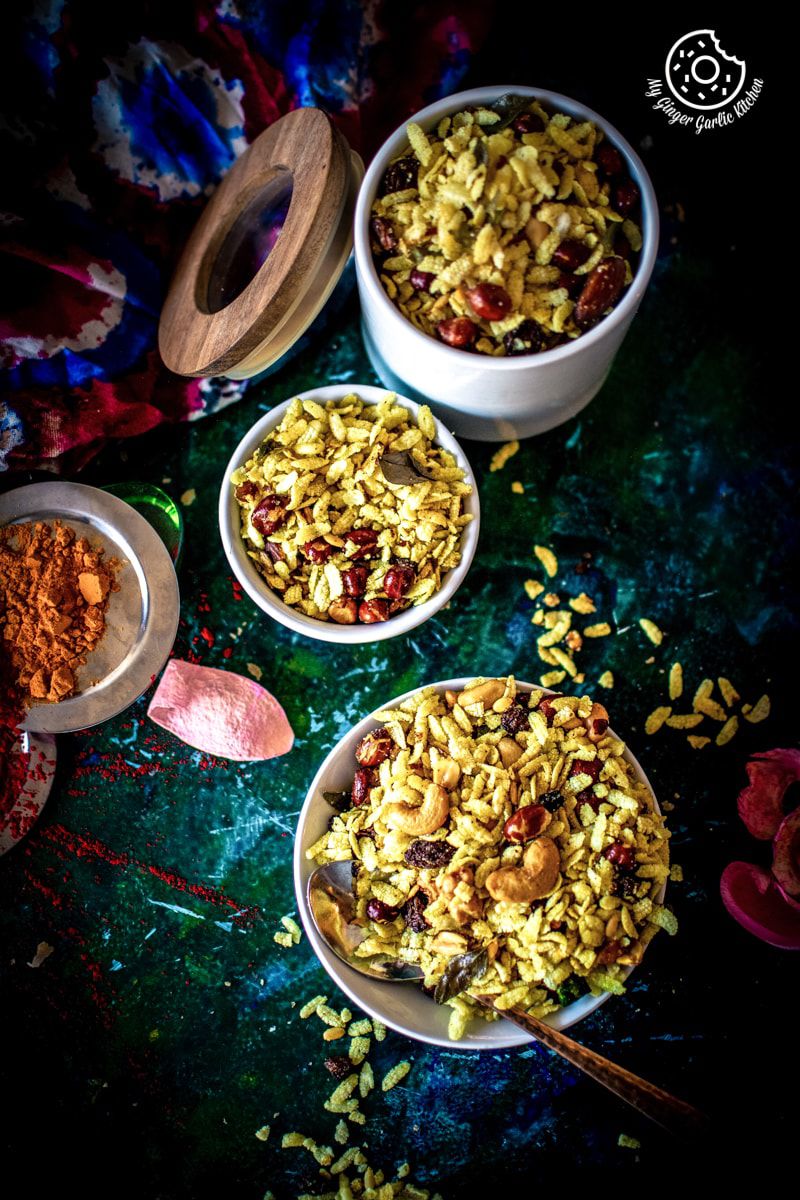
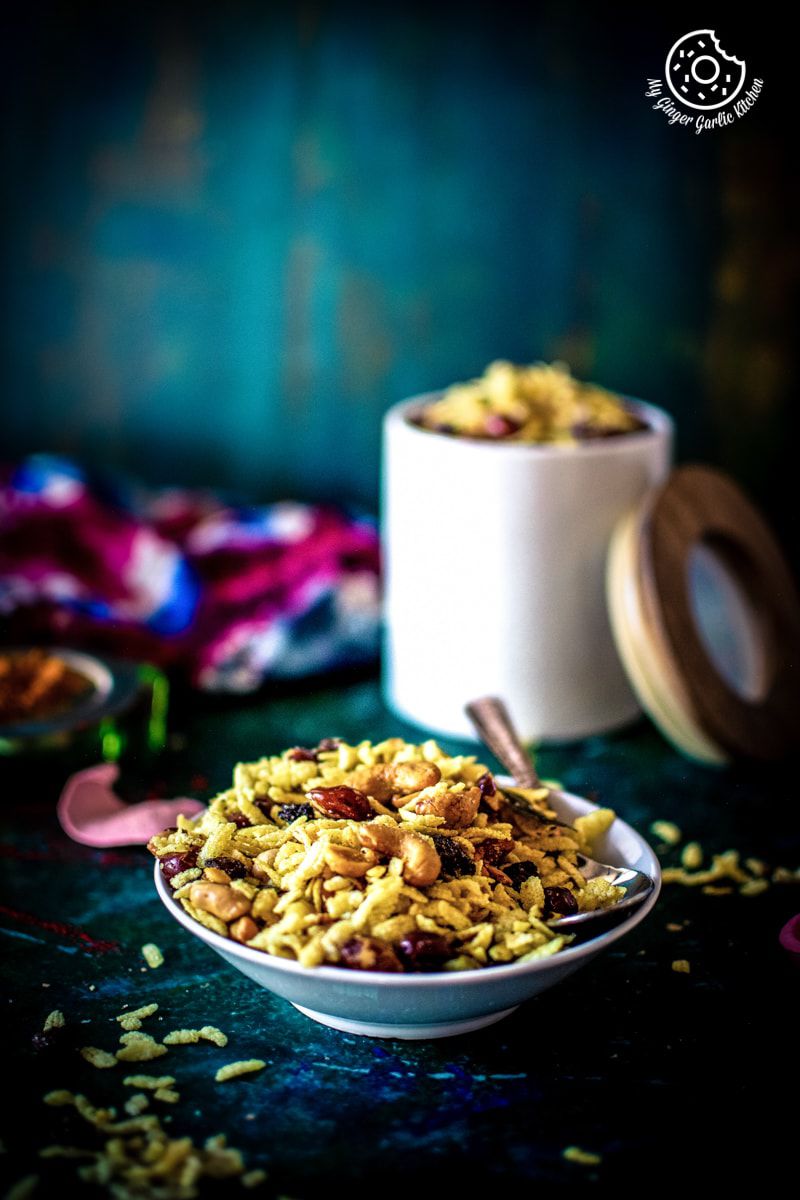
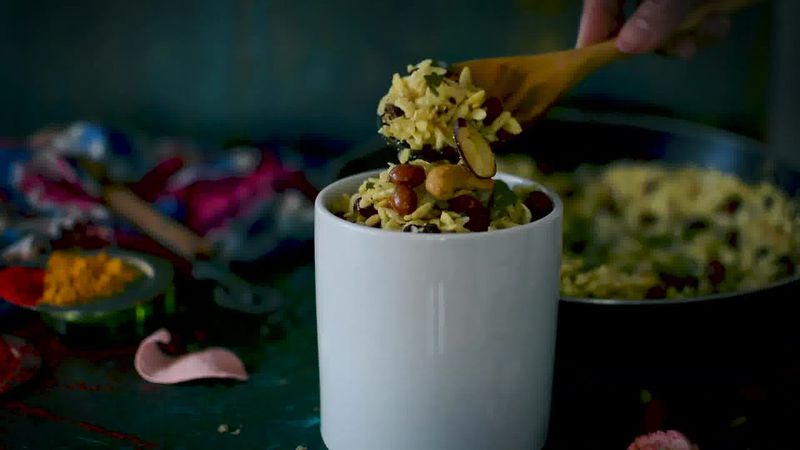
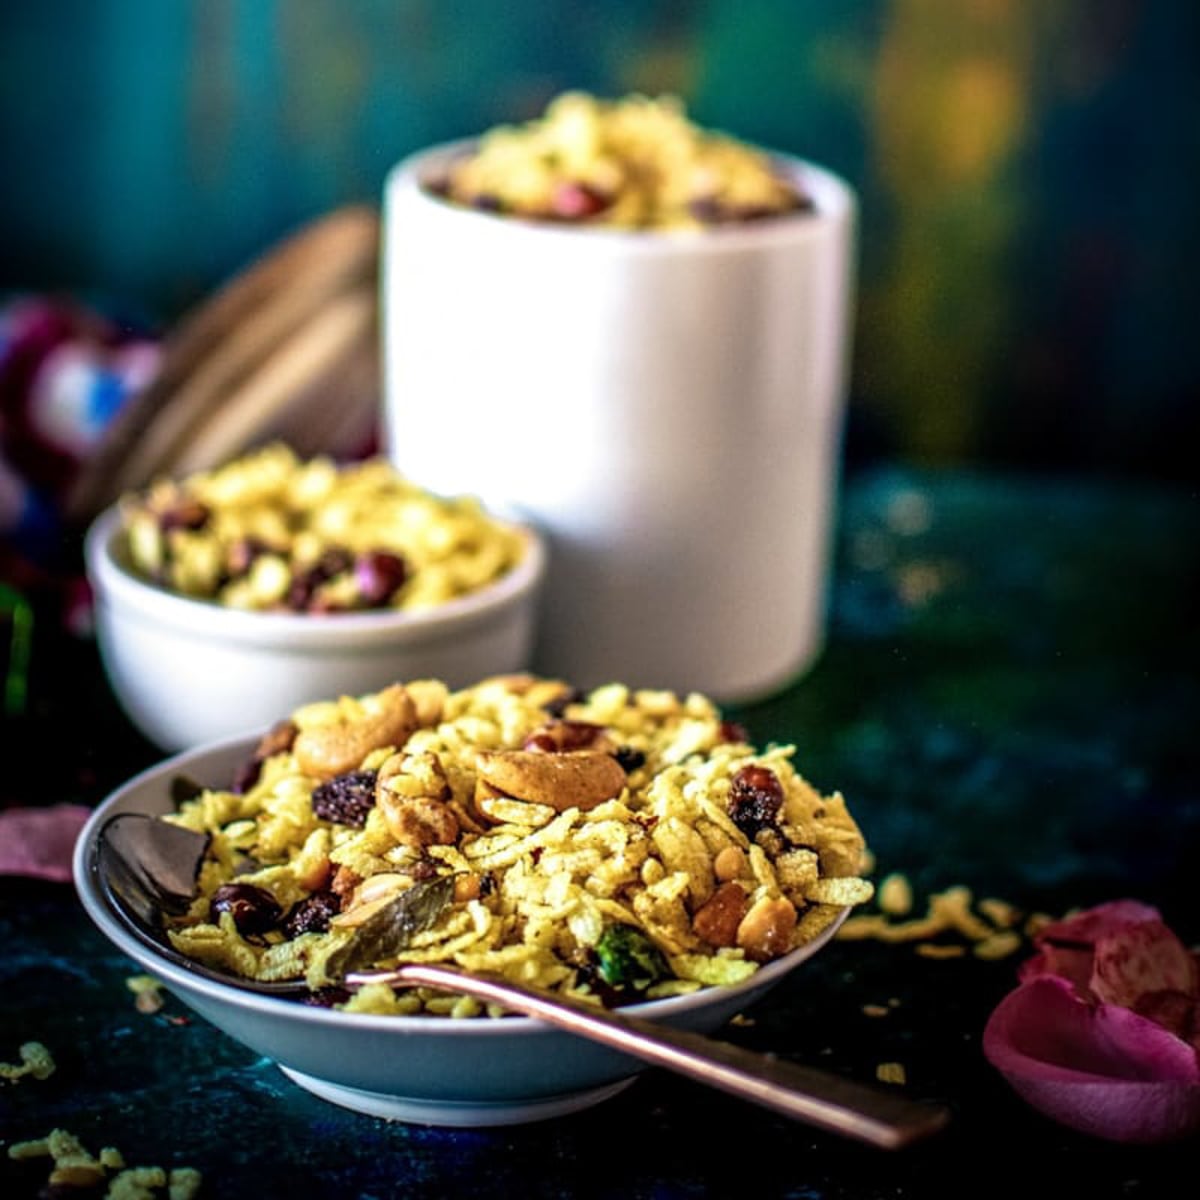
Mildly spicy, sweet, tangy, crunchy Poha Chivda (chiwda) is a popular Indian snack which is quick and easy to make. Chivda, also known as deep-fried poha, is flavored with fried nuts and spices.
Crispy and crunchy fried poha (flattened rice) combined with fried peanut, fried cashews, fried almonds, and some essential seasoning makes a wonderful namkeen (savoury) snack.
What is Chivda?
Chivda (namkeen) is one of the most delightful Indian Snacks. Chivda is a savory snack made with poha (flattened rice), and some nuts. Making chivda recipe is easy, quick, and fuss free.
This chivda has poha (flattened rice), peanuts, cashews, almonds, melon seeds, raisins, green chilies, curry leaves, and some basic seasoning.
Making this traditional recipe of Poha chivda at home is very easy and simple. This easy Chivda is an ideal tea time snack. Poha chivda is served mostly as a snack made during the festival.
This particular recipe of Khatta Meetha Poha Chivda I am sharing today has perfectly balanced flavours of sweet, spice and tang.
This chivda makes a great accompaniment with some hot chai (tea). So make this very delicious and fuss-free crunchy poha chivda when you have guests coming over tea or coffee.
What is Poha?
Poha is a Indian name for flattened or beaten rice. Poha is also known as pressed rice, chira or chura. For making poha, rice is pressed into flat, light, dry flakes.
When a liquid such as milk or water is added to these flakes of rice, they soak up the fluid, and thereby swell up. This liquid could either be hot or cold.
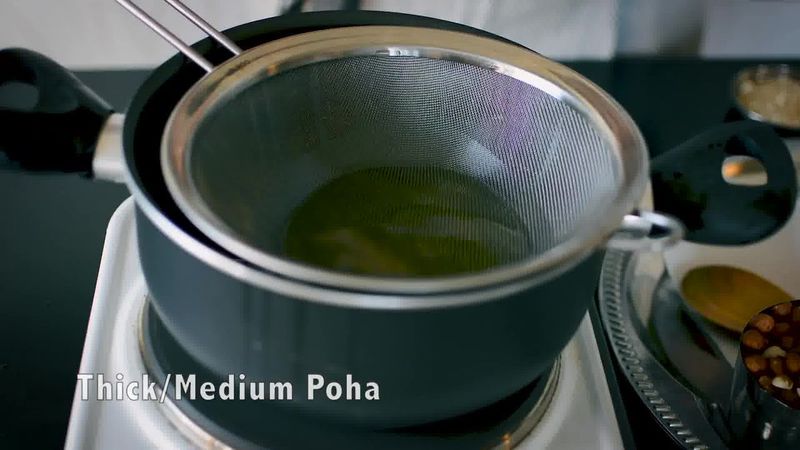
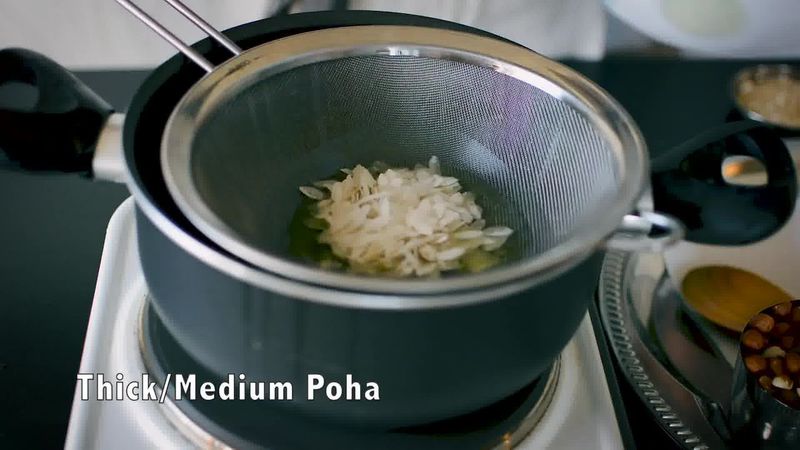
The density of the rice flakes varies between thick to thin. For making chivda you will have to use the medium/thin variety of poha.
There are mainly three types of poha varieties available:
-
Thin Poha: Thin Poha looks almost translucent. This is best for making roasted chivda.
-
Thick Poha: Thick poha is used for making fried poha chivda.
-
Medium Poha: Medium poha is great for chivda and stir-fried dishes such as Aloo Poha, Indori Poha.

Poha chivda has 2 variations:
-
Deep Fried Poha Chivda
-
Roasted Poha Chivda
The recipe video I am sharing today is fried chivda recipe which can be made using medium or thick poha. But if you want to make roasted chivda, then you’ll have to use thin poha.
How to Make Roasted Poha chivda?
Well, making roasted poha chivda is actually very simple and it is quite healthy too. There is nothing deep fried in this poha chivda. You can relish a chivda guilt-fry if it is roasted.
Poha chivda is mildly spicy and has a crisp and crunchy texture. The nuttiness from the roasted nuts gives this poha a rich and nutty texture.
Simply roast the poha by tossing and shaking the pan, and set it aside. Then fry the nuts, green chilies, and spices in some oil. Once the tadka (tempering) is ready, turn off the heat. Add roasted poha to the tadka, and mix everything to combine well.
Roasted Poha Chivda is ready for use. Store chivda in an airtight jar.
How to Make Poha Chivda?
For making deep-fried poha chivda, first, heat oil in a deep pan.
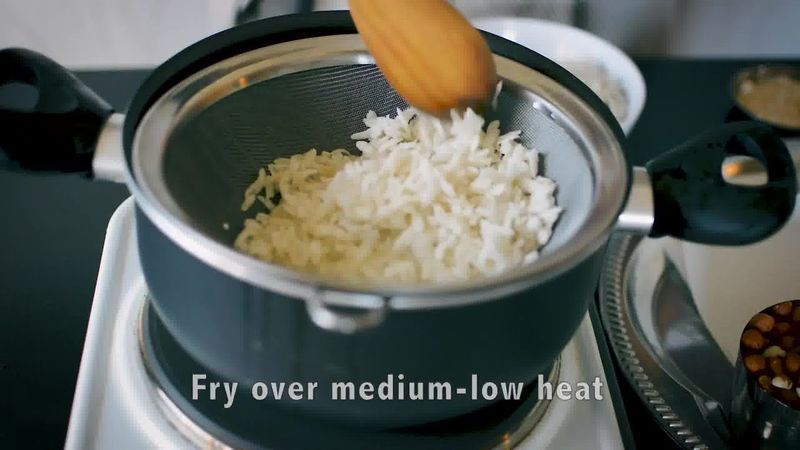
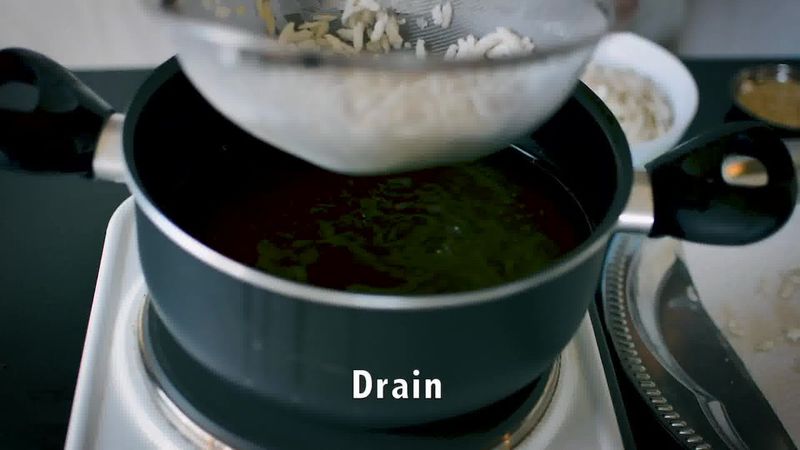
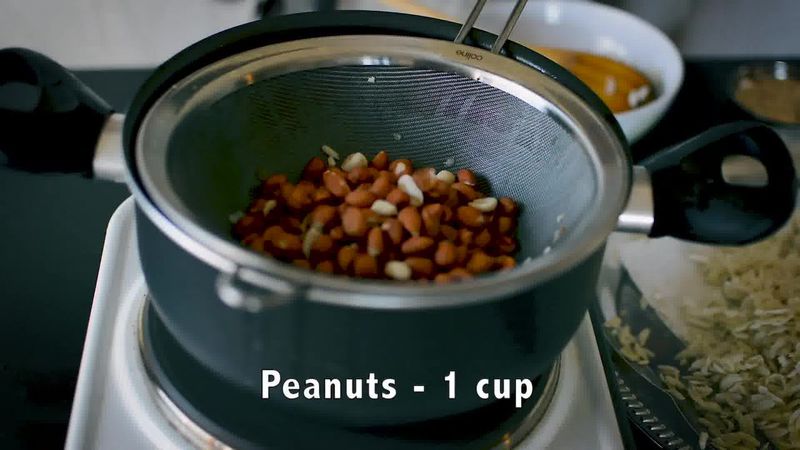
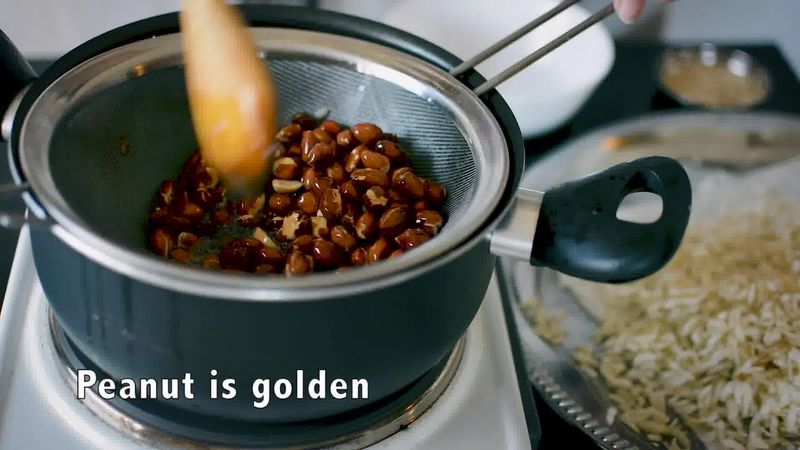
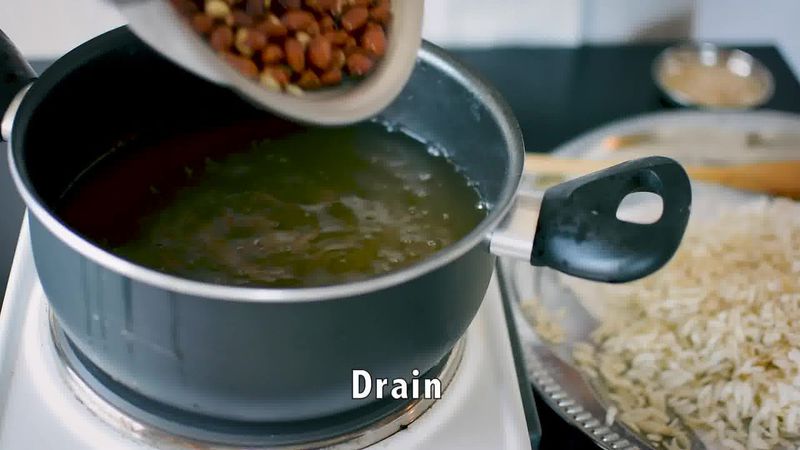
Put a steel strainer over the pan. Now add poha in batches deep-fry them until they are crisp. Drain onto an absorbent paper. In the same strainer fry peanuts until they are golden. Drain onto an absorbent paper.
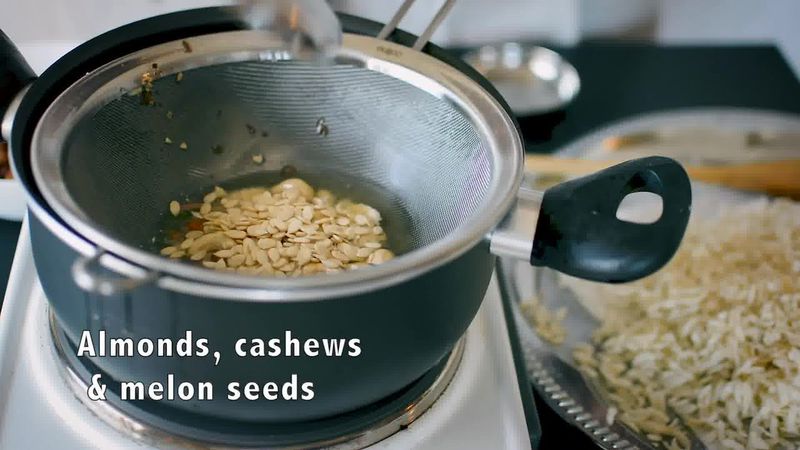
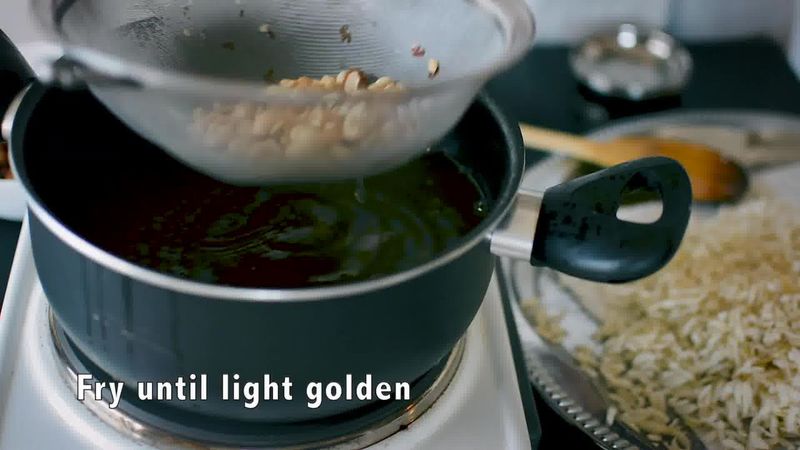
Now add cashews, almonds, melon seeds and fry them until they are golden.
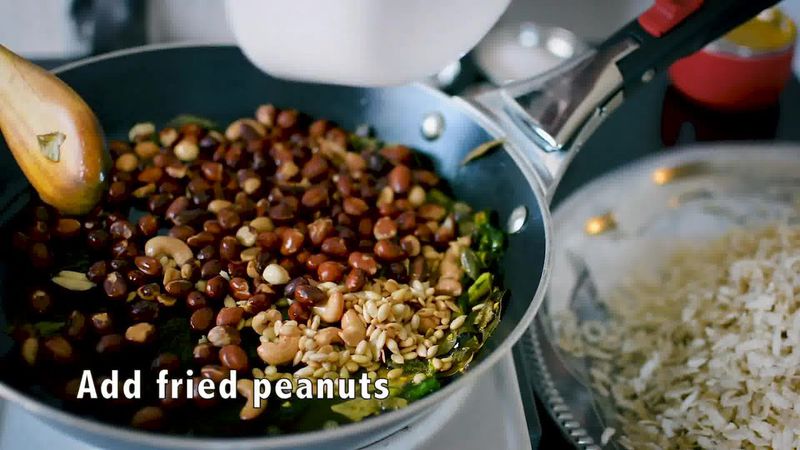
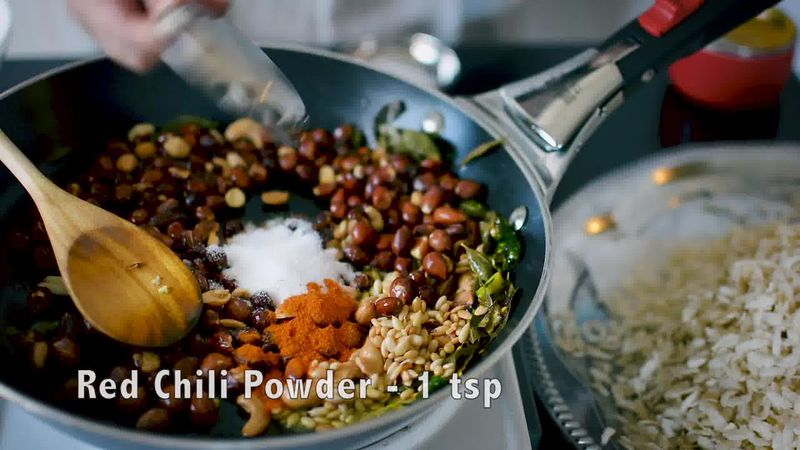
Prepare the tempering by heating 2 tbsp oil in a broad pan. Add turmeric, green chilies and curry leave to this pan. Saute them until they are crisp. Add fried peanuts and dry fruits. Add sugar, salt, red chili powder, citric acid powder. Mix everything well.
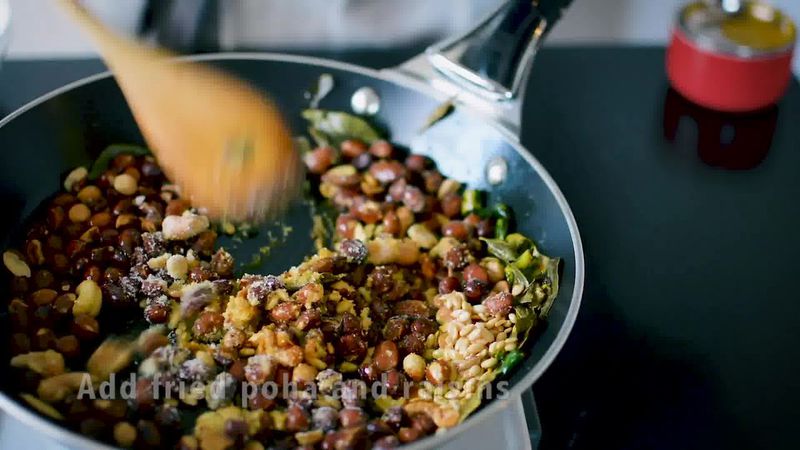
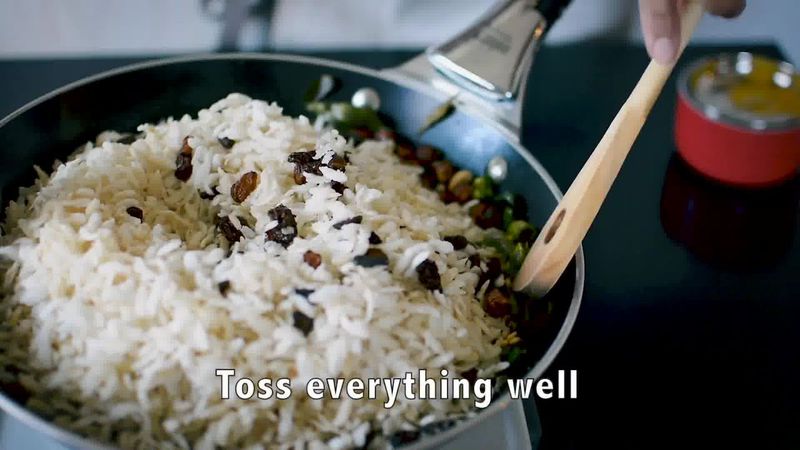
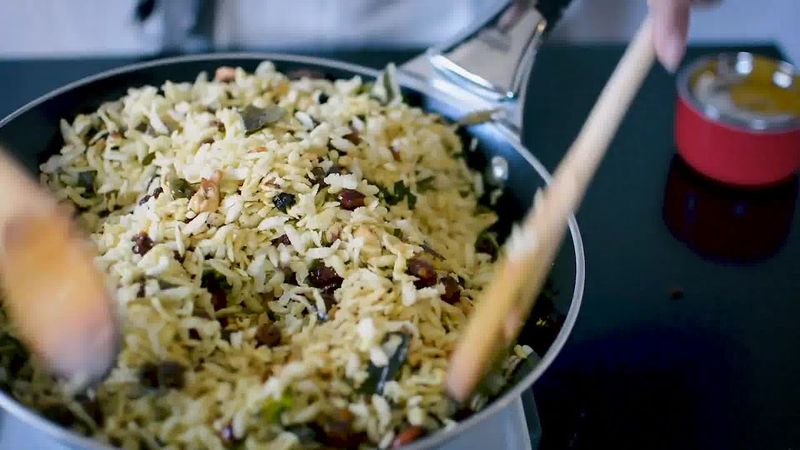
Add fried poha and raisins to this pan. Turn off the heat and toss everything well. Deep-fried poha chivda is ready.
Once cooled, store poha chivda in an airtight container.
Other namkeen chivda you may also love are, makhana namkeen, and Murmura Chivda.
If you are enjoying the recipe of this poha chivda, then there are some other great namkeen snack recipes which you may like:
Some important tips to keep in mind while making poha chivda:
-
If you are roasting Chivda, then make sure you use a thick bottomed Pan/kadahi.
-
Thin poha is very chiffony and papery. So when you are making roasted chivda, make sure you do not stir it too much, this might break the thin poha. So instead of stirring, try to toss and shake the pan until poha is crunchy.
-
For making poha chivda, always roast or fry poha on medium-low heat.
-
I have used 1 cup peanuts for 2 cups poha. But you can adjust the quantity according to your likings.
-
I only added cashews, almonds, melon seeds and raisins to this chivda recipe. But you can also add some murmura (puffed rice), bhuna chana dal (roasted Bengal gram), and sliced coconut to this chivda recipe.
-
You can store poha chivda or chiwda in an airtight container for up to 2 to 3 weeks. This would stay fresh and crunchy.
-
Poha puffs up while frying, so when making fried poha chivda, always fry poha in batches.
-
This is a khatta-meetha poha chivda recipe, so I have added citric acid powder for the tangy (khatta) taste. If you don’t have citric acid powder then you can replace this powder with some amchoor (dried mango) powder.
-
You can also add some cornflakes to this poha for that healthy touch.

Chivda Recipe - Poha Chivda (Step-by-step photo instructions)
Deep Frying Poha:
- Heat oil in a deep pan over medium heat. Put a steel colander/strainer over the pan.
- Divide poha into 4-5 batches. When the oil is hot, drop 1 batch of poha.
- Deep fry it until poha puffs up and gets crisp. (keep stirring poha with a spoon.) Poha shouldn't be brown.
- Once crisp, drain the fried poha onto a kitchen tissue to absorb extra oil. Fry all the poha batches, and set them aside.
Deep Frying Peanuts and dry-fruits:
- Put the strainer over the pan, and add 1 cup of peanuts to it.
- Deep fry peanuts until they are golden in color.
- Drain the fried peanuts onto a kitchen tissue and keep aside.
- Put the strainer over the pan, and add almonds, cashews, and melon seeds to it.
- Deep fry them until they are light golden in color.
- Drain them onto a kitchen tissue and set aside.

How to Make Deep Fried Poha chivda tempering/tadka:
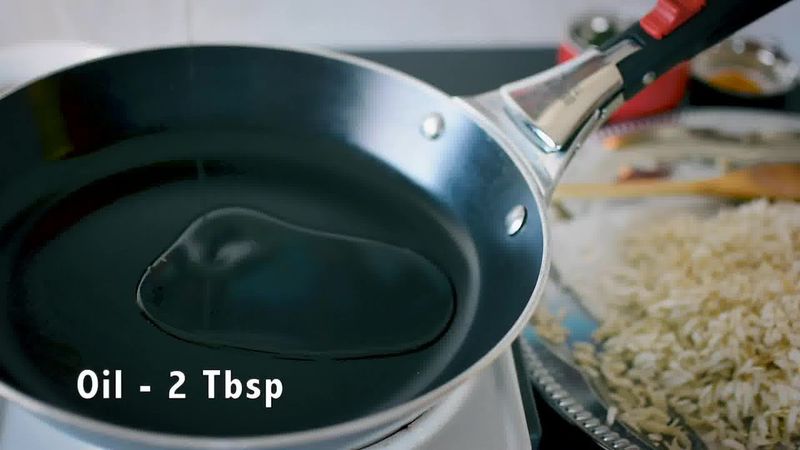
- Heat 2 tablespoons oil in a wide pan over medium heat.
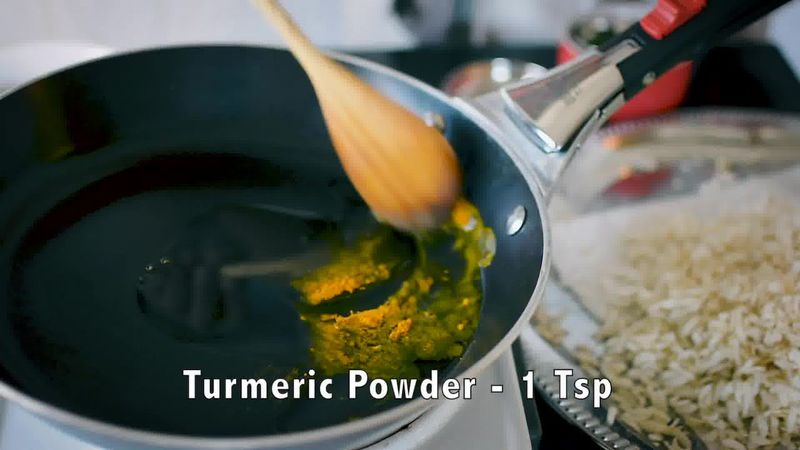
- Add 1 teaspoon of turmeric (haldi) powder. Fry for a few seconds.
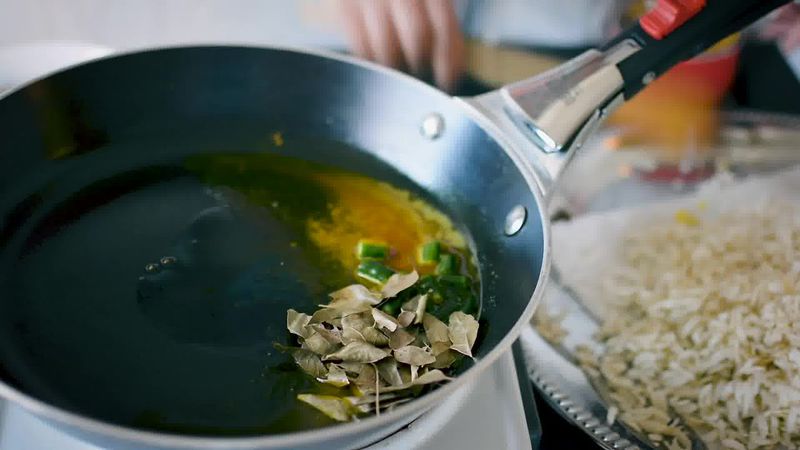
- Add green chilies, curry leaves and fry them until they are crisp.
- Now add fried peanuts and dry fruits.
- Also add sugar, salt, red chili powder, citric acid powder.
- Mix everything well.
How to Assemble Deep Fried Poha Chivda:
- Add fried poha, and raisins to this pan.
- Turn off the heat and toss everything well. Deep-fried poha chivda is ready.
- Once cooled, store poha chivda in an airtight container.
How to Make Roasted Poha Chivda:
- Heat a pan over medium heat. Add poha, and simply roast the poha by tossing and shaking the pan, and set it aside.
- Heat 2 tablespoons oil in a wide pan over medium heat.
- Add 1 teaspoon of turmeric (haldi) powder. Fry for a few seconds.
- Add green chilies, curry leaves and fry them until they are crisp.
- Then fry the peanuts, almonds, cashews, melon seeds in the same oil.
- Also add sugar, salt, red chili powder, citric acid powder. Mix everything well.
- Once the tadka (tempering) is ready, turn off the heat.
- Add roasted poha to the tadka, and mix everything to combine well.
- Roasted Poha Chivda is ready for use. Serve poha chivda with tea or coffee.
- Store chivda in an airtight jar.


Recipe Card
Chivda Recipe - Poha Chivda [Recipe]
★★★★★
(Rating: 5 from 26 reviews)
| Prep time 🕐 | Cook time 🕐 | Total time 🕐 |
|---|---|---|
| Category ☶ | Cuisine ♨ | Servings ☺ |
| Snacks | Indian | 8 |
| Nutrition Info ⊛ | Serving size ⊚ | |
| 285 calories | 1 serving |
INGREDIENTS
Poha Chivda:
- 2 cups thick or medium poha (flattened rice)
- 1 cup peanuts (moongphalli)
- 10-12 almonds (badam)
- 20-25 cashews (kaju)
- 2 tablespoons melon seeds (kharbuje ke beej)
- 2 tablespoons raisins (kishmish)
- 3 green chilies (hari mirch), roughly chopped
- 2 tablespoons curry leaves (kadi patta/meetha neem)
- 1 teaspoon red chili powder (lal mirch powder)
- 2 teaspoons powdered sugar (peesi hui shakkar)
- Salt to taste
- 1 teaspoon turmeric powder (haldi)
- 1/2 teaspoon citric acid powder (tatri), amchur powder (dried mango powder)
- 2 tablespoons oil for tadka (tempering)
- Oil for deep frying
INSTRUCTIONS:
Deep Frying Poha:
- Heat oil in a deep pan over medium heat. Put a steel colander/strainer over the pan.
- Divide poha into 4-5 batches. When the oil is hot, drop 1 batch of poha.
- Deep fry it until poha puffs up and gets crisp. (keep stirring poha with a spoon.) Poha shouldn't be brown.
- Once crisp, drain the fried poha onto a kitchen tissue to absorb extra oil. Fry all the poha batches, and set them aside.
Deep Frying Peanuts and dry-fruits:
- Put the strainer over the pan, and add 1 cup of peanuts to it.
- Deep fry peanuts until they are golden in color.
- Drain the fried peanuts onto a kitchen tissue and keep aside.
- Put the strainer over the pan, and add almonds, cashews, and melon seeds to it.
- Deep fry them until they are light golden in color.
- Drain them onto a kitchen tissue and set aside.
How to Make Deep Fried Poha chivda tempering/tadka:
- Heat 2 tablespoons oil in a wide pan over medium heat.
- Add 1 teaspoon of turmeric (haldi) powder. Fry for a few seconds.
- Add green chilies, curry leaves and fry them until they are crisp.
- Now add fried peanuts and dry fruits.
- Also add sugar, salt, red chili powder, citric acid powder.
- Mix everything well.
How to Assemble Deep Fried Poha Chivda:
- Add fried poha, and raisins to this pan.
- Turn off the heat and toss everything well. Deep-fried poha chivda is ready.
- Once cooled, store poha chivda in an airtight container.
How to Make Roasted Poha Chivda:
- Heat a pan over medium heat. Add poha, and simply roast the poha by tossing and shaking the pan, and set it aside.
- Heat 2 tablespoons oil in a wide pan over medium heat.
- Add 1 teaspoon of turmeric (haldi) powder. Fry for a few seconds.
- Add green chilies, curry leaves and fry them until they are crisp.
- Then fry the peanuts, almonds, cashews, melon seeds in the same oil.
- Also add sugar, salt, red chili powder, citric acid powder. Mix everything well.
- Once the tadka (tempering) is ready, turn off the heat.
- Add roasted poha to the tadka, and mix everything to combine well.
- Roasted Poha Chivda is ready for use. Serve poha chivda with tea or coffee.
- Store chivda in an airtight jar.
Watch Full Recipe Video:
NOTES:
- You can increase the amount of peanuts and dry fruits.
- Feel free to add roasted chana dal, sliced coconut, and roasted sesame seeds to this chivda.
- You can also add chopped garlic to the tadka for that garlicky punch.
- I did not add asafoetida (hing) to this recipe, but you can add a pinch of asafoetida.
If this recipe helped you, then please spread the word by sharing and subscribing to us on YouTube to get more such Recipe Videos.
Your feedback is so helpful for me and other My Ginger Garlic Kitchen readers. So, for Facebook and Instagram, please mention @MyGingerGarlicKitchen or #mygingergarlickitchen. I would love to see your photos. :)
Author: Anupama
Recipe Source Link: https://www.mygingergarlickitchen.com/poha-chivda-recipe/
Questions or comments about this recipe:
Ask on