Radish Raita - Mooli Raita
Radish Raita or Mooli Raita is a refreshing, deliciously cooling yogurt dip made with yogurt, grated radishes, and seasoning. Goes well with flatbreads.
Recipe Source Link:https://www.mygingergarlickitchen.com/radish-raita-mooli-raita/
« Go back Print this recipe »
Prep Time = 33 minutes
Cook Time = 02 minutes
Total Time = 35 minutes
Category = Condiments
Cuisine = Indian
Serves = 4
Nutrition Info = 78 calories
Serving Size = 1 serving
RECIPE INGREDIENTS
» For Mooli Raita //
- 1 cup natural yogurt (dahi/curd), use vegan for vegan version
- 1 large red onion, peeled and halved (pyaaj)
- 1/2 teaspoon chat masala powder (chat masala powder)
- 1/2 teaspoon roasted cumin powder (bhuna jeera powder)
- 1/4 ground pepper (kali mirch powder)
- 10-12 red radishes or 1 large white radish
- 2 small green chillies (hari mirch)
- Salt to taste
- Handful of coriander/cilantro leaves (hara dhaniya)
- Handful of mint leaves (hara pudina)
» For Tempering (Tadka) //
- 1/2 teaspoon cumin seeds (jeera)
- 1/2 teaspoon mustard seeds (rai)
- 2 dried red chillies
- 2 tablespoons Oil
- 6-7 curry leaves (dried or fresh)
- Pinch of asafoetida (hing)
- Pinch of kashmiri red chili powder
» For Serving //(Optional)
- Chopped coriander leaves
- Roasted cumin and red chili powder
- Sliced radishes
RECIPE INSTRUCTIONS
» How To Make Radish (Mooli) Raita //
- Rinse the radishes under cold running waterand let them dry.Trim the stem end and tops.
- Grate them using a grater with the large holes into a bowl.
- Now, chop onion, mint leaves, coriander leaves, and green chilies. (Seed the chilies, if they are too hot)
- Add them to the bowl with grated radishes.
- Add seasoning (chat masala powder, roasted cumin powder, ground black pepper, and salt).
- Next, add chilled whisked yogurt.
- Mix well until combined.
- Cover the bowl and refrigerate for 30 minutes.
» How To Make Tempering (Tadka) For Radish (Mooli) Raita //
- Heat oil in a pan.
- Add asafoetida, cumin seeds, mustard seeds, curry leaves, and dried red chillies to the oil.
- Sauté for a few seconds or until the seeds crackle.
- Once seeds start to crackle, turn off the heat. Add red chili powder and sauté few more seconds.
» How To Serve Mooli Raita Without Tempering (Tadka) //
- Transfter mooli raita to a serving bowl.
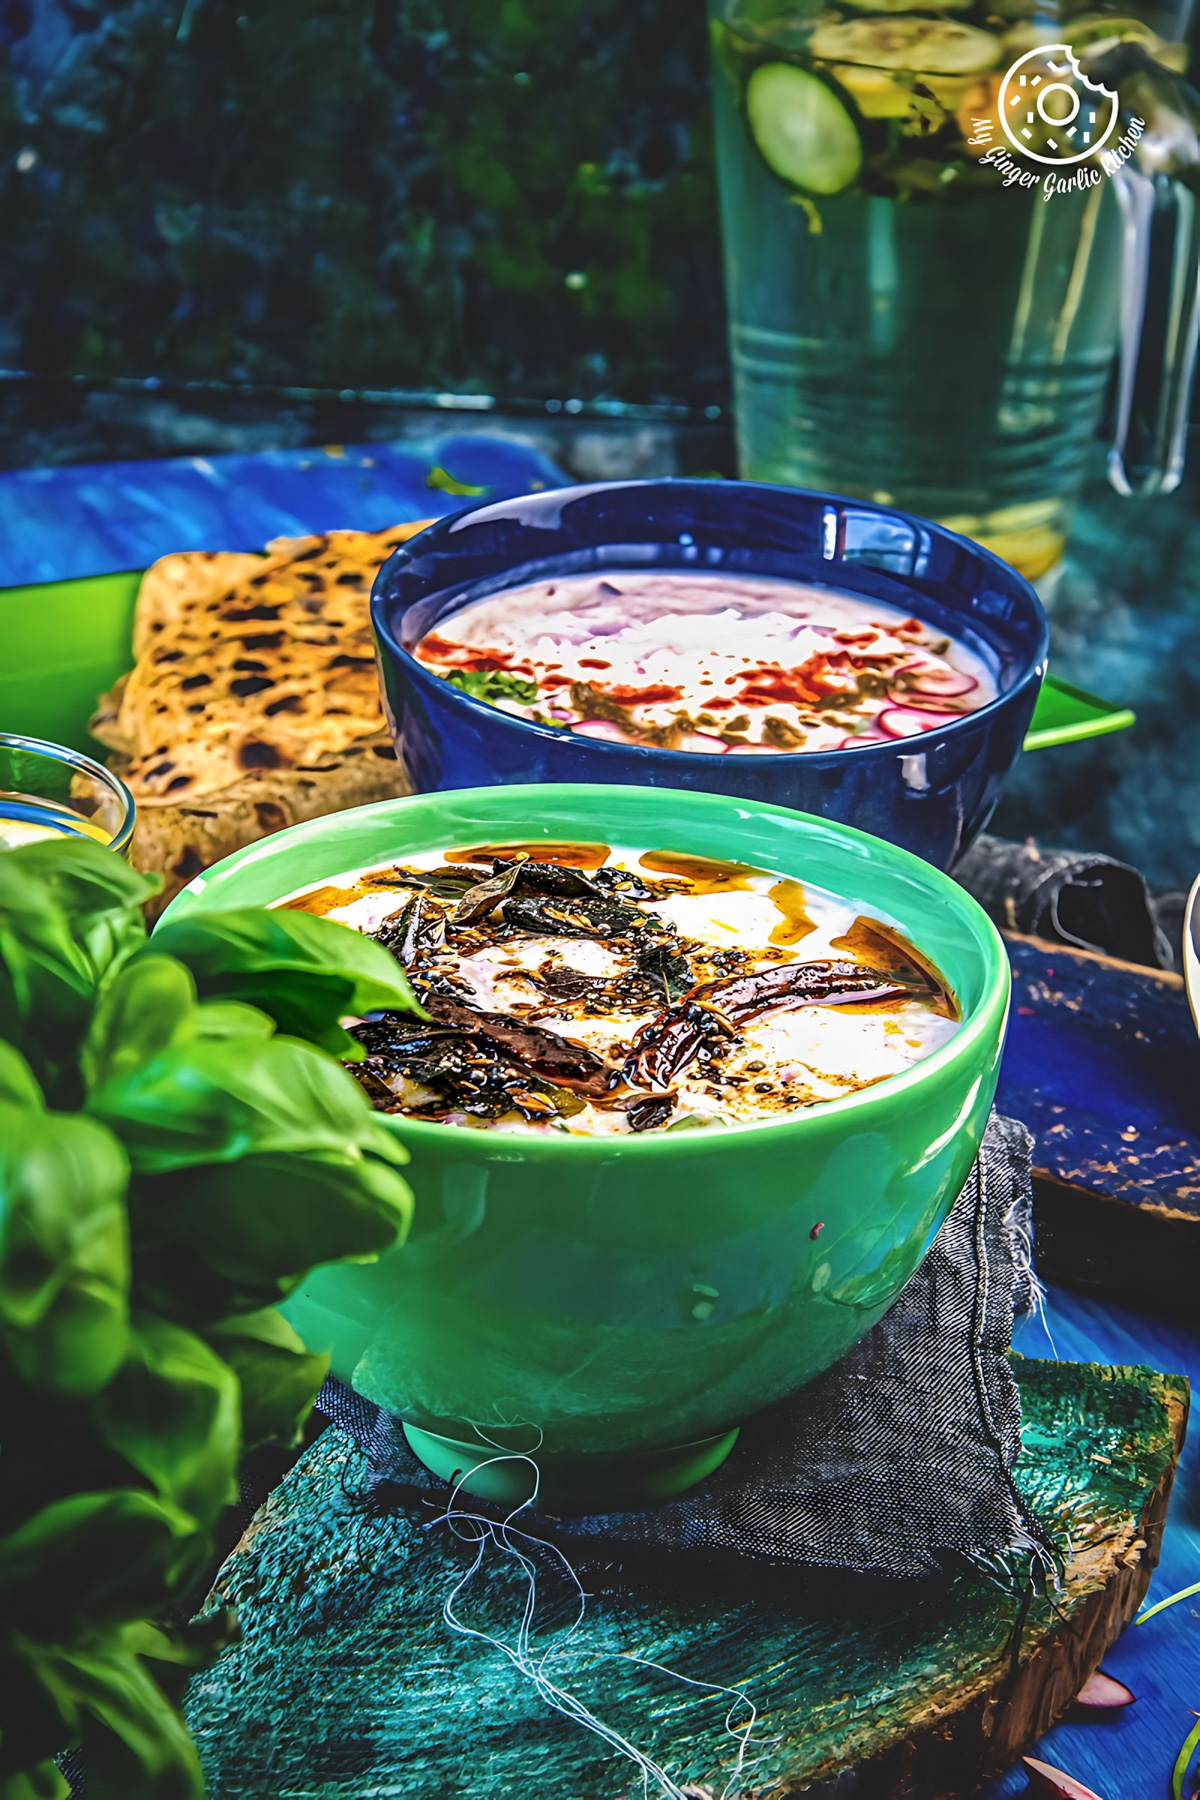
- Garnish with sliced radishes, fresh coriander, roasted cumin powder and chilli powder. Serve with khichdi or curry.
» How To Serve Mooli Raita With Tempering (Tadka) //
- Transfter mooli raita to a serving bowl.
- Pour the tempering over chilled raita. Serve with Avocado Roti or pulao.
RECIPE NOTES
- The addition of chopped green chilies gives a slight heat to this crunchy, and cooling mooli raita. So I like to add it. But you can completely omit it if you are not comfortable eating raw green chilies.
- This raita can be made into a lesser spicy version by replacing hot green chilies with the mild hot chilies like banana peppers.
- Adding chopped onions is optional but highly recommended. This is because onion adds a nice crunch and sweetness to this raita.
- 30 minutes of chilling is really important here. This is because in this time radish infuses all the juicy radish flavors in raita. Also, the flavors intensify when the mooli raita restsed in the refrigerator for some time.
- When making mooli raita, make sure that you are using fresh yogurt, or else the raita would turn tangy.
- For tempering, I would recommend oil. You can use ghee, but I personally dont like it. This is because when you pour ghee tempering over chilled raita, it solidifies and doesnt taste so good.
- I like to use mint and coriander both in this raita. You can choose to add any one of them.
- I like to add chat masala powder in radish raita because it adds a really nice flavor to this raita. You can skip it if you dont have it.
- I used red radishes but you can also use the Indian white radish or Daikon radish for this recipe.
- I have added grated radish to this raita recipe, but you can also finely chop, or thinly slice your radishes.
- I did not peel radishes, but if you want, then you can surely peel the skin off.
- If you like sweet raita, then feel free to add 1 teaspoon of sugar or honey to make this radish (mooli) raita slightly sweet.
- I use thick yogurt because it produces rich and creamy raita. You can also use regular plain yogurt. If your yogurt is too thick, then thin it out with ¼ cup of water or milk. use 1(½) cups of yogurt and skip the water.
- Serve chilled. Mooli Raita only tastes delicious when it is chilled.
- Use vegan yogurt to make the vegan version of this Mooli Raita Recipe.
For questions and suggestions:
If you have any questions or suggestions about this recipe, please do contact us via this contact form or via the social channels:
Website: www.mygingergarlickitchen.com // Contact Form // Facebook Page // Youtube Page // Instagram Page // Pinterest Page