Visit international or ethnic markets to discover fresh and authentic ingredients that aren't readily available in mainstream stores.
Ever wondered how to make paneer at home? Making homemade paneer is a lot simpler than you think.
This is a simple step-by-step video guide on how you to make Indian cottage cheese (paneer) at home!
This homemade paneer recipe has all the tips, tricks, and variations that will help you make the best paneer ever.
This very easy and simple post shows you ‘How to make Fresh Paneer at Home’. Paneer is a fresh cottage cheese from Indian cuisine.
In case if you are unaware of paneer , which is quite unlikely because if you love Indian food, or you have ever been to an Indian restaurant then you must have had paneer dishes for sure.
So, most of you would already know what paneer is. However, if there is anyone who never had paneer and doesn’t know what paneer is, then let me introduce you to this very humble, versatile, Indian cooking ingredient — Paneer.
If you wonder what to cook with paneer, then you are in good hands, because I have shared many paneer recipes on the blog, and there will be many more coming in the future. :)
What is Paneer?
Paneer is a fresh, unsalted Indian cottage cheese made by curdling the milk.
This cheese is widely used in Indian cooking especially in curries.
You need to start with whole milk or full cream milk to get the creamier texture of the cheese. The process is very simple.
Once the milk boils, pour in some yogurt, or lemon juice or vinegar. Vinegar, yogurt or lemon juice - they all work for curdling milk.
Once the milk is curdled, turn off the heat. Then you collect the curdled milk (chena, a Hindi word for curdled milk) in a muslin cloth and then let it set till it’s firm.
That is it. Now you know that making paneer at home is that easy.
Paneer is used in many curries in India. This cheese is mildly milky and it doesn’t have a very pungent taste, so it blends beautifully with the spices.
Popular and yummy paneer curries are butter paneer, palak paneer, and matar paneer.
In India, you can buy paneer from traditional dairy kiosks where they sell dairy products. However, in Europe, we get paneer only in Asian grocery stores which are not many.
Some other popular paneer recipes you might want to try are:
Being an Indian I yearn for paneer dishes often. But going to an Asian / Indian store on the other side of the city just for buying paneer doesn’t sound very motivating to me. So that’s the reason why I always opt for making my paneer rather than buying it.
So, now you know that making my paneer at home is not only a choice, but also a necessity being a foodie Indian.
Let me tell you a secret, I love making my paneer. It’s kinda fulfilling watching the milk curdle. It only takes a couple of minutes. Also, I love this feeling of using the paneer which is the freshest.
What is the perfect way to curdle the milk to make paneer?
When I was in India, I didn’t realize that making paneer could be tricky. It’s because in India you can curdle the milk with any acidic/citric agent. Everything works there: lemon juice, vinegar, citric acid, yogurt, and buttermilk.
Curdling milk in Europe is slightly tricky. When I moved here first I tried making my paneer with lemon juice, and I failed. It’s because it did not curdle fully.
Next time I made paneer using vinegar and the results were about the same. Then I added citric acid the next time but still ended up with no curdling.
Perfect curdling is the key to making the best paneer.
I tried all the possible combos then, but nothing worked. So, in a way, all my traditional learned wisdom did not help at all. So, I was desperately looking for a solution to this problem.
I told about this problem to one of my friends who runs an Indian restaurant here. She told me that they make paneer with buttermilk or yogurt. And I gave it a go the very same day.
And Voila, my milk was perfectly curdled. Just the way it should be. So after tens of failed trials, I finally found the recipe which works best for the environment I live in.
Why to make paneer, instead of buying readymade?
If we get paneer in stores, then why do we need to make it? Not so obvious, isn’t it.
If you are in India then you might get the paneer from the dairy which is fresh and tasty. But if you live outside India, then getting the same quality of paneer is not that easy.
And trust me, making your paneer is fun. I don’t only make this because I need to, but I also love making paneer. It’s because it’s indeed a satisfying experience.
Also, making your own paneer is a breeze. That’s why I always prefer to use homemade paneer over store-bought when it comes to curry or any other recipe made with paneer.
The advantages of making homemade paneer are countless. Following are some advantages for your reference:
✓ Homemade paneer is always fresh and free of preservatives because you know what goes in it.
✓ You choose your favorite milk to make paneer.
✓ Homemade paneer is always softer and so delectable.
✓ You can choose how creamier paneer you want by adding or omitting the cream.
✓ You are free to use any curdling or acidic agents of your choice.
I think now you have many convincing reasons to make paneer at home!
How to Make Paneer?
As I stated earlier, you only need 2 ingredients to make paneer at home.
-
Milk: You can choose any milk for making paneer. Using whole milk is recommended because it gives the best results when you want nice paneer cubes with a creamy texture.
-
Curdling agent: Yogurt, lemon juice, vinegar or buttermilk.
What are the ingredients to make paneer?
Ingredient 1: Full fat milk
Ingredient 2: Any one of the following curdling agents:
-
Yogurt or Buttermilk: It gives the soft yet firm paneer which is rich in taste.
-
Vinegar: If you choose vinegar then do not add it too much or else you will get grainy paneer.
-
Lemon Juice: Same with lemon juice. If you add it too much then the paneer will turn rubbery & crumbly.
-
Citric Acid: Start with a tiny amount of citric acid, because the milk curdles faster with this.
The method of making paneer is the same with all the acidic agents. To find out which method works for you, you can do a little test before making paneer. If lemon or vinegar works then you are good to go.
Tips and variations to make your best paneer at home:
I have made paneer many times, and these are tiny things one should keep in ming while making paneer. I hope these tips will help you make the best paneer ever. Follow along.
-
If you want creamier paneer then you can add 1/4 cup of heavy cream to the milk while boiling it.
-
For making paneer at home, it’s very important that whole milk (or full-fat milk) is used. If you will use fat-free or low-fat milk, then the milk will not have enough fat and would not curdle the way it should be, or might not curdle at all.
-
Don’t throw the whey after draining the curd. You can use the whey for making dough for Chapati or Paratha.
-
Do not use stale or expired milk for making panner, because it is unhealthy and also it won’t taste good.
-
I use cow’s milk for making paneer. You can either use cow’s milk, buffalo milk or goat milk o make paneer. Just make sure that you use the milk which is highest in fat.
-
If using buffalo or goat milk then remember to stir the milk often, because the milk tends to stick and burn at the bottom.
-
Refrigerating paneer is recommended because it really helps firm-up the cheese. Otherwise, the paneer will crumble quite easily when you cut into the paneer cubes.
-
Raw milk makes the best paneer, but it is not easily available everywhere. So you can use the best quality full cream pasteurized milk.
-
Store bought paneer is made using citric acid. But for homemade paneer you can choose any of the citric agents of your choice. No matter what curdling agent you use, make sure to rinse the curdled milk well. Or else it will taste acidic.
-
The amount of curdling agent also depends on the quality of milk, so there is no standard amount. The key is to always add the small amount of curdling agent first and then add more, if the milk is not curdled fully.
-
The measurements in the recipe card gives you the rough idea of how much curdling agent is needed. So you can start with the mentioned amount, and if it still does not curdle then add more.
-
Always boil the milk in a large pot. It speeds up the boiling process.
-
Do not cover the pot when boiling milk, or else you need to constantly pay attention to it all the time, as it could quickly spill over the stovetop.
-
Always add the acidic ingredient only after the milk comes to a boil.
-
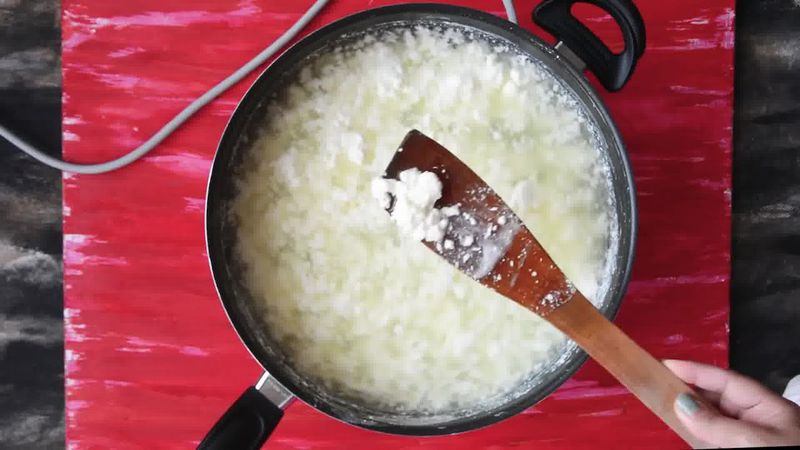
Turn off the heat immediately when the milk has curdled completely, or else your paneer would become tight and grainy.
-
Use just the right amount of acids to curdle the milk. Using too much of acidic ingredient makes the chenna or paneer grainy and rubbery. So add the lemon juice in batches only as needed.
-
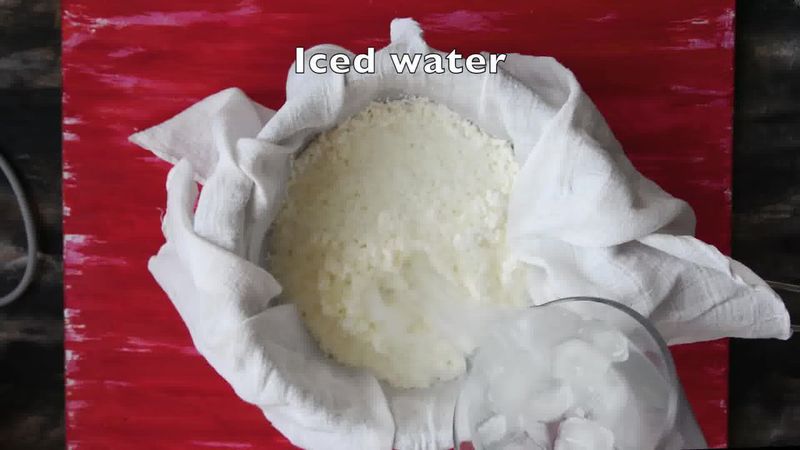
I always prefer to rinse with some ice-cold water or ice cubes immediately after draining the panner, because it completely stops it from cooking further.
-
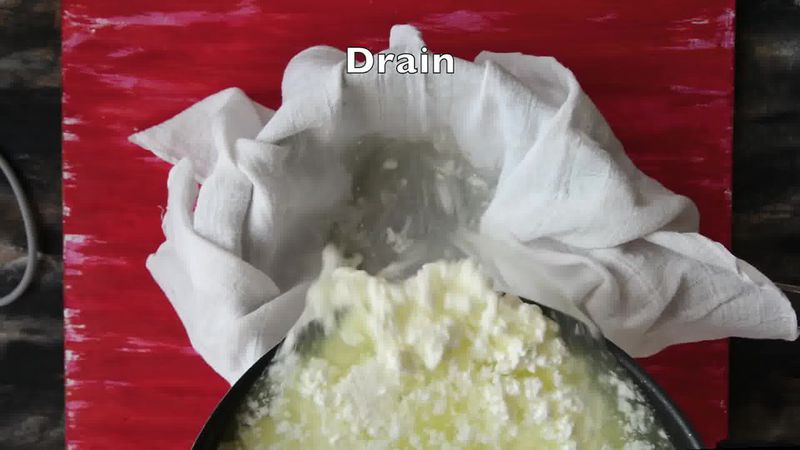
Make sure to drain and squeeze the curdled milk (chena / milk solids) well.
-
Only add paneer cubes to your favorite gravy at the end when the gravy has thickened.
I hope you’ll like this homemade paneer recipe.
You might also love to see these outstanding Indian desserts made using paneer:
How to Make Paneer (Step-by-Step-Video) (Step-by-step photo instructions)
How to make Paneer:
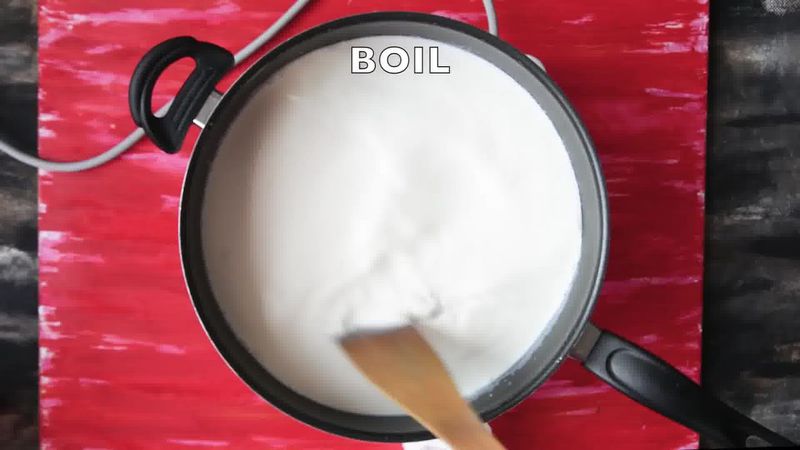
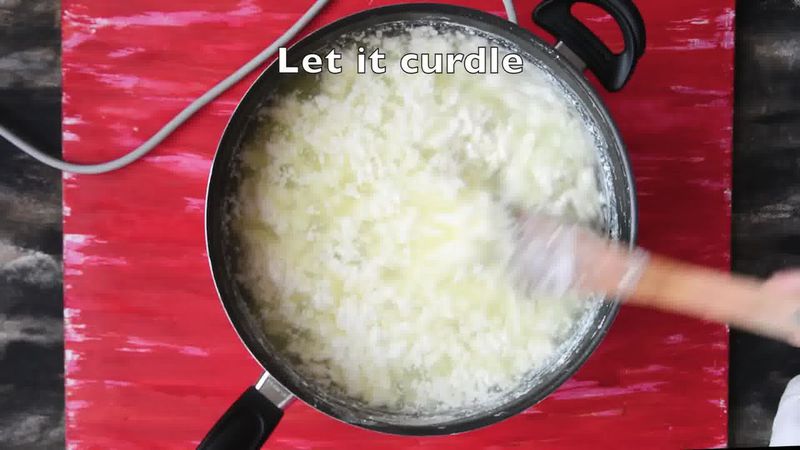
- Pour milk into a pan and bring it to a boil.
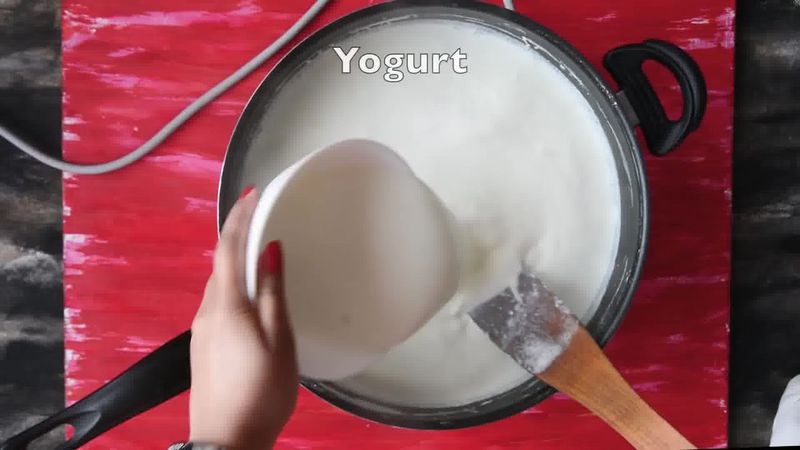
- Reduce the heat to medium and add yogurt or any of the other citric/acidic agent, and stir slowly.
- The milk should start to curdle straight away. If it doesn't curdle immediately then you can add some more curdling agent. The whole curdling process might take 2-3 minutes.
- When the milk is fully curdled and completely separate the curds and greenish whey, then remove it from the heat.
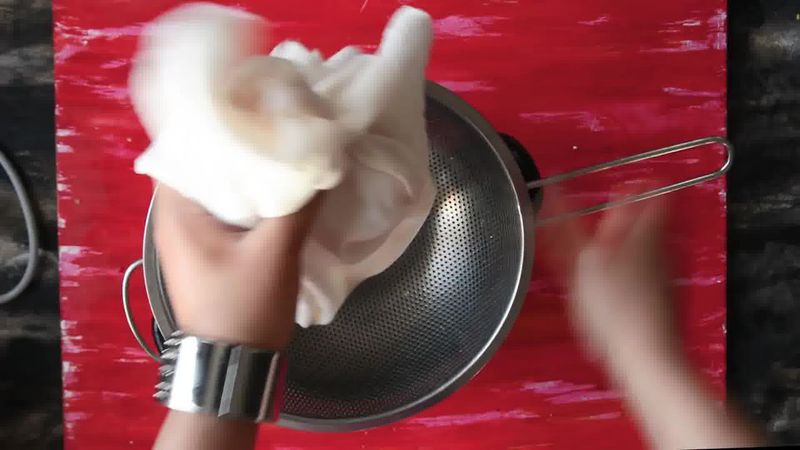
- Line a colander with a large piece of muslin cloth or cheesecloth and place it over a large pan or a bowl.
- Carefully pour the mixture into the colander to collect the curds in the cheesecloth.
- Pour ice cold water to get rid of any left-over whey or rinse it under the cold running water.
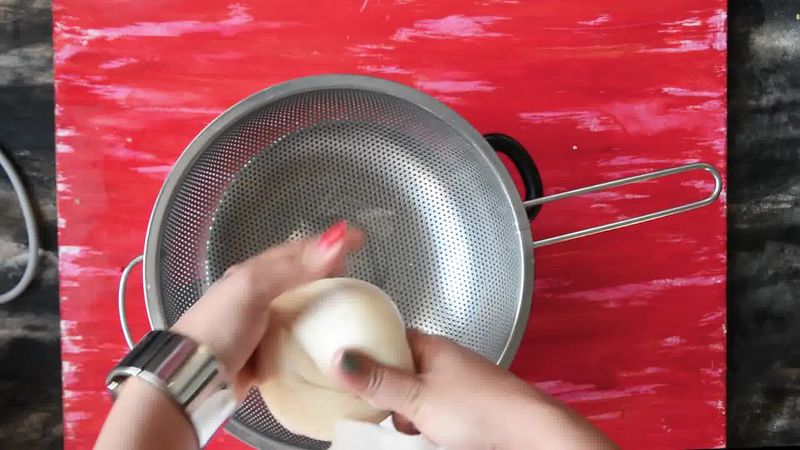
- Take all the ends of the cloth together and twist the cloth so that the curdles milk takes the shape of a ball.
- Squeeze out the excess liquid. The curdled milk is cool enough to handle at this point, so you can easily squeeze.
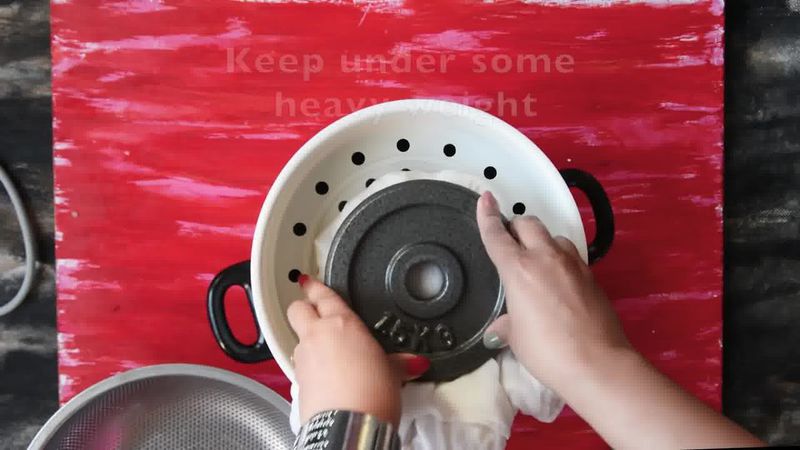
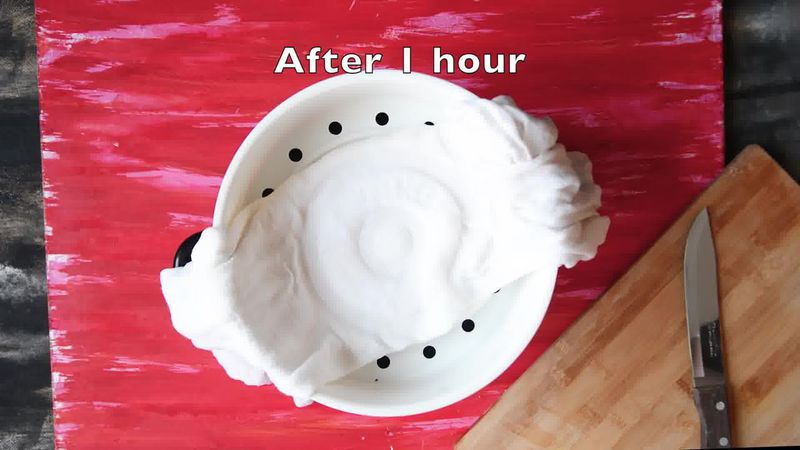
- Leave the muslin cloth in the colander and put some weight on it. Leave it like this for at least 1 hour. This process will drain all the water and you will get the soft yet firm paneer.

How to store Paneer:
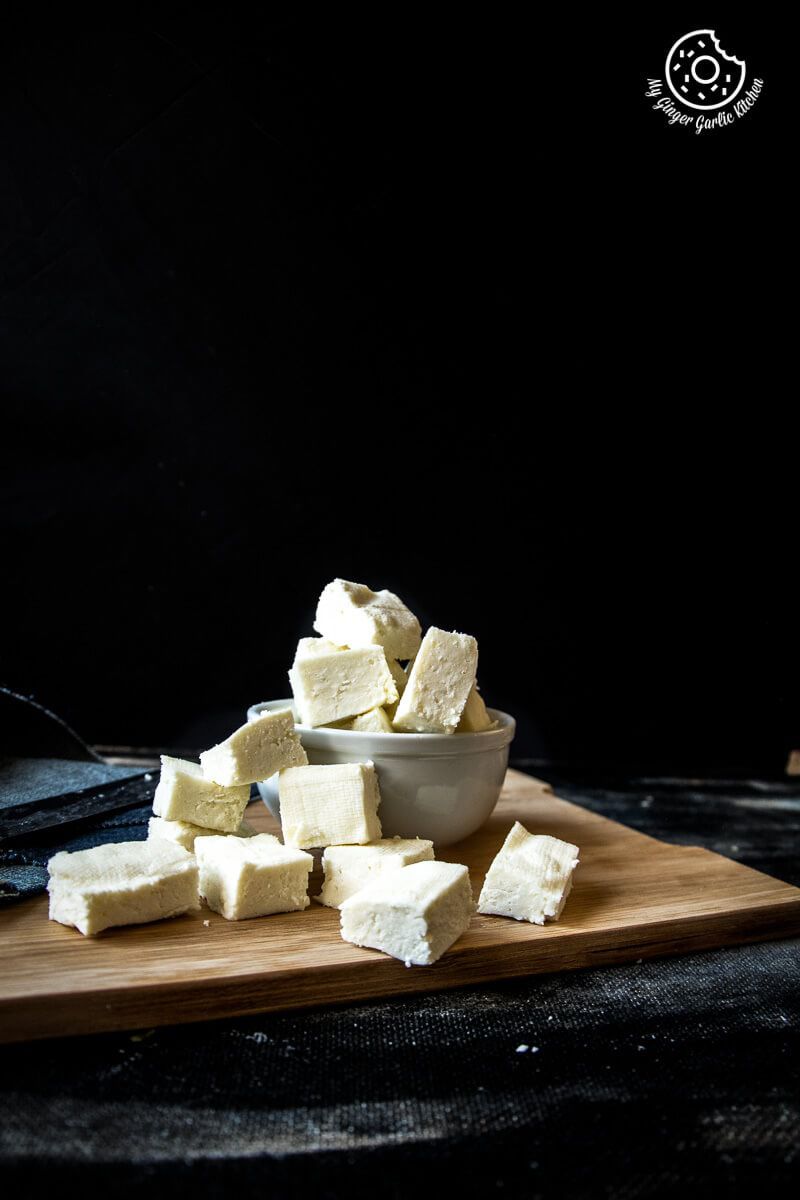
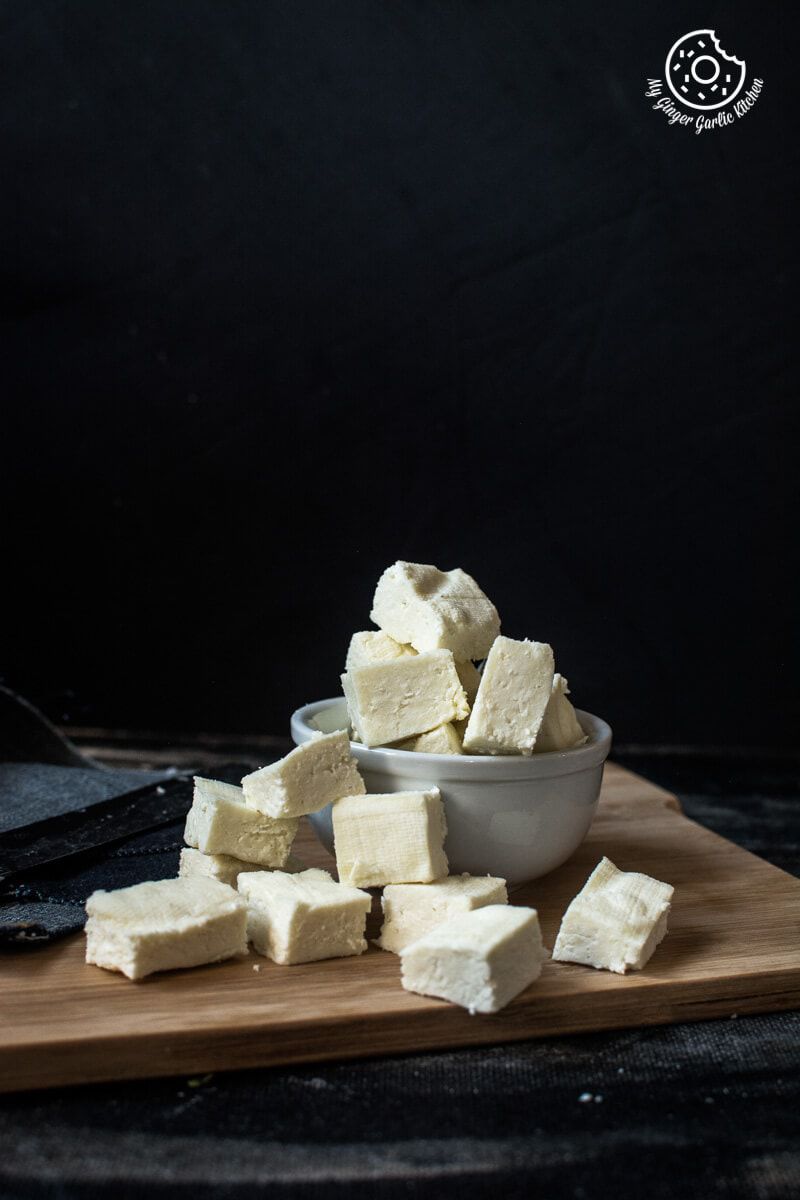
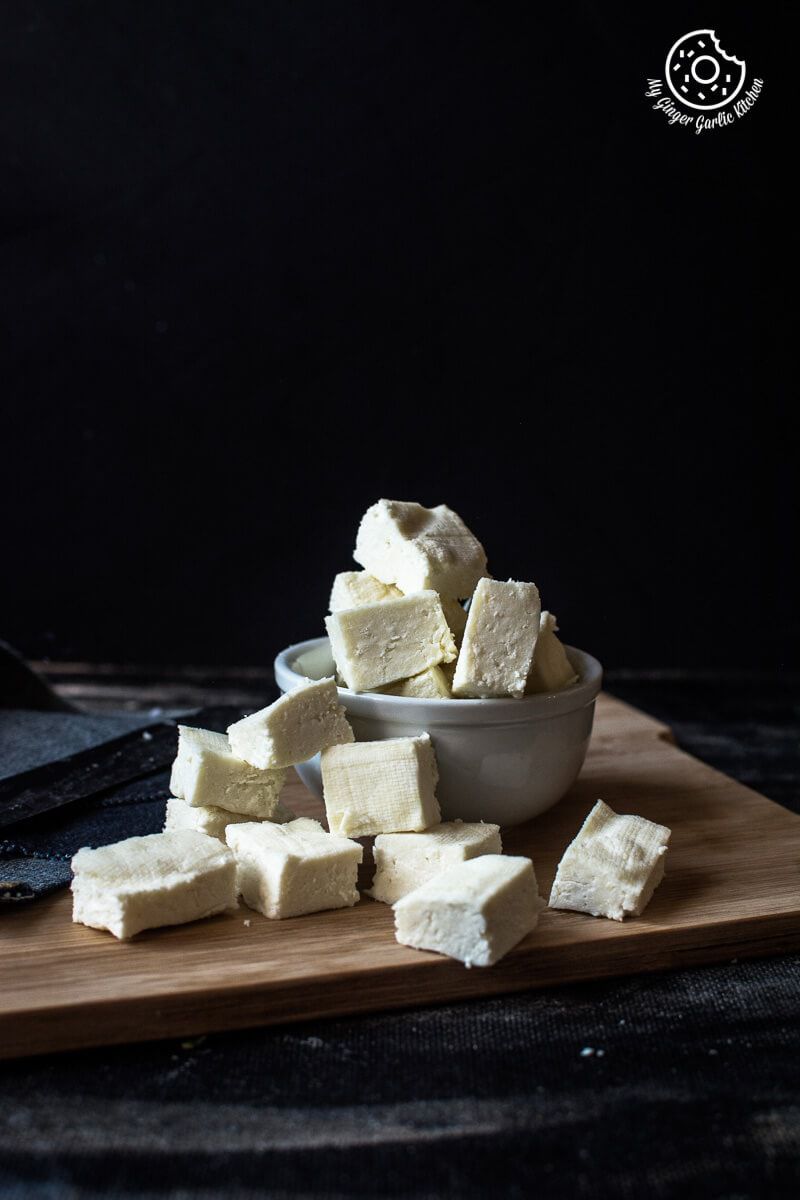
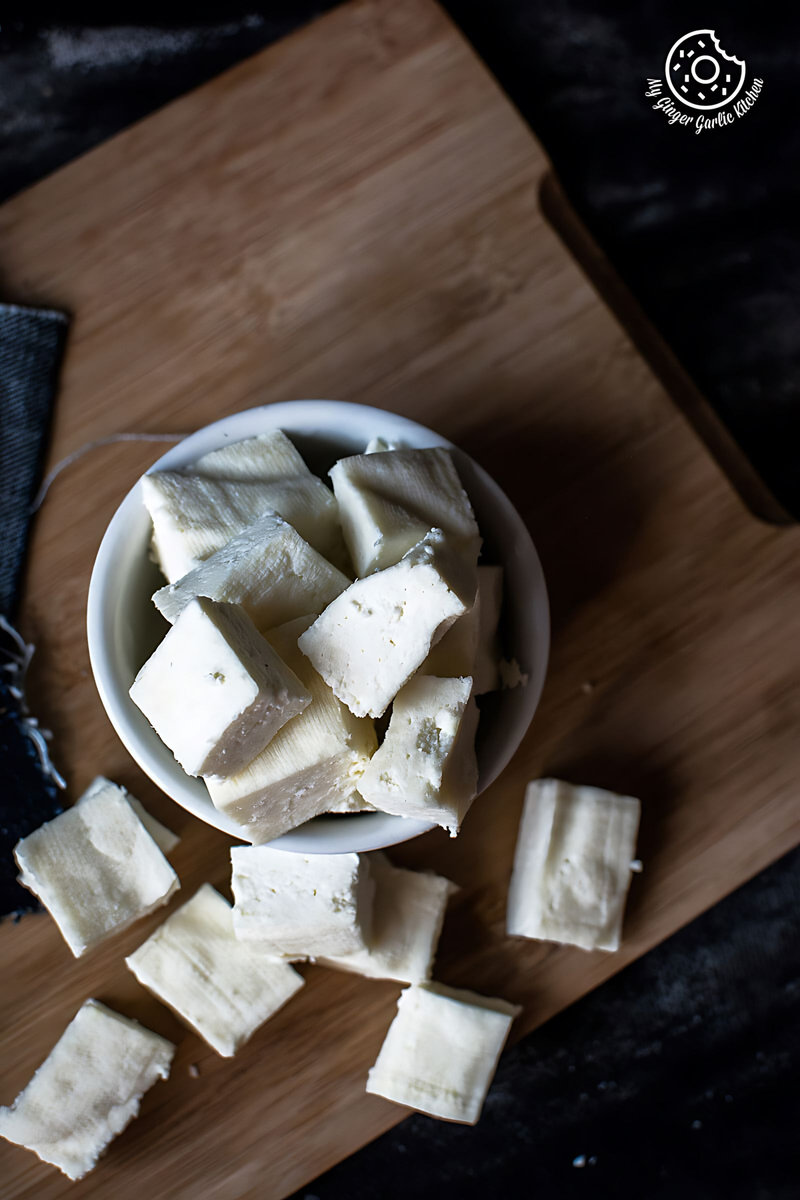
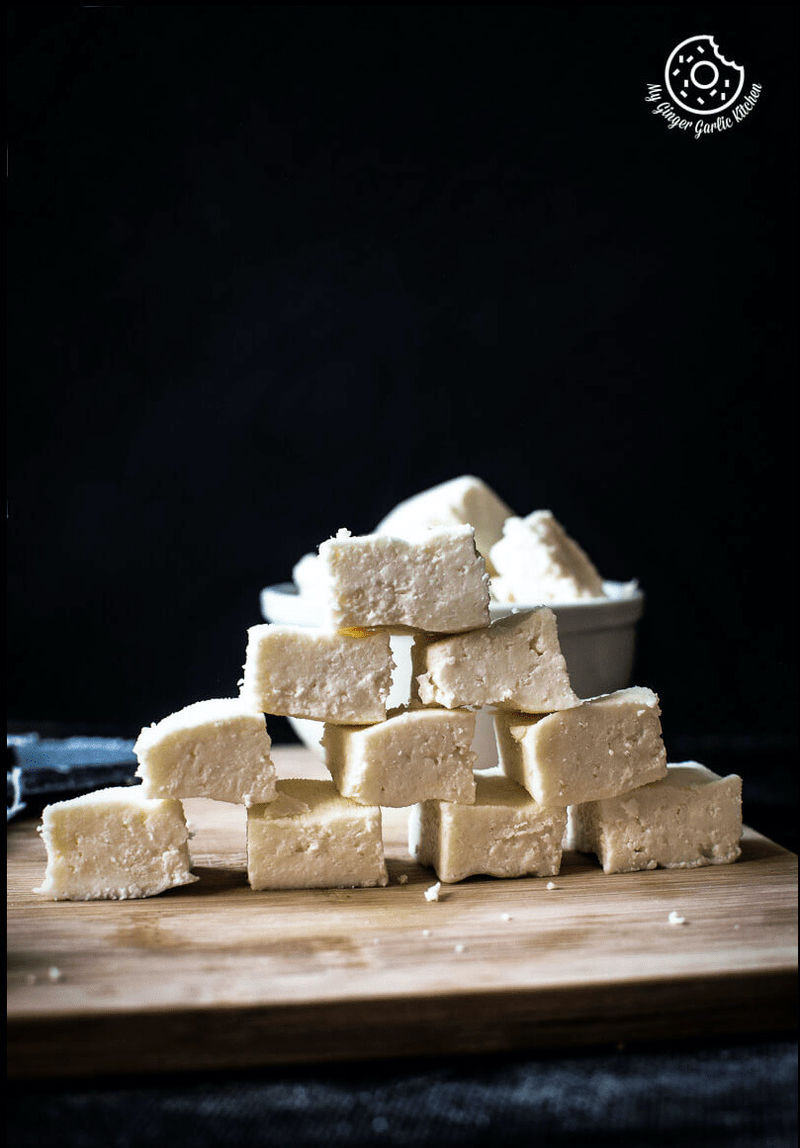
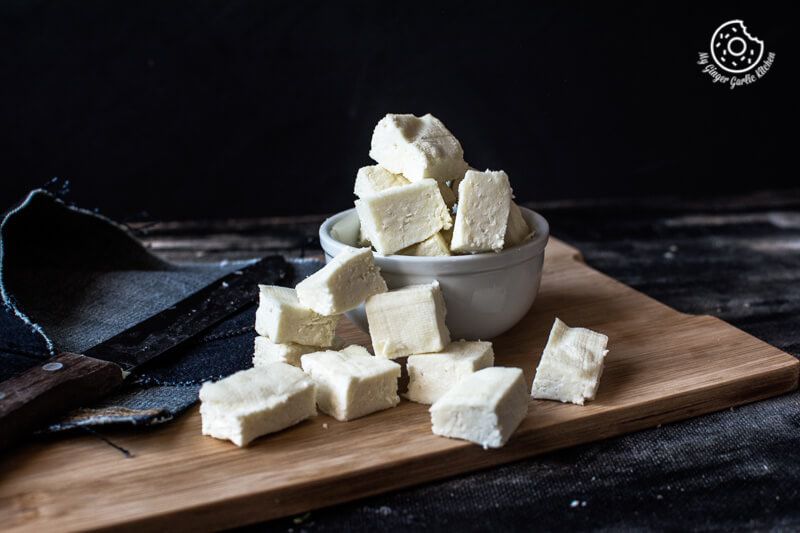
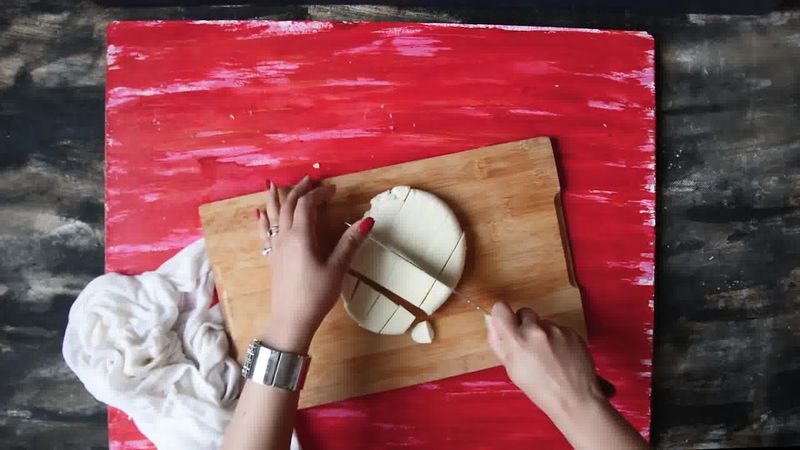
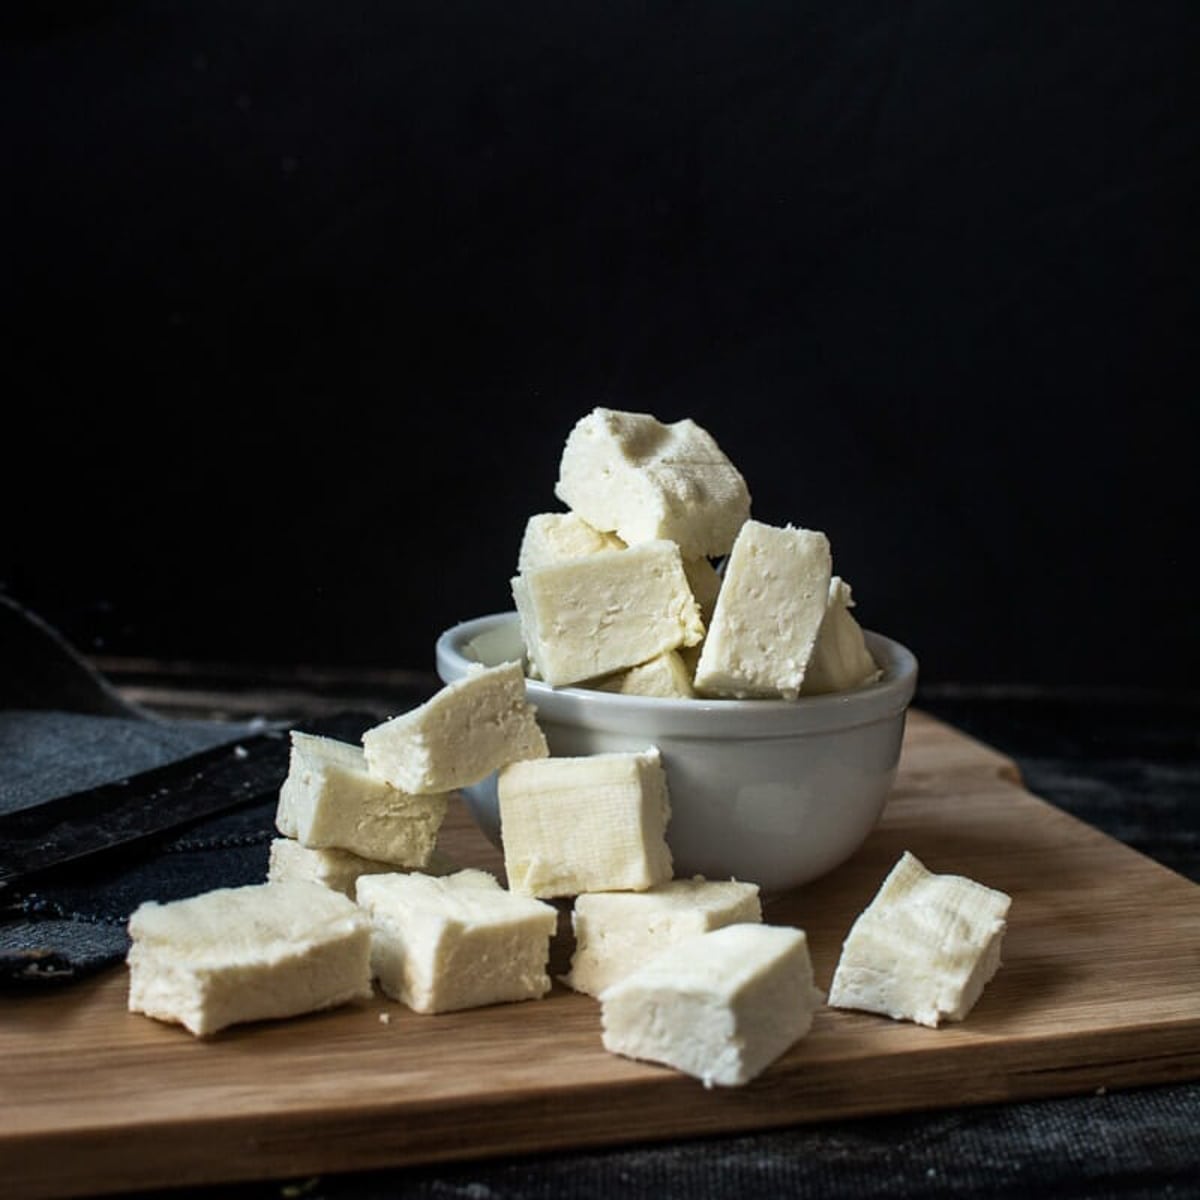
- Once pressed for 1 hour, your paneer is finished and ready to use. Remove fresh disc shaped paneer from cheesecloth.
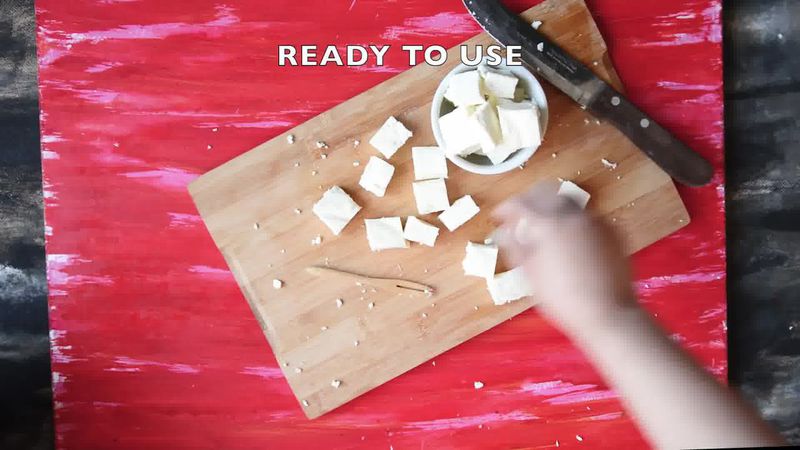
- Cut into desired pieces before use.
- Your creamy, firm and light Paneer is ready to use. Make a paneer curry or use it in your favorite dish.
- To refrigerate, pour 1 cup cold water into a large freezer safe bowl. Add a pinch of salt and stir well. Place paneer into the water.
- Cover and refrigerate for up to 3-4 days. You can also use it immediately.


Recipe Card
How to Make Paneer (Step-by-Step-Video) [Recipe]
★★★★★
(Rating: 5 from 141 reviews)
| Prep time 🕐 | Cook time 🕐 | Total time 🕐 |
|---|---|---|
| 60 mins | ||
| Category ☶ | Cuisine ♨ | Serves ☺ |
| Howto | Indian | 4 |
| Nutrition Info ⊛ | Serving size ⊚ | |
| 97 calories | 100 grams |
INGREDIENTS
For making paneer:
- 1 liter full-fat milk
Choose any of the curdling agents below:
- 1 cup natural yogurt (in this video I have used yogurt)
- 2 cups buttermilk
- 3-4 tablespoons vinegar, or as needed
- 3-4 tablespoons lemon juice, or as needed
- 1 tablespoon citric acid
INSTRUCTIONS:
How to make Paneer:
- Pour milk into a pan and bring it to a boil.
- Reduce the heat to medium and add yogurt or any of the other citric/acidic agent, and stir slowly.
- The milk should start to curdle straight away. If it doesn't curdle immediately then you can add some more curdling agent. The whole curdling process might take 2-3 minutes.
- When the milk is fully curdled and completely separate the curds and greenish whey, then remove it from the heat.
- Line a colander with a large piece of muslin cloth or cheesecloth and place it over a large pan or a bowl.
- Carefully pour the mixture into the colander to collect the curds in the cheesecloth.
- Pour ice cold water to get rid of any left-over whey or rinse it under the cold running water.
- Take all the ends of the cloth together and twist the cloth so that the curdles milk takes the shape of a ball.
- Squeeze out the excess liquid. The curdled milk is cool enough to handle at this point, so you can easily squeeze.
- Leave the muslin cloth in the colander and put some weight on it. Leave it like this for at least 1 hour. This process will drain all the water and you will get the soft yet firm paneer.
How to store Paneer:
- Once pressed for 1 hour, your paneer is finished and ready to use. Remove fresh disc shaped paneer from cheesecloth.
- Cut into desired pieces before use.
- Your creamy, firm and light Paneer is ready to use. Make a paneer curry or use it in your favorite dish.
- To refrigerate, pour 1 cup cold water into a large freezer safe bowl. Add a pinch of salt and stir well. Place paneer into the water.
- Cover and refrigerate for up to 3-4 days. You can also use it immediately.
WATCH RECIPE VIDEO: Click the play button and video will load ...
NOTES:
- Soak paneer in water, cover it and keep it in the refrigerator for up to 3-4 days. Or you can freeze paneer up to 2 months.
- Milk will not curdle properly if the acidic agent is not sufficient. In that case, instantly add little more yogurt/lemon juice/vinegar. Do not add too much acidic agent, use just as needed.
- Do not overcook the paneer after curdling, or it may turn hard.
If this recipe helped you, then please spread the word by sharing and subscribing to us on YouTube to get more such Recipe Videos.
Your feedback is so helpful for me and other My Ginger Garlic Kitchen readers. So, for Facebook and Instagram, please mention @MyGingerGarlicKitchen or #mygingergarlickitchen. I would love to see your photos. :)
Author: Anupama
Recipe Source Link: https://www.mygingergarlickitchen.com/how-to-make-paneer-at-home-homemade-paneer/